Learn
Workflow for 

Adobe Premiere Pro Plugin

DaVinci Resolve Plugin

FCPX Plugin
Getting Started
When purchasing your license for CineMatch you will receive an email containing your invoice, installation instructions, and an .fkv file (backup license file).
A user account would have been created under the email address you purchased with, which allows you to activate the plugin, view your license details, and manage which devices are activated. You can reset the password for your account so you can access your license details.
If you are using the free trial of CineMatch, you will be able to use all of the plugin controls, except your footage will remain watermarked until it has been activated.
The first thing you will need to do is make sure you have downloaded and installed the free trial of CineMatch for your editor. Simply fill out the form on our Free Trial page, and your download will begin. Run the installer, and restart your editor to start grading with Nitrate.
- When installing CineMatch for the first time, you'll need to add permission for the plugin to record your screen. This permission is required for the color picker in the plugin to work.
- Under System Preferences > Privacy > Screen Recording, check the box for 'CineMatch' - you may be prompted for your device’s username and password.
- After you've approved the permission request, the installation process will continue.
CineMatch will appear as an effect that can be applied to your clips, either on the timeline or to a master clip.
Add some footage to your timeline, go to the effects tab and find CineMatch by typing "CineMatch” into the search bar. Drag the effect onto your clip to access CineMatch’s controls. Your footage will remain watermarked until activated.
Activating the plugin
Under the ‘Register Plugin’ header, click the ‘Activate License’ button. This will open a pop-up window, where you can enter your account details to login and activate the plugin. If your login does not work, you can select the ‘Use .fkv file’ button to activate the plugin with your .fkv file.
Once your license has been activated, you will see an ‘Activation Successful’ message. Close the pop-up window to begin grading. If you experience issues with your activation, please contact us at support@filmconvert.com
Quick Start Method
How to perform a quick camera match with CineMatch:
- Add two clips you want to match to your timeline. Leave clips in Log, don’t apply LUTs or make other adjustments
- Add CineMatch from the Effects menu to both clips
- Under the Effects Controls, set the Source settings for each clip to match how the footage was shot
- On your first clip, leave the Target blank. On your second clip, set the Target to match the Source of your first clip
- Check the Apply REC.709 Transform box, and adjust your exposure, white balance and tint
- Check the Apply REC.709 Transform box, and adjust your exposure, white balance and tint Use the HSL Match Refinement tool to modify specific colors which need tweaking to match the target
- Once your clips are matched, toggle off the REC.709 transform to begin your creative grade, or leave it on if you’re happy with the look
That’s it!
Full Workflow Guide
CineMatch is a set of tools designed to help you match footage shot on different cameras to a baseline technical level – a seamless, matched timeline in Log or REC.709, ready for creative grading.
The plugin fits into your existing color workflow by replacing the manual step of camera matching (or time spent hunting for the correct technical LUT for your camera), with a simple drag-and-drop application. Just tell CineMatch the settings of your source footage, and which camera you’d like to convert it to, and CineMatch handles the rest.
The CineMatch workflow includes sensor-matching technology which aligns the color values of your Log footage, RAW-like controls for exposure, white-balance and tint for making camera adjustments, and an intuitive collection of tools for final tweaks. We’ve also included False Color views to help visualize the color information in your images and guide your corrections.
While CineMatch provides extremely accurate results, it’s unlikely you’ll get a 100% perfect match just by dropping the plugin on your footage. Even with perfectly balanced footage from both cameras, differences in shooting conditions and sometimes the materials present in the scene can throw off the sensor match.
However, if you follow good shooting practices and the steps below, CineMatch will significantly speed up your workflow for matching footage from multiple sources, giving you more time to spend on the creative side of your grading.
Shooting for the match
To ensure your best chances of getting well-matched footage, try to follow good shooting principles:
- Shoot in a Log or RAW picture style. This will maximize the dynamic range able to be captured by your camera, and give CineMatch the most data to work with. Most modern cameras and monitors will allow you to apply a display LUT to help you monitor exposure while shooting, but make sure not to bake this in to your footage
- White-balance each camera using a white or grey card. If you don’t have a white or grey card, you can use a phone app to get a light temperature reading and dial that into your camera. Ensuring your camera is capturing the correct white value for your scene’s lighting is essential. Redo your white balance at every new setup or change in lighting
- Don’t adjust too many other parameters in-camera, such as contrast or saturation. CineMatch is designed to accept the camera’s default settings, and may not be able to recover if the image recorded departs wildly from the neutral settings.
- Shoot a few seconds of a chart on both cameras. If you can get a common reference in both shots, it will give you a much better idea of what the colors looked like on the day
Terms to know: A-Cam and b-cam footage
On most projects, you’ll have a primary or “hero” camera that will be the source of most of your footage. We call this your A-Cam footage.
Then, you will have additional “b-cam” or “b-roll” footage, shot on a second camera, drone, action cam, or archival footage.
Think about the various footage sources you have in your project, and pick which will be the “target” for your matching. Normally this will be the camera you shot on for the majority of the project, to minimize the amount of matching you have to do.
Example: if 80% of your footage is shot in S-Log3, and you have some additional V-Log footage you’d like to match, you’ll apply CineMatch to your V-Log clips, with the Source set to V-Log and the Target set to S-Log3. For other camera sources in your project, you’ll set the Source to match how the footage was shot, and the Target to S-Log3 as well.
Selecting Source and Target Cameras
CineMatch is designed to work on Log footage straight from the camera. Don’t apply any other LUTs or corrections to the clip before CineMatch, or else the matching engine won’t be able to apply the correct transformation.
On each clip, simply tell the plugin what profile you shot in (Source) and what profile you want to convert it to (Target).
Example: to match S-Log3 SGamut.Cine footage from the Sony A73 to C-Log2 from the Canon C200, choose the following settings:
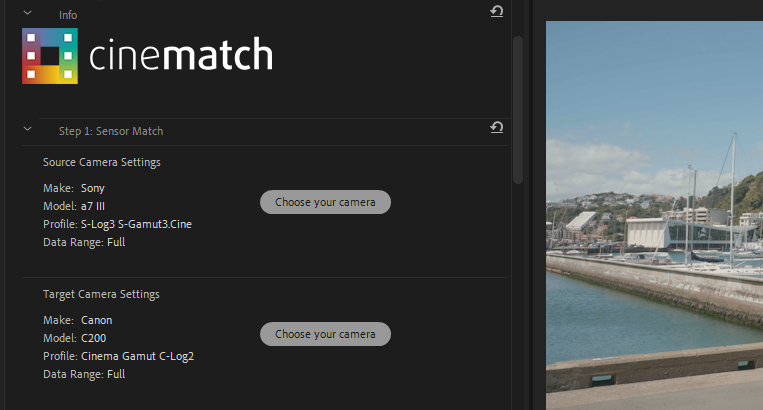
Apply CineMatch to all your b-cam clips the same way. You can copy and paste the effect, or apply it at the Master Clip level if you’ve got several instances of the clip in your project.
Do I need to apply CineMatch to my A-Cam footage?
We recommend adding CineMatch to your A-Cam clips as well. To do this, drag CineMatch onto the A-Cam clip, specify the Source camera settings, but leave the Target Camera Settings blank.
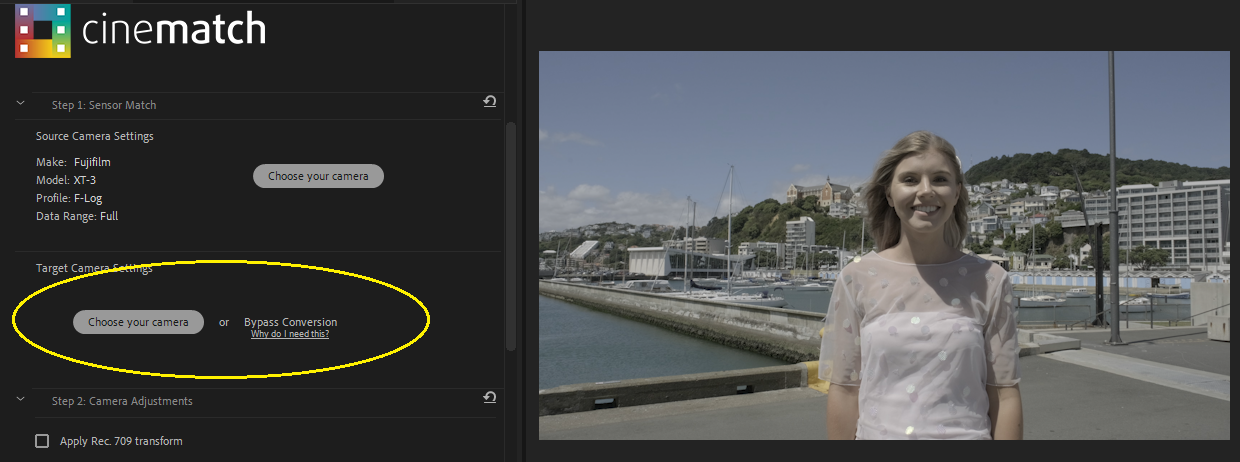
The Primary Corrections in CineMatch are customized to the response curve of your camera, so you will get more accurate and intuitive results with the CineMatch controls than the generic sliders in your editor.
The CineMatch controls operate on the underlying Log footage, even with the Output Transform applied, so you can make corrections without fear of clipping your footage.
Limited vs. Full Data Range
By default, the CineMatch profile you use will be applied using the data range native to the in-camera setting. However, if your footage has been transcoded or recorded to an external device, this can change the data range for your footage, so CineMatch won’t interpret the footage correctly.
The Data Range tool allows you to specify the data range of your footage. If your contrast doesn’t look right after applying CineMatch and making your primary corrections, try switching the Data Range.
Working with Color Managed Projects
CineMatch has been updated to work with the new color science features in Premiere Pro v25.2. Specifically, CineMatch now supports Premiere Pro’s working color spaces, Rec.709, Rec.2100 HLG, Rec.2100 PQ, ACEScct and the output color spaces, Rec.709, Rec.2020, Rec.2100 HLG and Rec.2100 PQ.
The workflow in CineMatch does not change much from the previous version, but there are a few things you will need to know.
If Color Management is on in Premiere Pro, CineMatch will need to know what the Working Color Space and Output Color Space settings are. Technically it only needs to know the Output Color Space if you are using the color pickers.
If Color Management is off in Premiere Pro, then CineMatch only needs to know the Output Color Space. In this case it needs to know the Output Color Space for the color pickers, and if you want to use the CineMatch Output Transform.
CineMatch will only work correctly if Premiere Pro interprets your footage either correctly or not at all. That is to say, if Premiere Pro interprets your F-Log2 / Rec.2020 as Rec.709 (Use Media Color Space: Rec.709), then you either need to set the Override Media Color Space to F-Log2 / Rec.2020, or turn off the input color management by checking the Preserve RGB Checkbox.
Similarly, if Premiere Pro does not support your footage at all (there is no correct override option available), then you need to turn off input color management, rather than let it use the default Rec.709 setting.
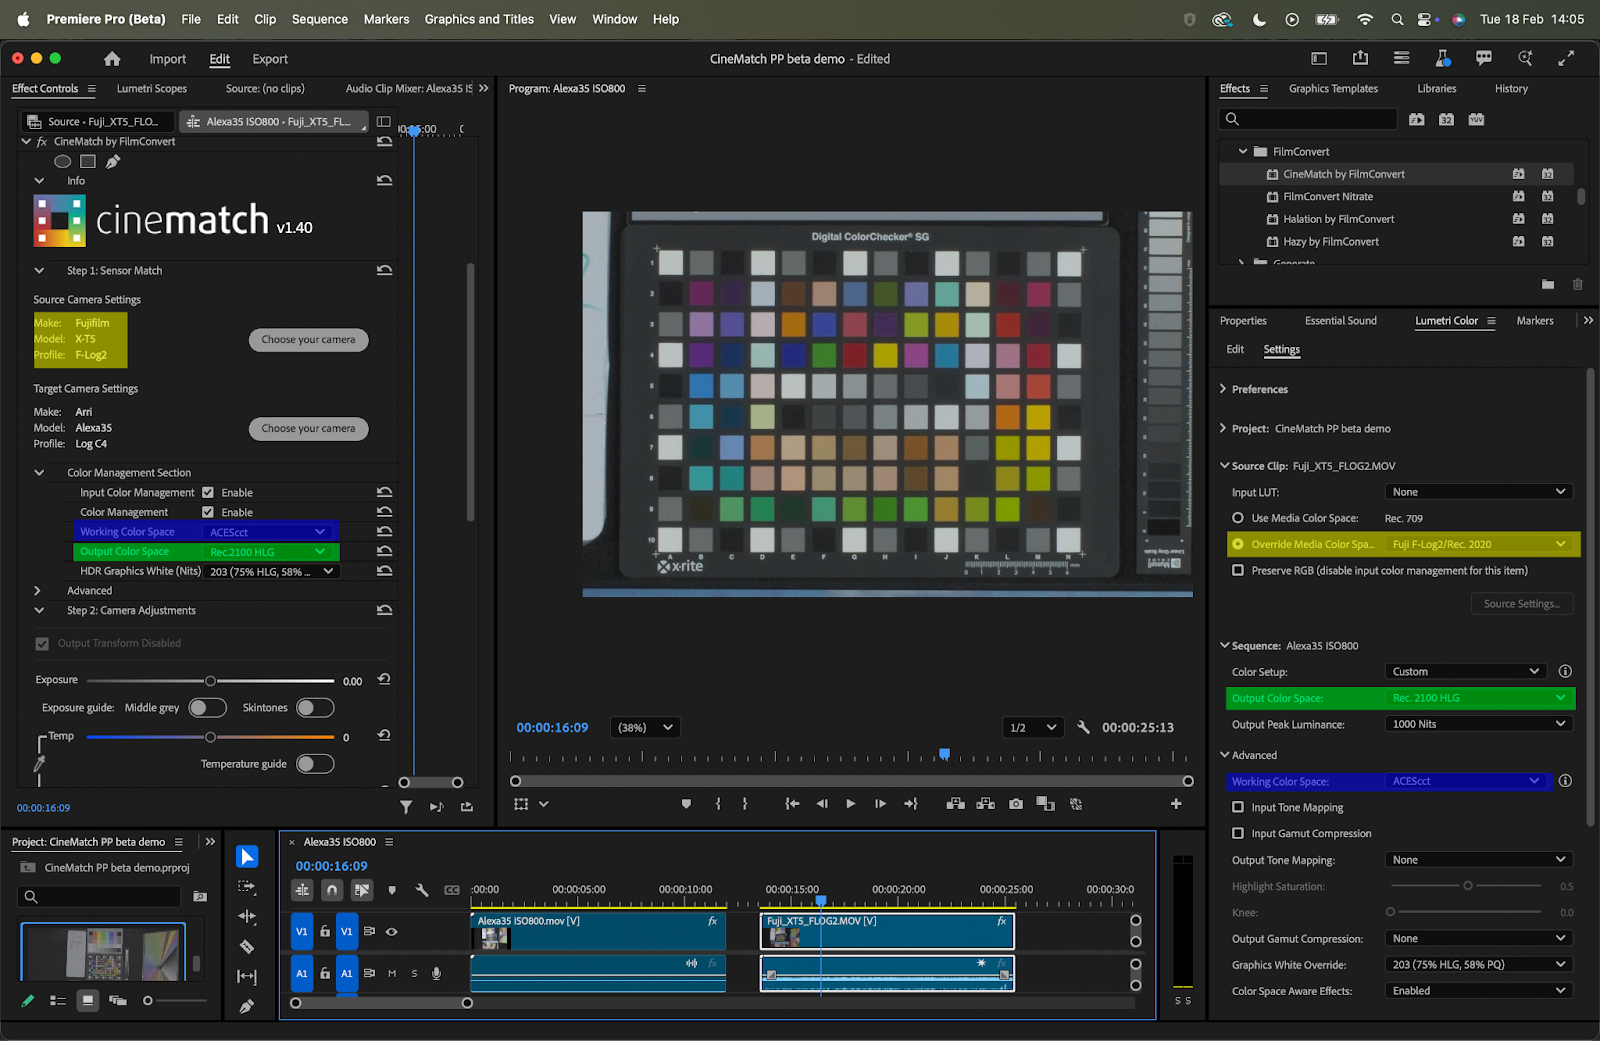
In this image, the source camera is selected, and Premiere is using an override to select the correct media type. Also, the working and output color spaces are set and matched between Premiere Pro and CineMatch.
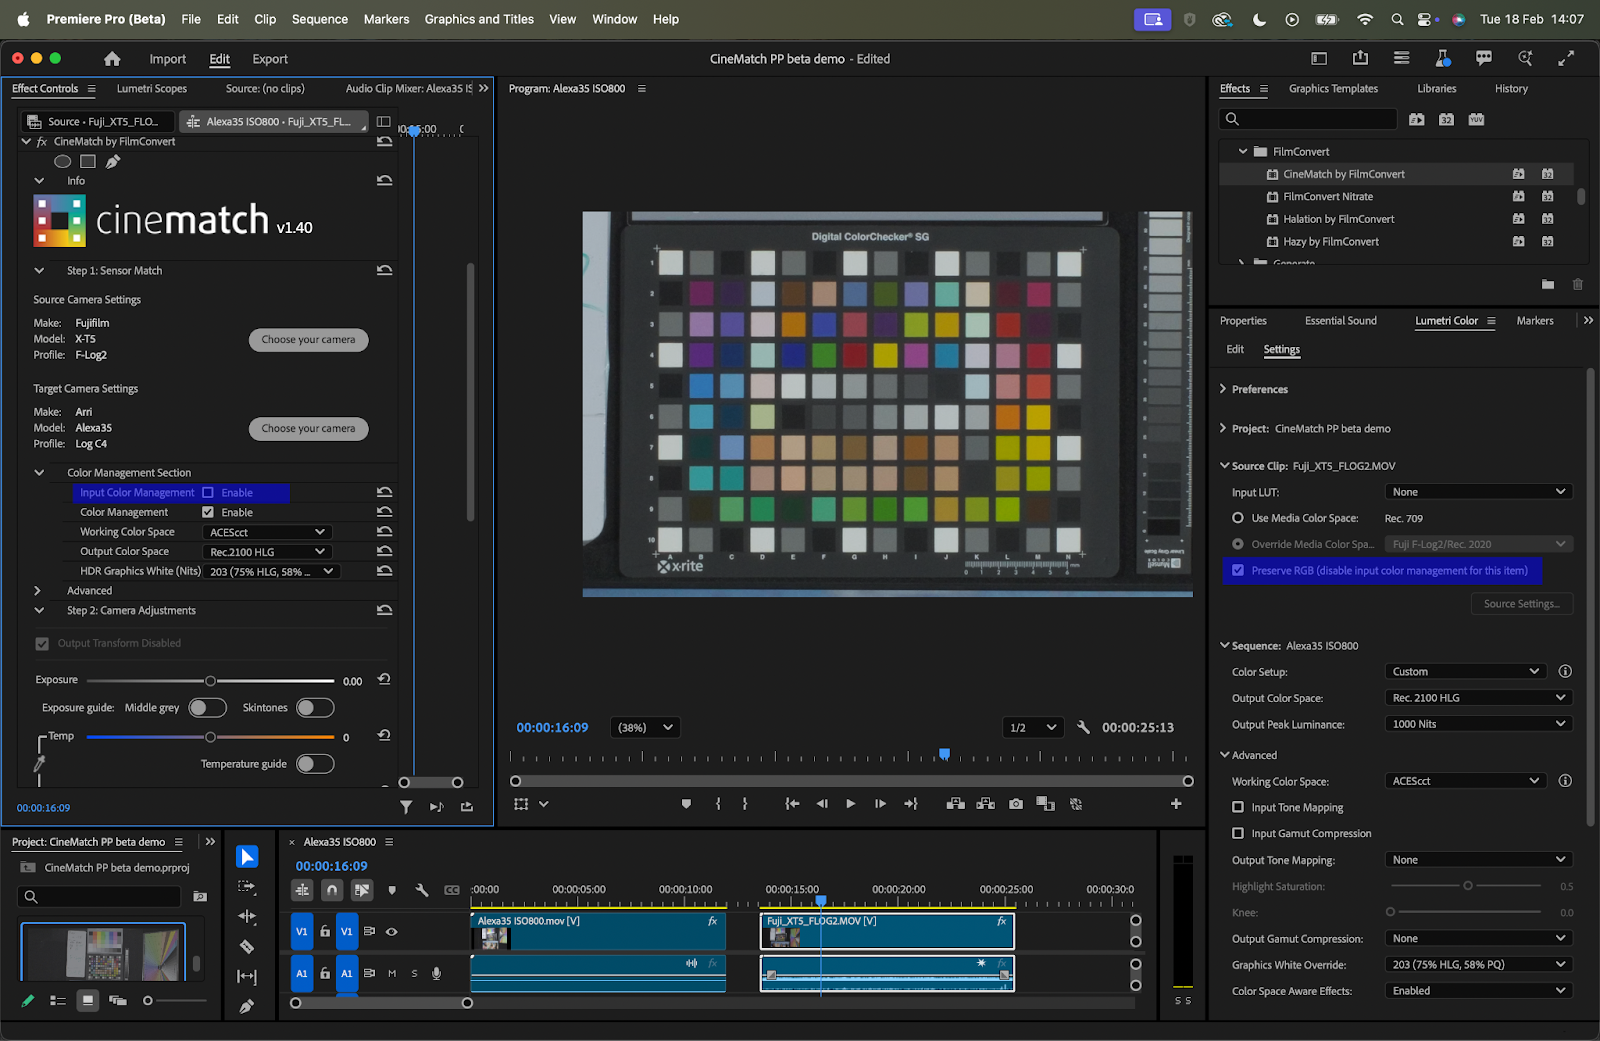
In this image the input color management is disabled. CineMatch will convert the footage into the working space of ACEScct itself.
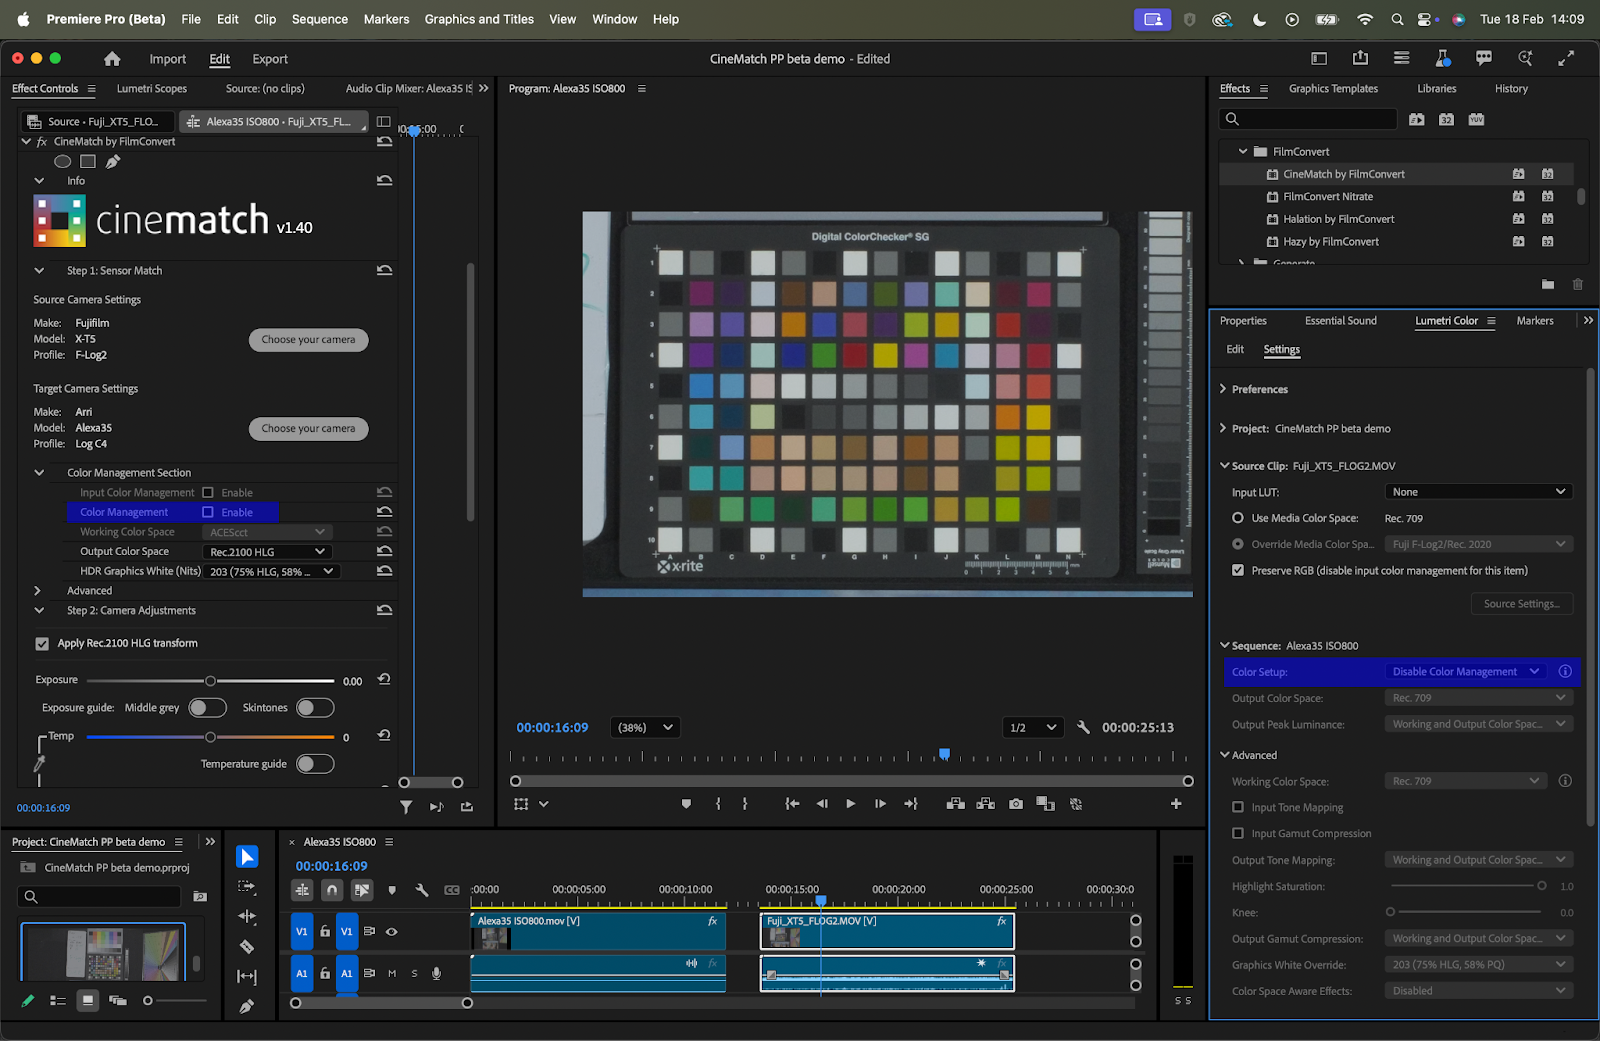
In this image, color management is off. In this case CineMatch will convert the footage to the target camera, and then output in Rec.2020 HLG. Input Tone Mapping should be off in Premiere Pro to achieve the most accurate match. We do not recommend using the Rec.709 working space as this space will almost definitely require input tone mapping to be used, and the highlight data will be crushed before CineMatch can perform its match.
Comparison View
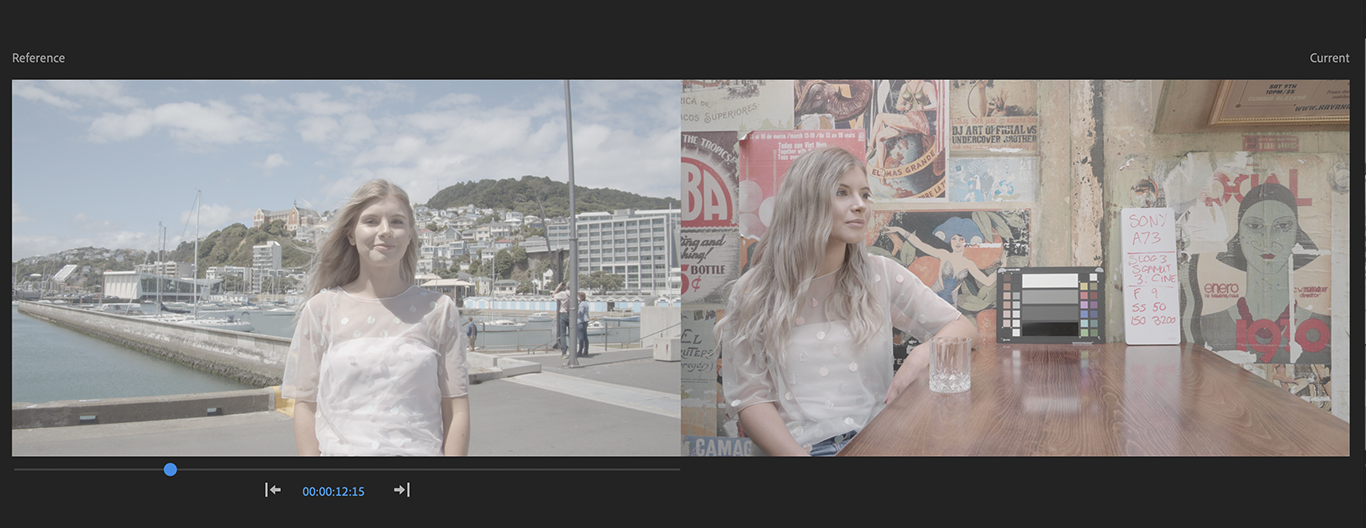
Adobe Premiere Pro provides a handy comparison view to see two clips from your timeline side by side.
To switch to Comparison View, click the Program Monitor Comparison View button, or choose Comparison View in the Program Monitor Settings menu.
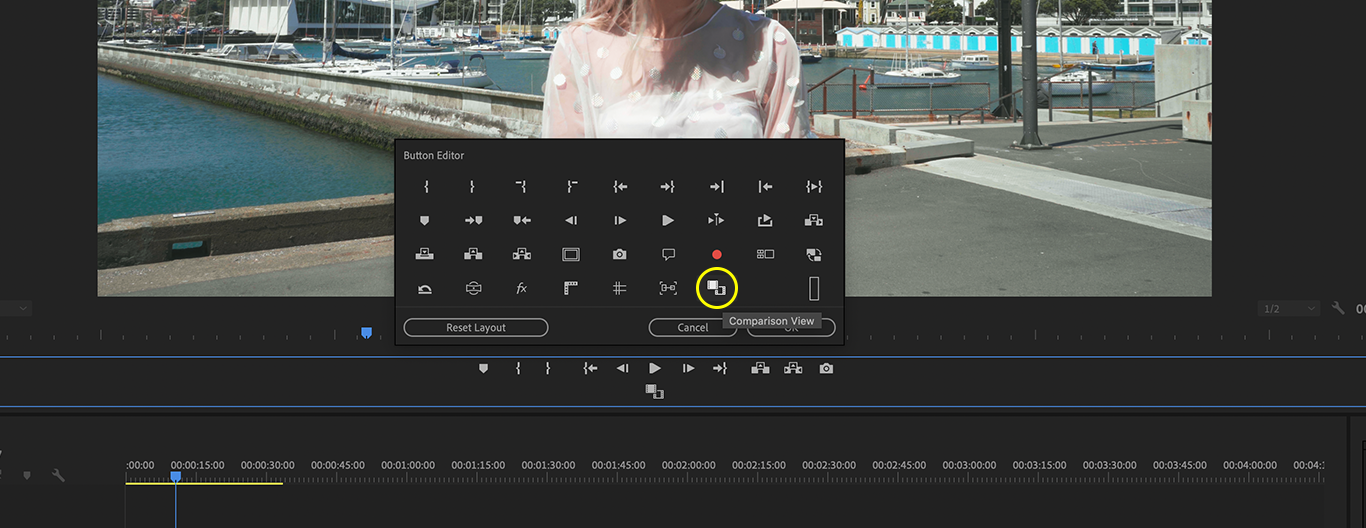
Pick your reference frame by dragging on the Reference View mini-timeline, entering a specific timecode, or click Next Edit or Previous Edit.
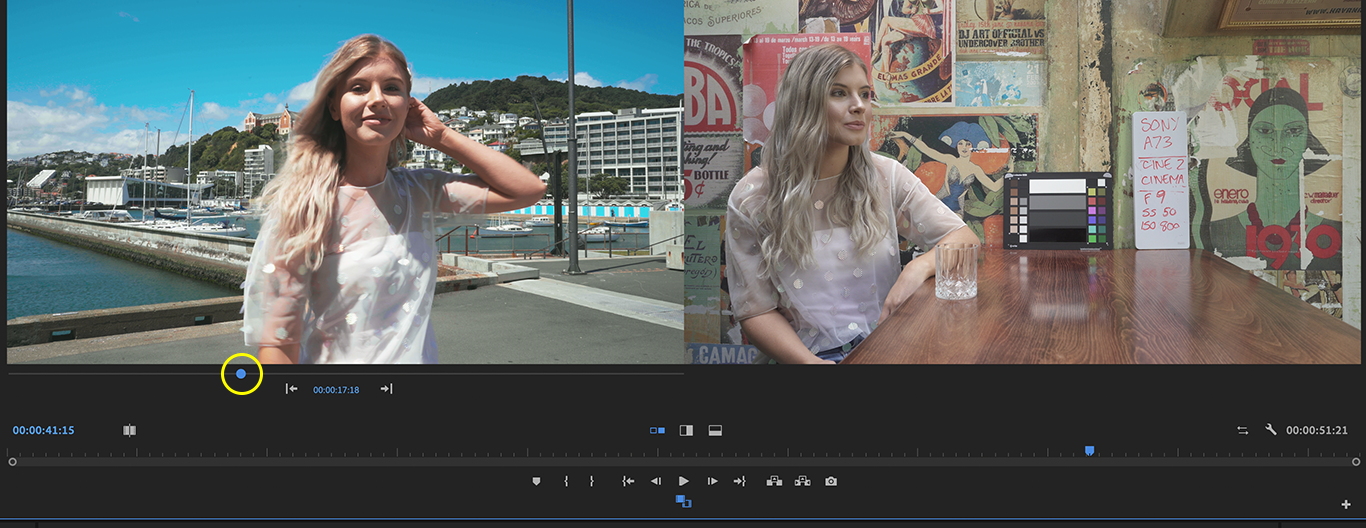
Your comparison frame will be the frame where your playhead is sitting in your sequence timeline.
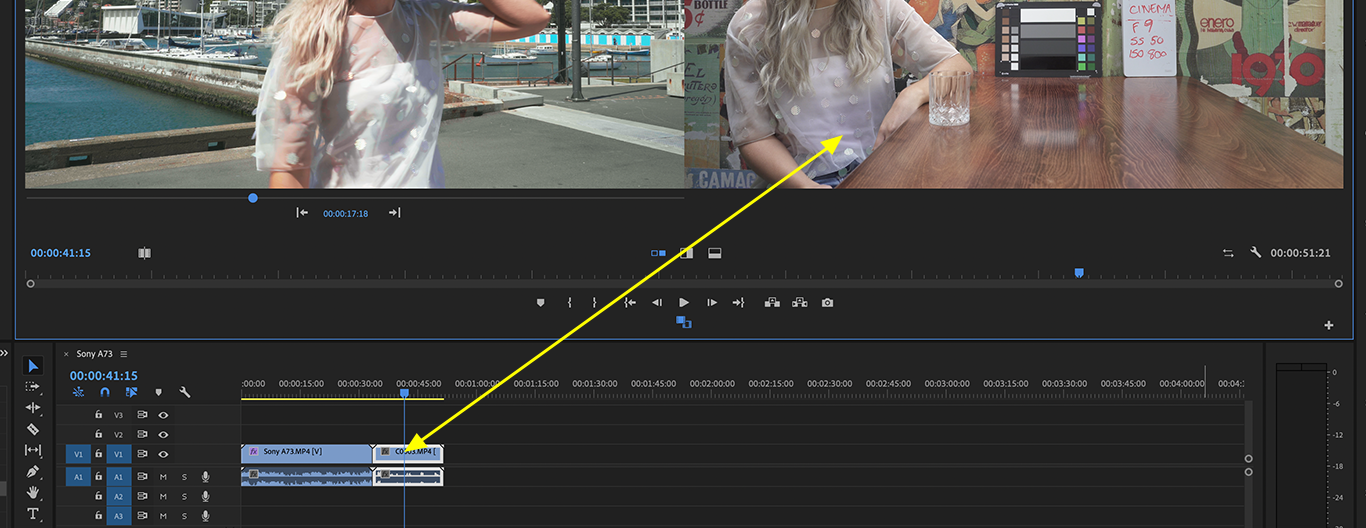
You can choose a side-by-side display, or choose the Split Vertical or Split Horizontal displays to help match a particular part of the image.
Primary Corrections
Once you’ve applied the correct sensor settings, you will be looking at two Log images for your A-cam and b-cam clips, matched to a single Log picture style.
Exposure
Use the exposure control to match your exposure across the two shots. The slider has been mapped to your chosen camera profile, so you can adjust the exposure as if you had changed it in camera.
White Balance
Like the Exposure slider, our temperature and tint slider are also mapped to your chosen camera profile, so you can ensure that when you white-balance your footage, it will respond in the camera’s native color science.
The Auto White Balance picker will help you quickly set the white balance for your scene.
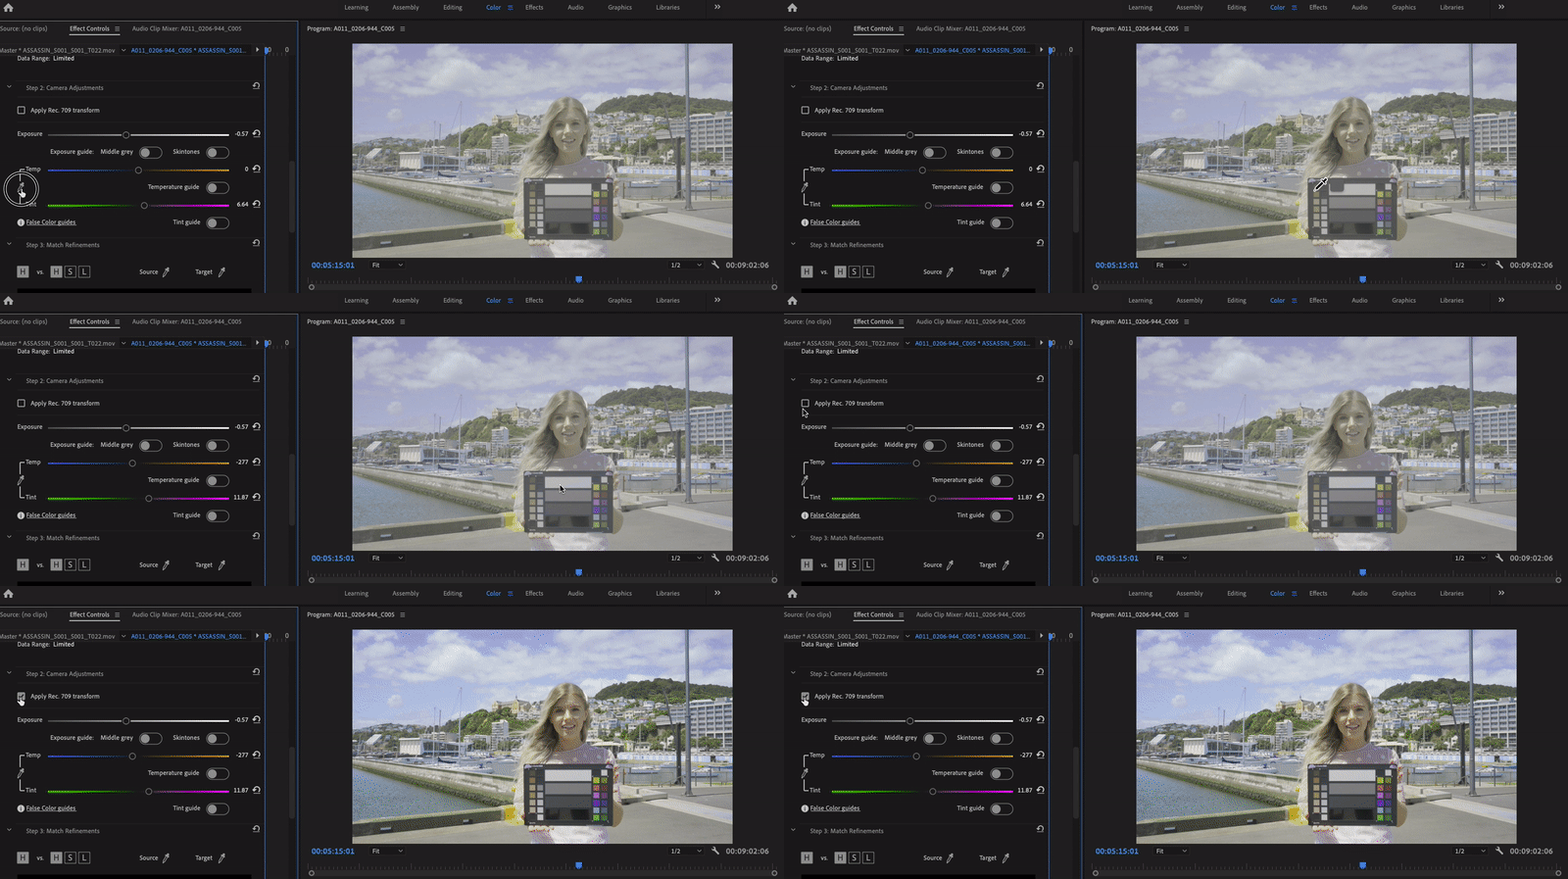
Click the Eyedropper tool by the Temp/Tint controls, and then select an area in your scene that should be neutral white.
After you’ve made your Auto White Balance correction, you’ll see adjustments have been made to both the Temp and Tint sliders.
Apply REC.709 Transform
We’ve added an optional transform in the primary corrections so you can view your footage in the REC.709 color space. This view can be toggled on and off by clicking the ‘Apply REC.709 Transform’ checkbox.
This transform lets you view your footage on a REC.709 monitor, but you can still use the Primary Controls in Log so you’re not losing any color information to clipping.
Alternatively, you can leave your images in Log and use FilmConvert as an Adjustment Layer over your entire timeline for a film grade. In FilmConvert, apply the camera selection to match the target you set in CineMatch.
False Color Guide
CineMatch includes several False Color Guides to help evaluate your images.
Exposure – Middle Grey
Green is mapped to the middle grey range for REC.709. Pick the area of the image you would like to expose in the mid-range, and with the false color applied, move the exposure slider until this area appears green.
In Comparison View, adjust the exposure in both shots so that the green lines up in the same area. This will ensure that area is exposed at the same level.

Exposure – Skin tones
This False Color view maps orange to a common exposure for skin tones in REC.709. Identify the area of a subject’s face that you want to expose correctly, apply the false color, and adjust the exposure slider until the skin is orange. This will also work in Comparison View if you have two shots of a face that you want to quickly match in exposure.

Temperature
This has been designed to help you visualize where the balance in temperature lies within your image. All warm elements are mapped to orange and all cool elements are mapped to blue. To ensure an element in your scene is a neutral color, adjust the temperature slider until it displays as grey.
This also works in Comparison View to quickly identify if two shots are balanced with each other.

Tint
This false color guide shows all of the green and magenta elements of your image. Like the Temperature false color, you should identify a part of your image that you would like to be neutral and move the tint slider until that is area is grey. This also can be used in Comparison View to quickly identify if your shots are balanced with each other.

Using scopes for camera matching
Scopes are a powerful tool for visualizing the color and light information in your images.
Scopes work by plotting the visual pixel information from your footage numerically, so you can “read” the image the way you would read a chart or graph.
Scopes can help you analyze particular issues or aspects of a picture, and are very helpful for camera matching, as you can often see differences on scopes that will be hard to spot on the program monitor.
Scopes can also be used when you’re using Comparison View, so you can analyze the color information in both images simultaneously – perfect for balancing exposure, white points and color temperature.
Below are descriptions of the three main scopes that will be helpful for camera matching. For more information on reading scopes, check out Ollie Kenchington’s Introduction to Scopes article on the FilmConvert Color Hub.
Turning on Scopes in Adobe Premiere Pro
Enable the Lumetri Scopes by switching to the Color workspace in Premiere Pro, or dragging the Lumetri Scopes panel to a convenient section of your window.
Change the Scope view by clicking on the Spanner icon.
Luma Waveform
The Luma Waveform plots the luminance (or brightness) of the pixels in your image, with the brightest at the top and the darkest at the bottom. If the Luma Waveform shows a big cluster of information towards the top of the waveform, it means a lot of your picture contains very bright pixels.
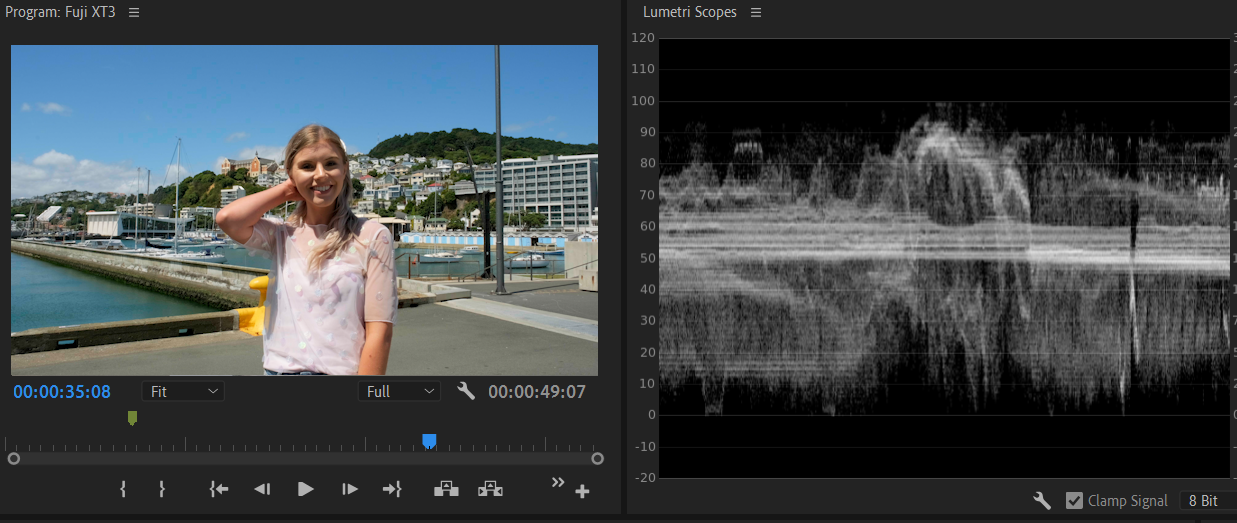
When you use the Exposure control, you will see the entire Luma Waveform shift up and down as you make pixels brighter or darker.
You can align the luminance values of specific ranges in your image (highlights, midtones and shadows) using the Curve controls, Levels, or the sliders underneath each Color Wheel.
For camera-matching, try to match the white point and black point of your images by making sure they hit around the same point on the waveform. Then identify the key part of the image that needs to be the same exposure (e.g. a person’s face) and adjust the Midtone range so those areas hit the same point on the waveform.
RGB Parade
The RGB Parade is similar to the Luma Waveform, but it splits the luminance information into 3 channels – red, green and blue. When the 3 channels are at equal levels in the waveform, you know you have a neutral white balance.
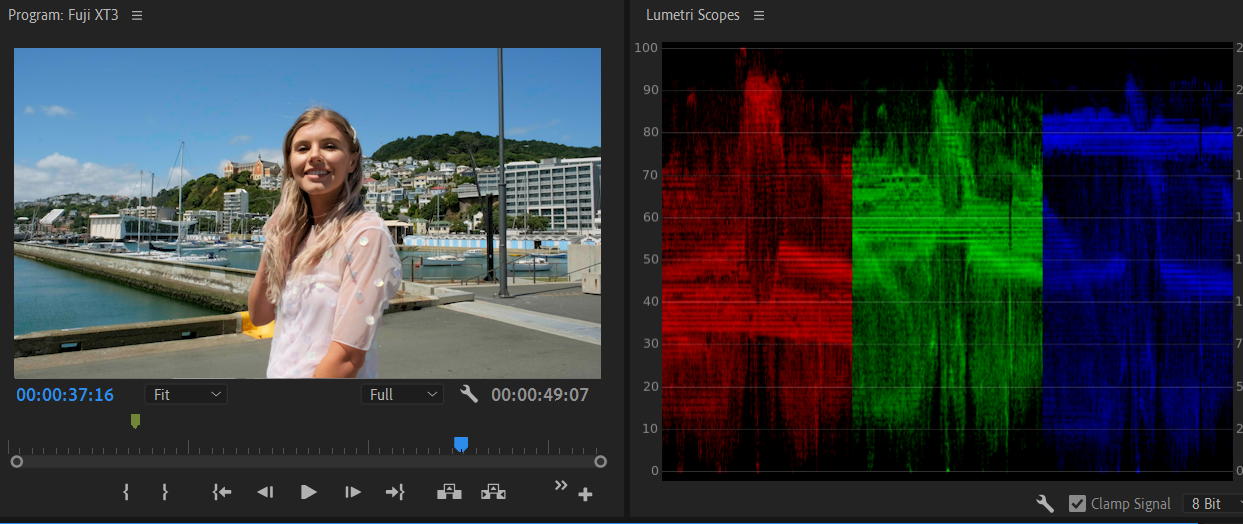
If one channel is higher than the others, you know that color is brighter in your image. You can use the White Balance and Tint sliders, and the Color Wheels in the Secondary Controls, to adjust the balance between the three channels to make sure your images have a similar color balance.
Example: if the image you are matching to has a large amount of blue in the shadows (represented by a strong concentration of blue at the bottom of the Blue channel), make sure the image you’re matching has the same distribution.
YUV Vectorscope
The YUV vectorscope is a circular plot of the hue and saturation values in your image. Around the edge of the circle are boxes which represent the primary colors. Lines extend from the centre of the circle to edges – the closer to the edge, the more saturated that color is in the image.
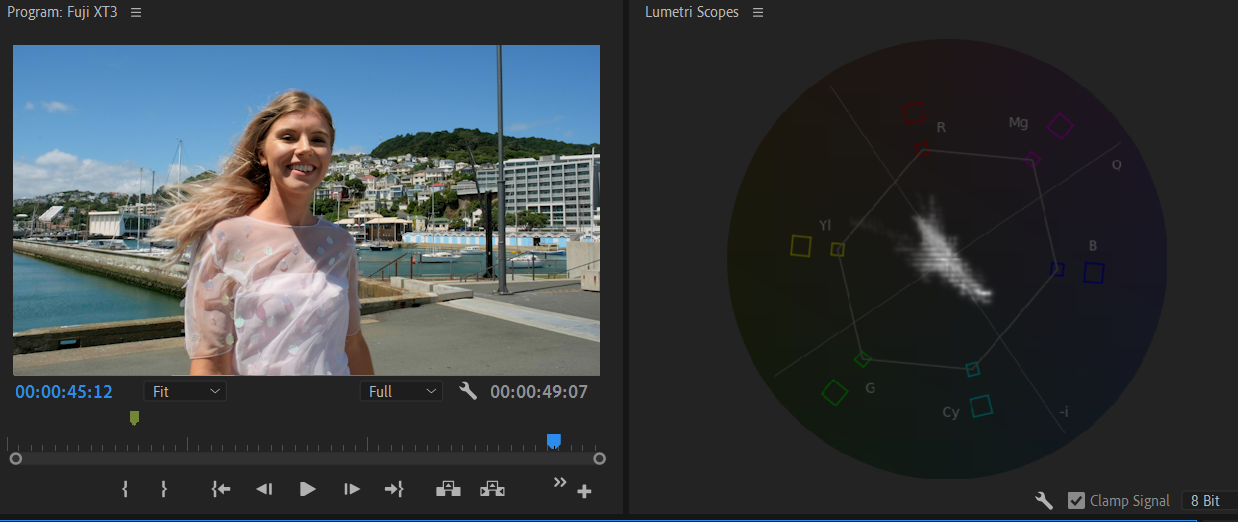
The vectorscope also contains a helpful skintone indicator. You can use this line to help align the skintone of your subject on both A-Cam and b-cam clips to ensure you have well-matched colors. Use the mask tool in Premiere to create a temporary mask on a person’s face to see clearly on the vectorscope where the skin falls on the hue line.
H/S/L Match Refinement
The HSL tools are designed to help you correct for any differences in your scene that the sensor match cannot accommodate. Most commonly, this will be differences introduced by a lens or the shooting conditions on the day.
Switch to Comparison View so you can see an example of the color in both images that you would like to tweak.
Use the Source eyedropper to select the color in the image you wish to adjust. This will create 3 points on the color curve to show you the color you’ve selected.

Use the Target eyedropper to select the color you would like to match to. The HSL tool will automatically try to align these two colors using Hue and Saturation.

You can refine the adjustment by clicking on the curve points and dragging them around to reshape the curve. The colors on the axes will show you the direction of your adjustments.
The dimmed line will show what changes have been made on the other two curves not currently selected.
There are 3 curves you can adjust – Hue vs. Hue, Hue vs. Saturation, and Hue vs. Lightness. Click the letter icon to switch between the different curves.
Hold down the Shift key to lock your adjustment to the vertical axis.
To remove a point on the curve, double-click the point. You can reset all the points on the curve with the Reset button.
Secondary Color Corrections
After Sensor Match and Primary Corrections, you should be in good shape with your match. CineMatch provides several tools for tweaking your image further.
Color wheels allow you add more of a particular hue to the Shadows, Midtones and Highlights of an image. Use color wheels to neutralize a color cast in the shadows or highlights, or adjust skin tone in the mids.
The Saturation slider modifies the overall saturation of your image.
The Curves control allows you to modify the brightness and contrast of your image by plotting the brightness of individual color bands. Click to add points on the curve – dragging downwards will darken that image represented by the curve, pushing the point up will brighten it.
The Levels histogram plots the light values of your image horizontally so you can see the distribution from dark to light. Adjust the handles to change the white point, black point and midpoint of your image.
Uninstalling the plugin and camera packs
Mac OS
To remove the plugin from Mac OS, you’ll need to manually delete the files from your machine using the Finder.
The CineMatch plugin is located below:
Macintosh HD/Library/Application Support/CineMatch
Windows
To remove the plugin from a Windows machine:
- Select the Start button
- Select Settings > Apps > Apps & features
- Select CineMatch from the list of programs on your machine and select Uninstall
Our latest version of CineMatch for DaVinci Resolve contains support for DaVinci Wide Gamut (DWG), which means you can use the plugin with color managed workflows. You can download this version of the plugin from here.
Find out how to use CineMatch both with and without color management enabled here.
Getting Started
When purchasing your license for CineMatch you will receive an email containing your invoice, installation instructions, and an .fkv file (backup license file).
A user account would have been created under the email address you purchased with, which allows you to activate the plugin, view your license details, and manage which devices are activated. You can reset the password for your account so you can access your license details.
If you are using the free trial of CineMatch, you will be able to use all of the plugin controls, except your footage will remain watermarked until it has been activated.
The first thing you will need to do is make sure you have downloaded and installed the free trial of CineMatch for your editor. Simply fill out the form on our Free Trial page, and your download will begin. Run the installer, and restart your editor to start grading with Nitrate.
- When installing CineMatch for the first time, you'll need to add permission for the plugin to record your screen. This permission is required for the color picker in the plugin to work.
- Under System Preferences > Privacy > Screen Recording, check the box for 'CineMatch' - you may be prompted for your device’s username and password.
- After you've approved the permission request, the installation process will continue.
CineMatch will appear as an effect that can be applied to your clips, either on the timeline or to a master clip.
Add some footage to your timeline, go to the effects tab and find CineMatch by typing "CineMatch” into the search bar. Drag the effect onto your clip to access CineMatch’s controls. Your footage will remain watermarked until activated.
Activating the plugin
Under the ‘Register Plugin’ header, click the ‘Activate License’ button. This will open a pop-up window, where you can enter your account details to login and activate the plugin. If your login does not work, you can select the ‘Use .fkv file’ button to activate the plugin with your .fkv file.
Once your license has been activated, you will see an ‘Activation Successful’ message. Close the pop-up window to begin grading. If you experience issues with your activation, please contact us at support@filmconvert.com
CineMatch for DaVinci Resolve now supports DaVinci Wide Gamut. You can find instructions of how to use CineMatch both with and without color management enabled here.
Quick Start Method
How to perform a quick camera match with CineMatch:
- Set up your projects as DaVinci YRGB, with your timeline color set to match your display/monitor
- In the Color tab, identify the clips you want to match. Leave the clips in Log, don't apply LUTs or any other color management adjustments
- Add CineMatch from the OpenFX panel to both clips
- Under the Effects Controls, set the Source for each clip to match how the footage was shot
- On your first clip, leave the Target blank. On your second clip, set the Target to match the Source of your first clip
- Adjust your exposure and white-balance, using the 'Apply REC.709 Transform' and the False Color guides to assist
- If needed, use the HSL Match Refinement tool to modify specific colors which need tweaking to match the target
- Once your clips are matched, toggle off the REC.709 transform to begin your creative grade, or leave it on if you're happy with the look
That’s it!
Full Workflow Guide
CineMatch is a set of tools designed to help you match footage shot on different cameras to a baseline technical level – a seamless, matched timeline in Log or REC.709, ready for creative grading.
The plugin fits into your existing color workflow by replacing the manual step of camera matching (or time spent hunting for the correct technical LUT for your camera), with a simple drag-and-drop application. Just tell CineMatch the settings of your source footage, and which camera you’d like to convert it to, and CineMatch handles the rest.
The CineMatch workflow includes sensor-matching technology which aligns the color values of your Log footage, RAW-like controls for exposure, temperature and tint for applying primary corrections, and an intuitive collection of tools for final tweaks. We’ve also included False Color views to help visualize the color information in your images and guide your corrections.
While CineMatch provides extremely accurate results, differences in shooting conditions and sometimes the materials present in the scene can throw off the sensor match.
However, if you follow good shooting practices and the steps below, CineMatch will significantly speed up your workflow for matching footage from multiple sources, giving you more time to spend on the creative side of your grading.
Shooting for the match
To ensure your best chances of getting well-matched footage, try to follow good shooting principles:
- Shoot in a Log or RAW picture style. This will maximize the dynamic range able to be captured by your camera, and give CineMatch the most data to work with. Most modern cameras and monitors will allow you to apply a display LUT to help you monitor exposure while shooting, but make sure not to bake this in to your footage
- White-balance each camera using a white or grey card. If you don’t have a white or grey card, you can use a phone app to get a light temperature reading and dial that into your camera. Ensuring your camera is capturing the correct white value for your scene’s lighting is essential. Redo your white balance at every new setup or change in lighting
- Don’t adjust too many other parameters in-camera, such as contrast or saturation. CineMatch is designed to accept the camera’s default settings, and may not be able to recover if the image recorded departs wildly from the neutral settings.
- Shoot a few seconds of a chart on both cameras. If you can get a common reference in both shots, it will give you a much better idea of what the colors looked like on the day
Terms to know: A-Cam and b-cam footage
On most projects, you’ll have a primary or “hero” camera that will be the source of most of your footage. We call this your A-Cam footage.
Then, you will have additional “b-cam” or “b-roll” footage, shot on a second camera, drone, action cam, or archival footage.
Think about the various footage sources you have in your project, and pick which will be the “target” for your matching. Normally this will be the camera you shot on for the majority of the project, to minimize the amount of matching you have to do.
Example: if 80% of your footage is shot in S-Log3, and you have some additional V-Log footage you’d like to match, you’ll apply CineMatch to your V-Log clips, with the Source set to V-Log and the Target set to S-Log3. For other camera sources in your project, you’ll set the Source to match how the footage was shot, and the Target to S-Log3 as well.
Using DWG in CineMatch with Color Management
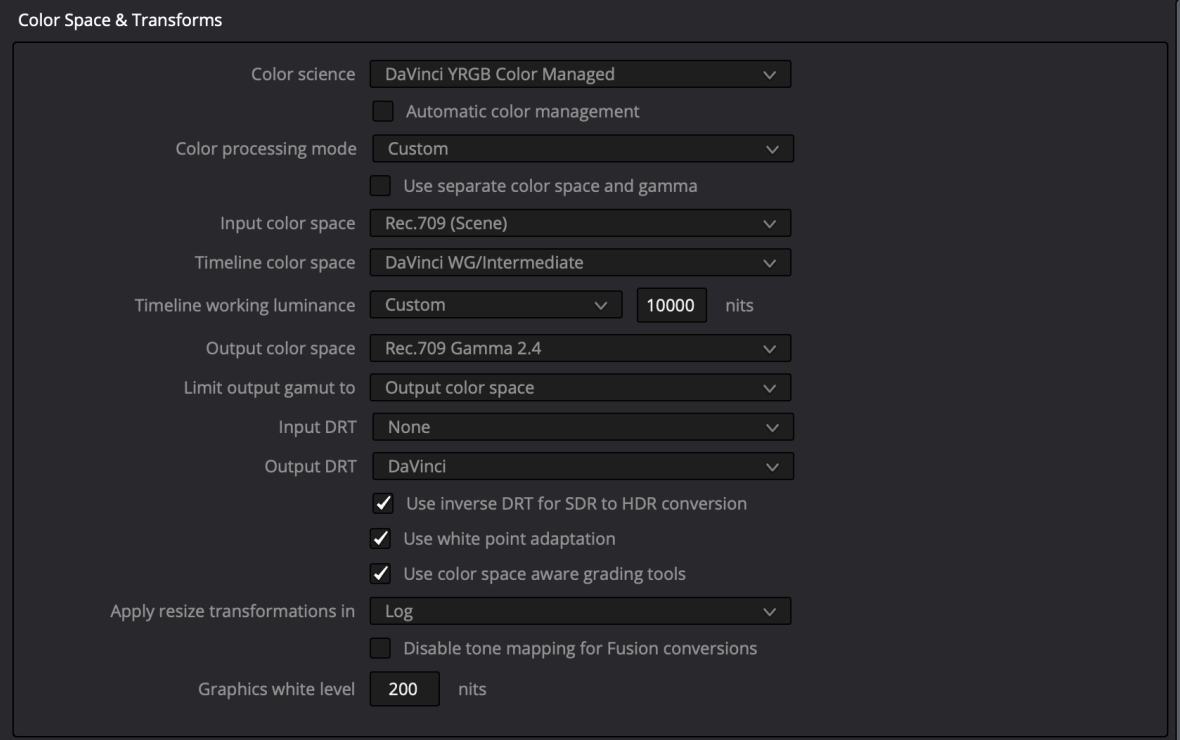
These are the settings required for using CineMatch with DaVinci Wide Gamut /DaVinci Intermediate with Color Management on.
The settings are obtained easily by selecting the Color Processing Mode, HDR DaVinci Wide Gamut Intermediate and then selecting the Custom settings.
The important aspects to change from this mode are:
- The Nits level should be set to the maximum for DaVinci Intermediate (10,000).
- The tone mapping for the Input DRT needs to be turned off.
These two changes make sure that the footage is not modified before CineMatch receives it (apart from the IDT conversion). If you are not matching footage shot by shot, then potentially these changes are not critical.
Any output options can be changed to suit.
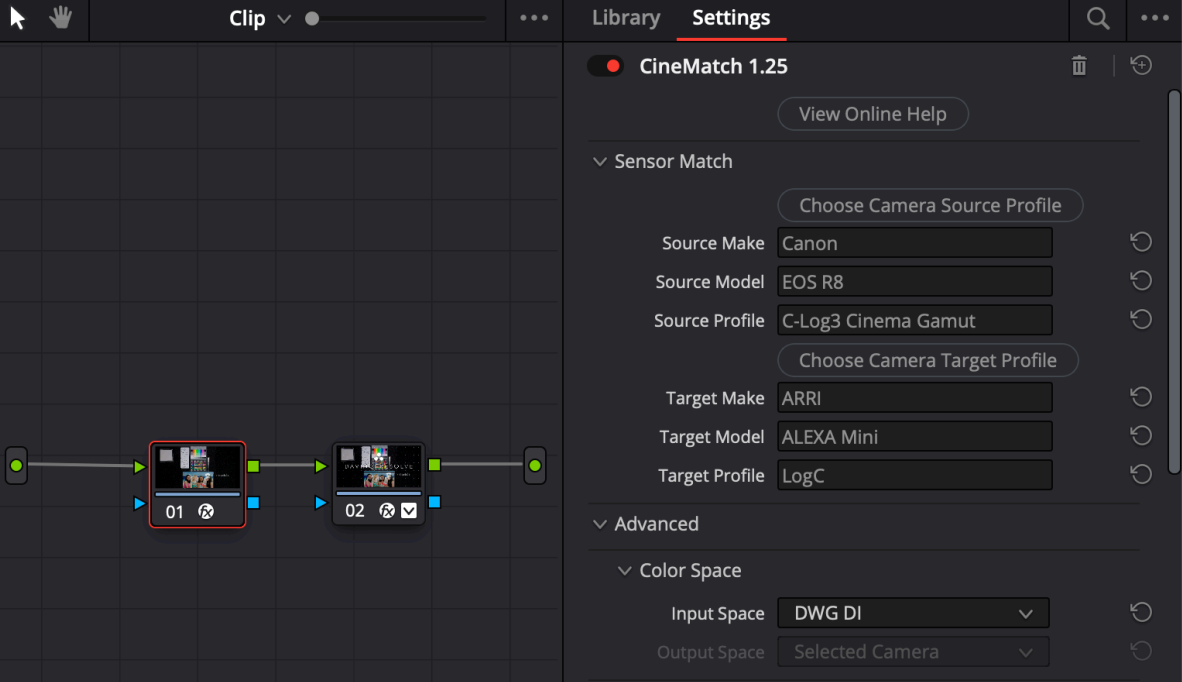
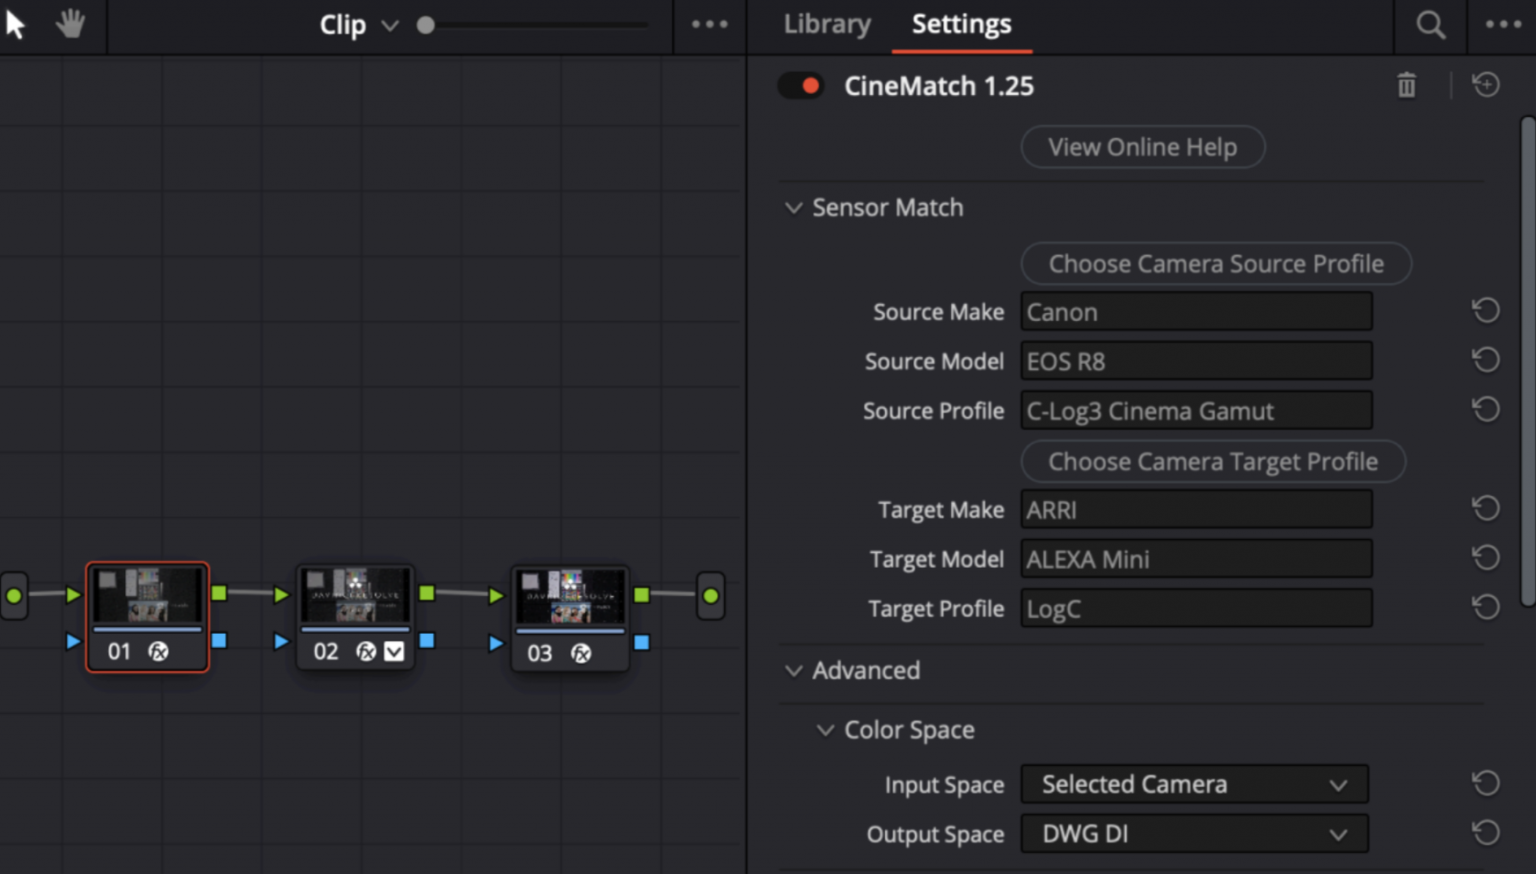
Node one: CineMatch should be the first node in the Color Management setup. Care should be taken to ensure that Resolve has selected the correct IDT.
There are two new settings in CM to support DWG, Input Space and Output Space. The Input Space needs to be set to DWG DI. Once set, the Output Space is locked to DWG DI also. If the IDT is bypassed, then set the Input Space to Selected Camera, and the Output Space to DWG ID.
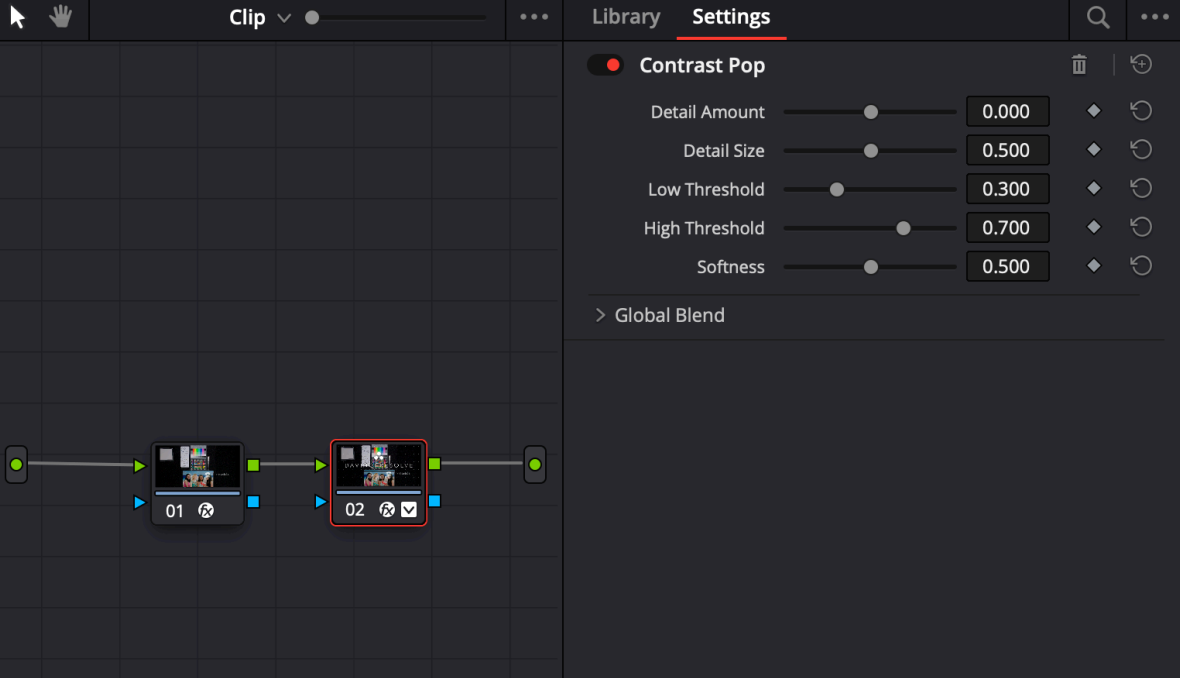
Node two: General grading should go here and subsequent nodes as per a normal Resolve workflow.
Using DWG in CineMatch without Color Management
These are the Color Management settings required for using CineMatch with DaVinci Wide Gamut / DaVinci Intermediate in DaVinci YRGB. The output space can be anything you require.

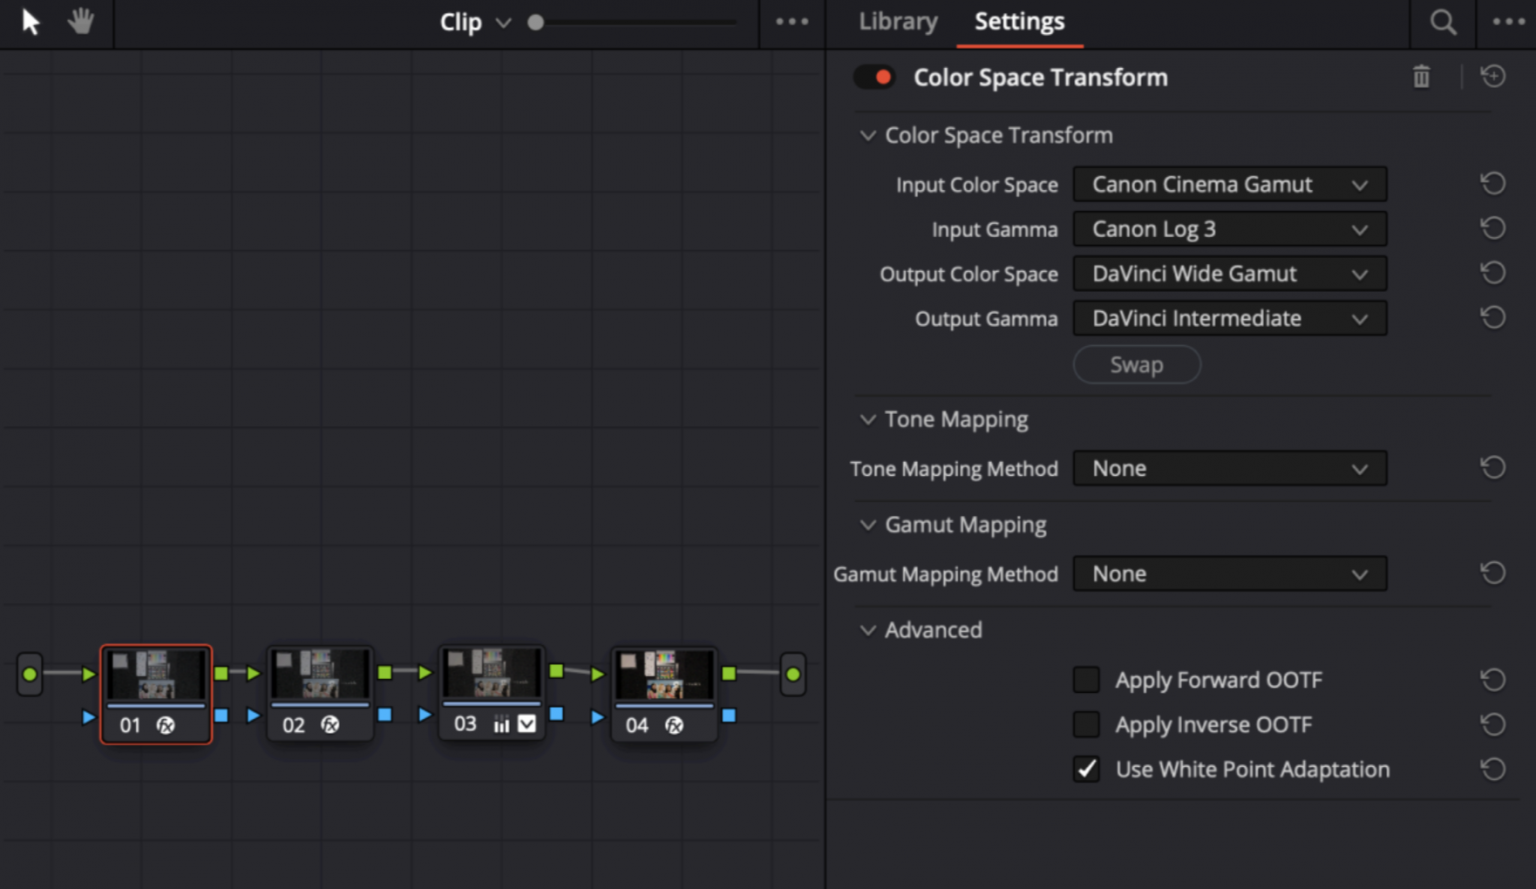
Node one: There are two possible nodes that can the first node in this workflow. The first option is to use a CST to convert your footage to DWG DI.
You need to ensure that the tone mapping is off in the initial CST to ensure good matching. Note that if you are not matching footage shot by shot, then potentially it is not required to turn the tone mapping off.
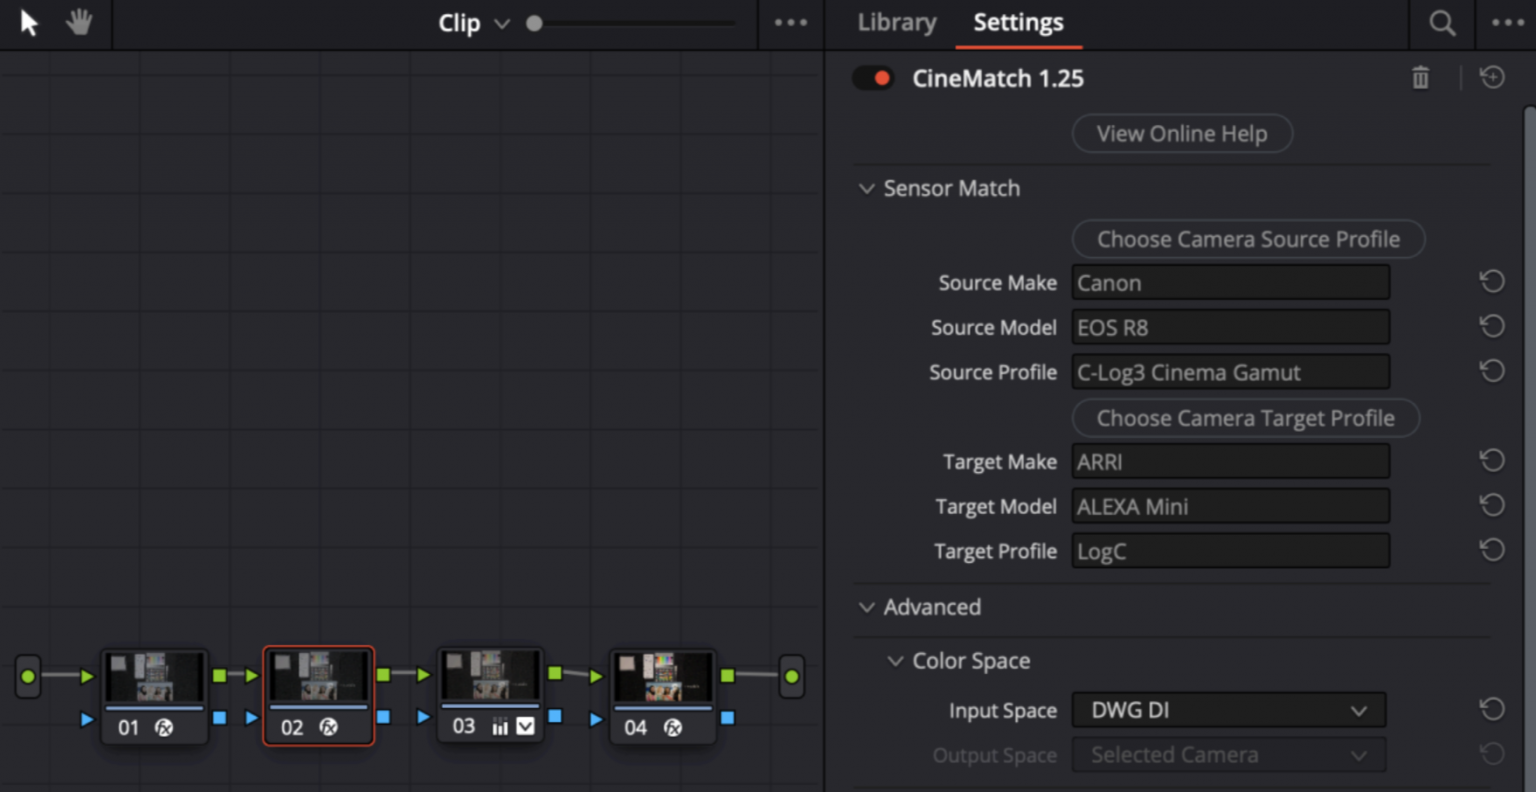
Node two: This node should be CineMatch. The correct input and output cameras still need to be selected, and additionally the Input Space needs to be set to DWG DI. The Output Space is locked to DWG DI as well.
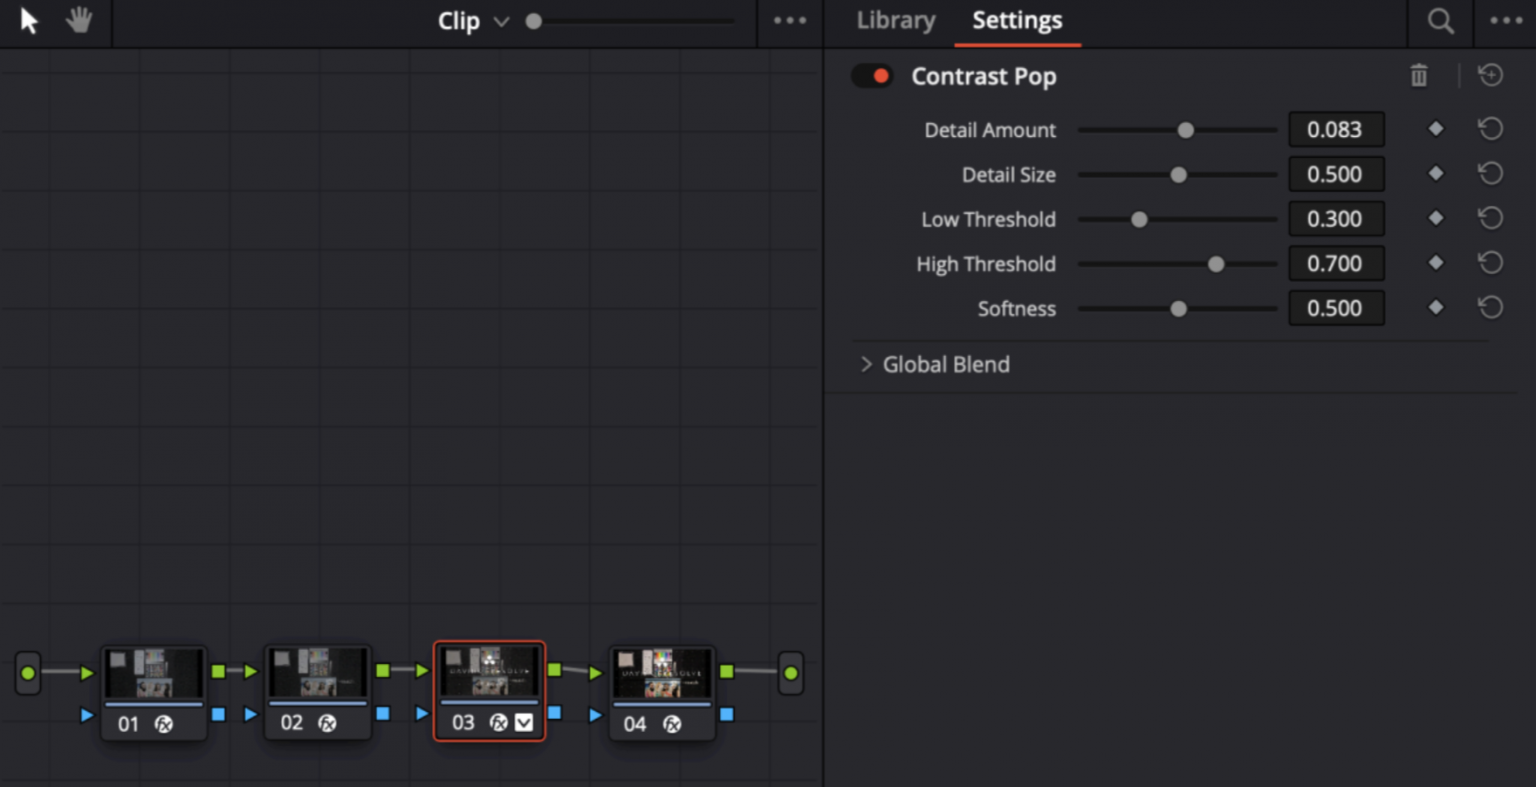
Node three: General grading should go here and subsequent nodes as per a normal Resolve workflow.
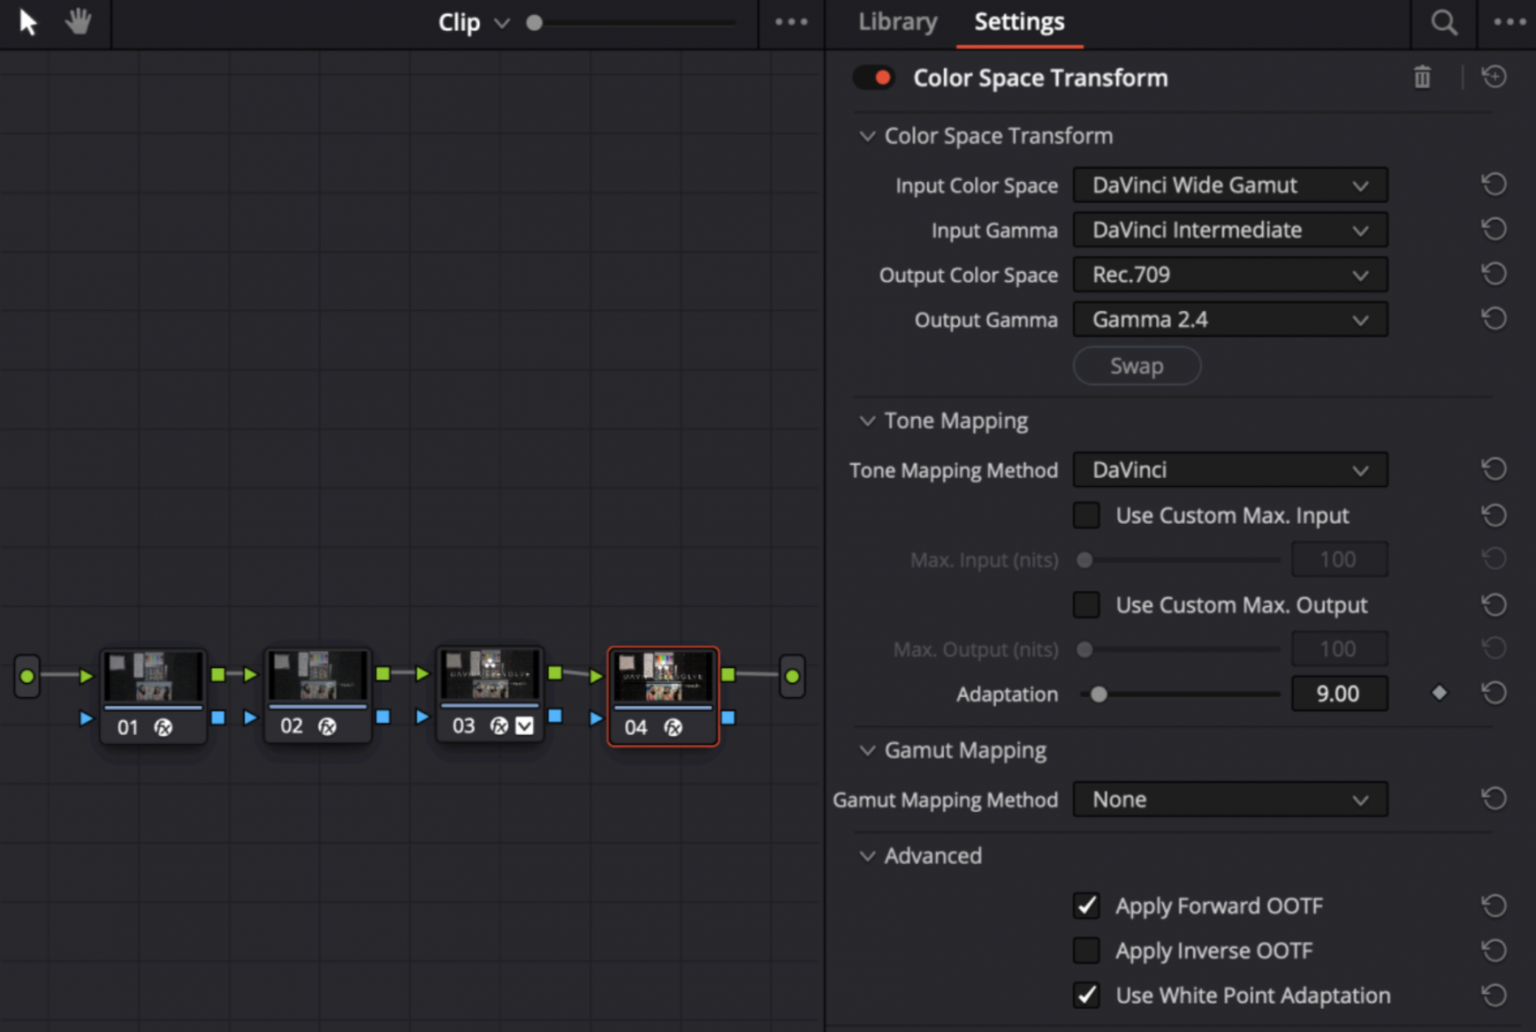
Final Node: This is the output node which is a CST to convert from DWG DI to the output space specified in the Color Management settings.
Node one alternative: The second option for the node graph mentioned above, is for the first node to be CineMatch. In this case set the Input Space to the Selected Camera, and CineMatch will perform the conversion to DWG DI itself. Set the Output Space to DWG DI.
If you have any further questions, please contact us at support@cinematch.com.
Selecting Source and Target Cameras
CineMatch is designed to work on Log footage straight from the camera. Don’t apply any other LUTs or corrections to the clip before CineMatch, or else the matching engine won’t be able to apply the correct transformation.
On each clip, simply tell the plugin what profile you shot in (Source) and what profile you want to convert it to (Target).
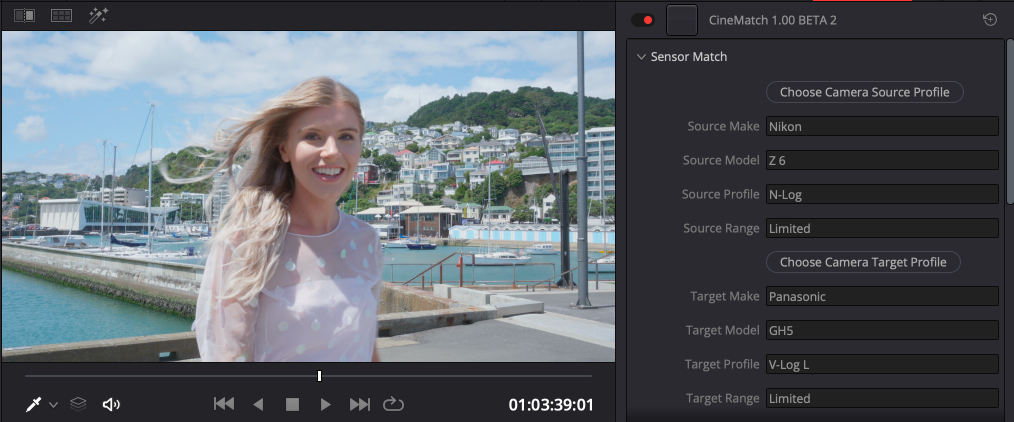
Example: to match Nikon Z 6 N-Log to the Panasonic GH5 V-Log L, choose the following settings:
Apply CineMatch to all your b-cam clips the same way. You can copy and paste the node, or apply it at the Master Clip level if you’ve got several instances of the clip in your project.
Do I need to apply CineMatch to my A-Cam footage?
We recommend adding CineMatch to your A-Cam clips as well. To do this, drag CineMatch onto the A-Cam clip, specify the Source camera settings, but leave the Target Camera Settings blank.
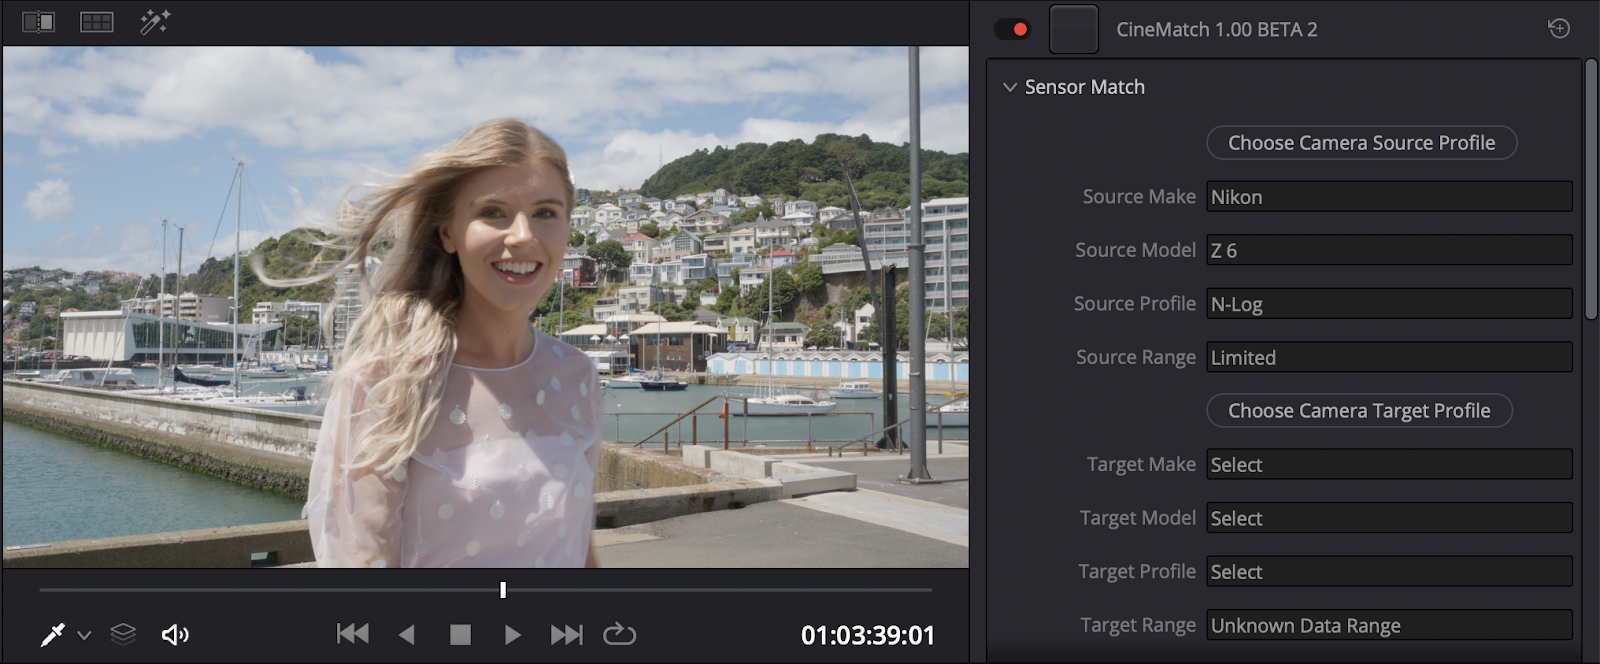
The Camera Adjustments in CineMatch are customized to the response curve of your camera, so you will get more accurate and intuitive results with the CineMatch controls than the generic sliders in your editor.
The CineMatch controls operate on the underlying Log footage, even with the REC.709 transform applied, so you can make corrections without fear of clipping your footage.
Limited vs. Full Data Range
By default, the CineMatch profile you use will be applied using the data range native to the in-camera setting. For most use cases this selection can be left at default.
However, if your footage has been transcoded or recorded to an external device, this can change the data range for your footage, so CineMatch won’t interpret the footage correctly.
The Data Range tool allows you to specify the data range of your footage. If your contrast doesn’t look right after applying CineMatch and making your primary corrections, try switching the Data Range.
How do I use CineMatch with RAW footage?
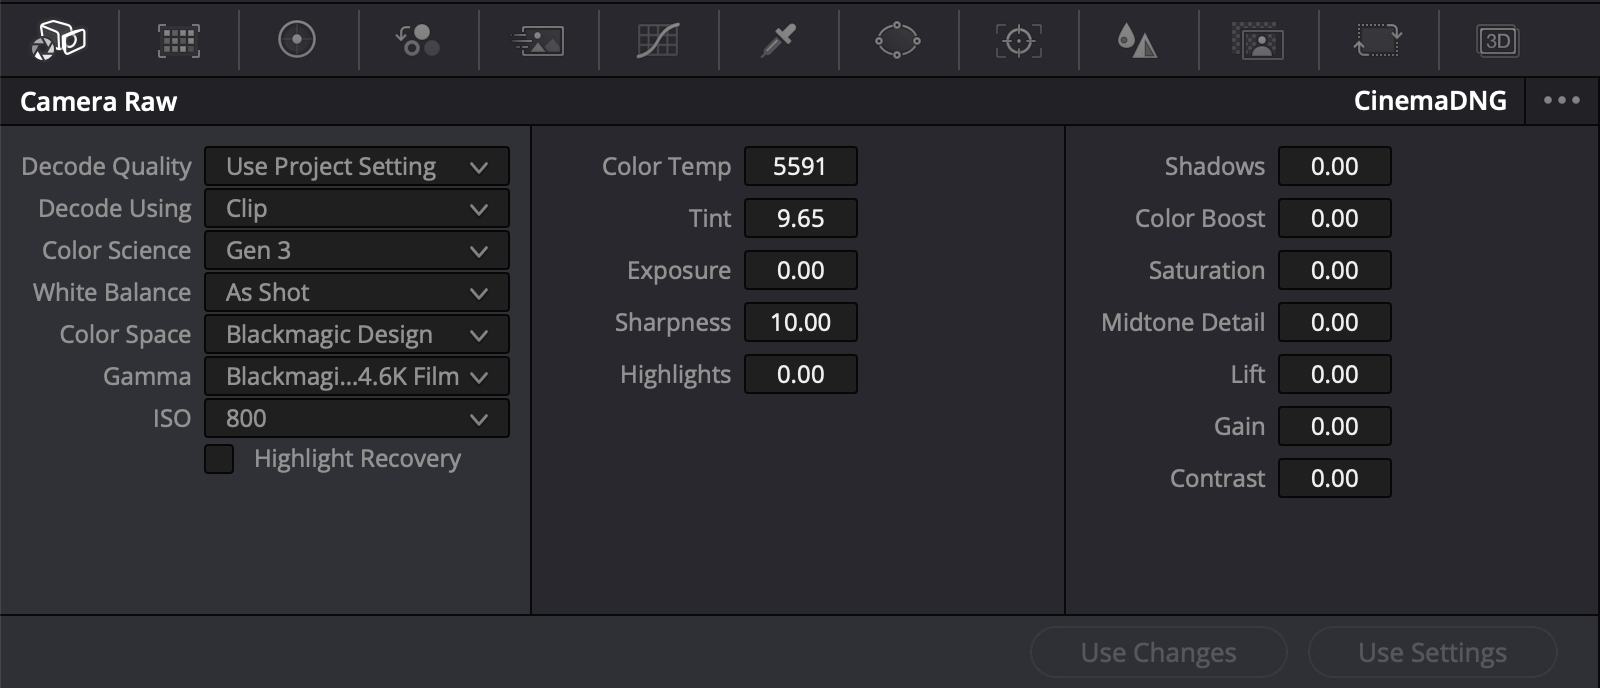
If you’re starting with RAW footage (e.g. .R3Ds, BMFilm, Canon Raw Lite etc), you’ll need to debayer it to a Log source that CineMatch supports first.
Davinci Resolve will accept most RAW footage and settings can be altered in the Camera Raw tab. If your RAW footage is not supported, consult the software provided by your camera manufacturer to debayer the footage before you apply CineMatch.
Comparing A and b-cam clips
DaVinci Resolve provides a number of ways to view your source and target clips at the same time, working on 1 clip whilst referencing the other. These methods are available on the Color Page.
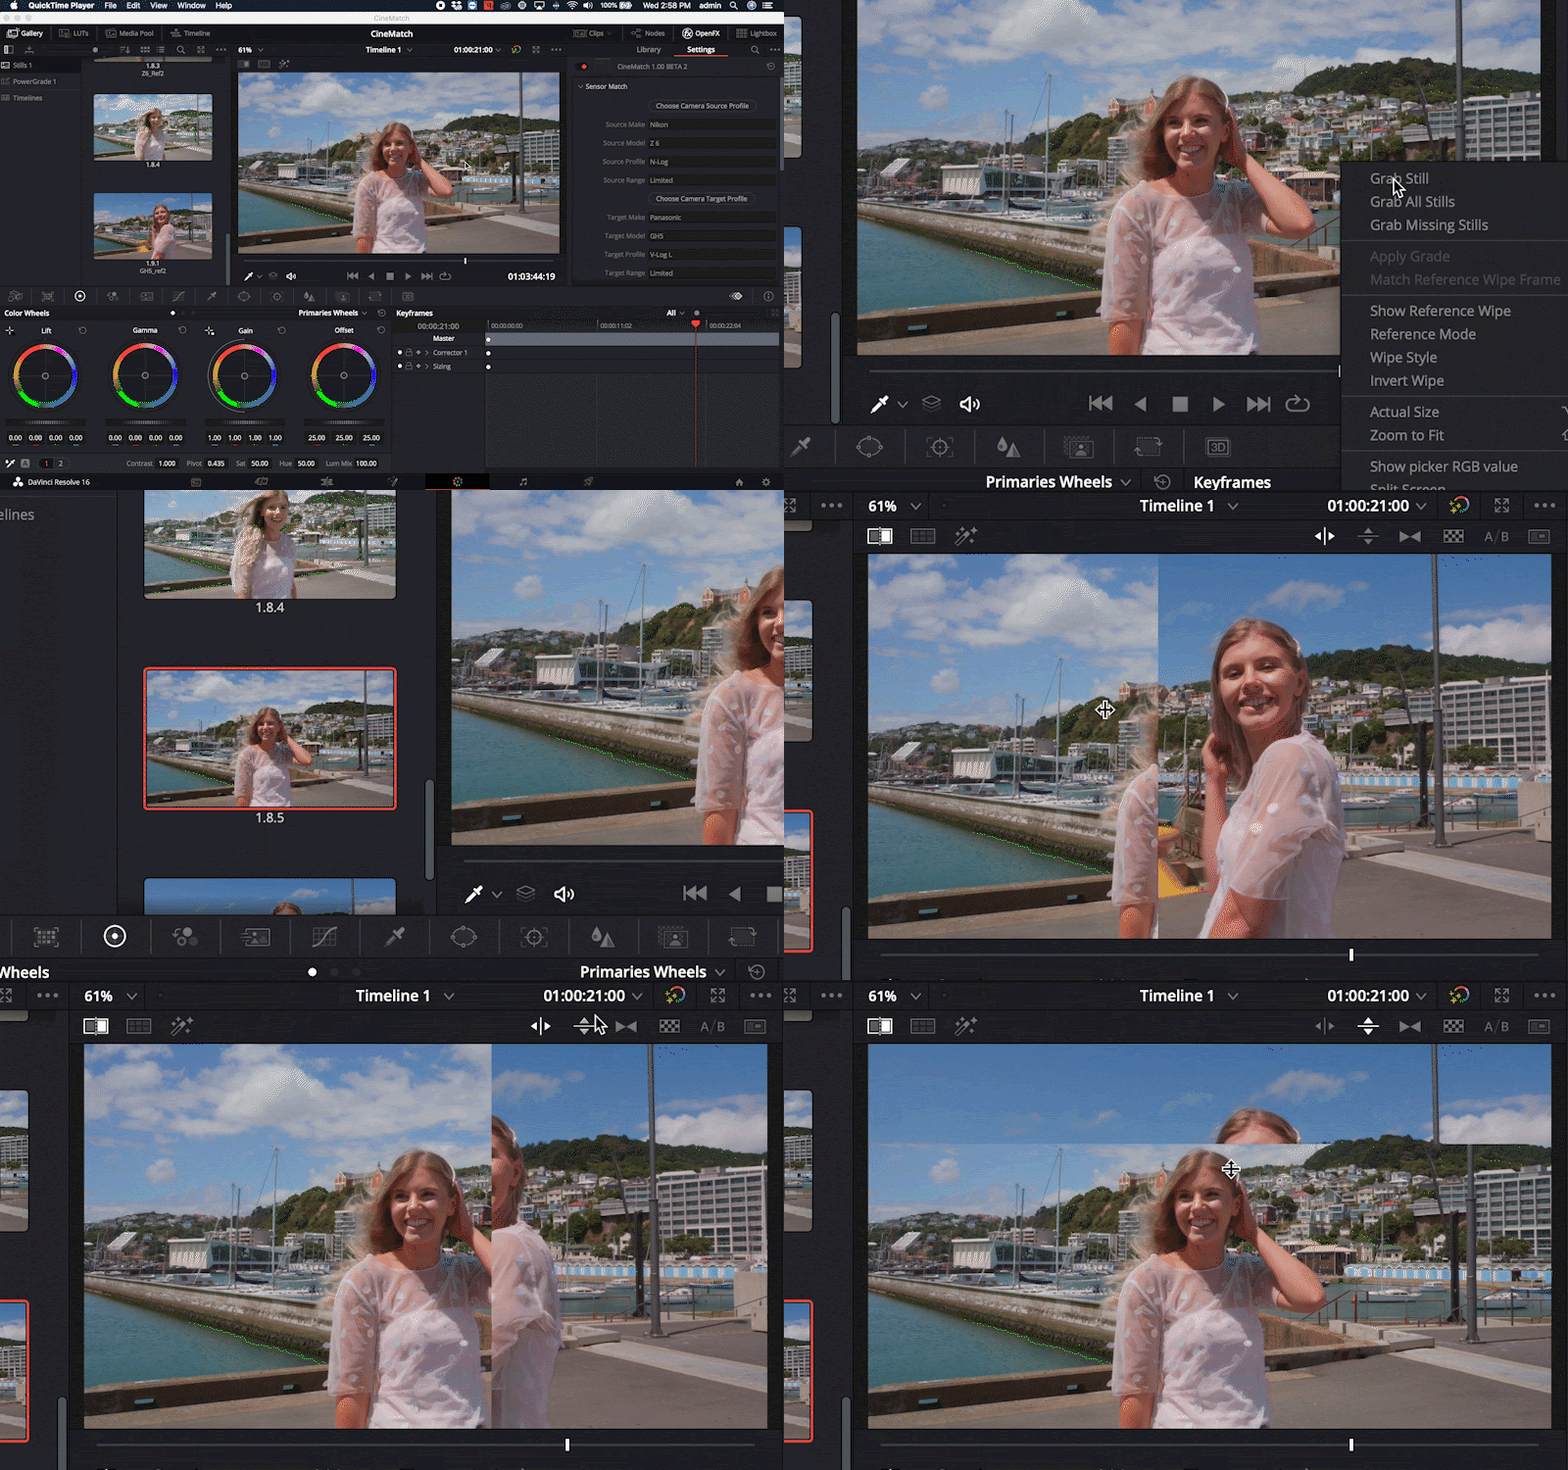
Grab a Still
The first method is to reference a still from your gallery.
Select the frame on your timeline you'd like to reference, right-click on the preview window and select “Grab Still”.
The still will appear in your gallery - rename it to something meaningful so you can find it again if needed.
Double-click the still in the gallery and Resolve will open “Image Wipe” on your preview window. You can use the different wipe modes to compare your reference still and your current clip.
Adobe Premiere Pro provides a handy comparison view to see two clips from your timeline side by side.
To switch to Comparison View, click the Program Monitor Comparison View button, or choose Comparison View in the Program Monitor Settings menu.
Wipe Timeline Clip
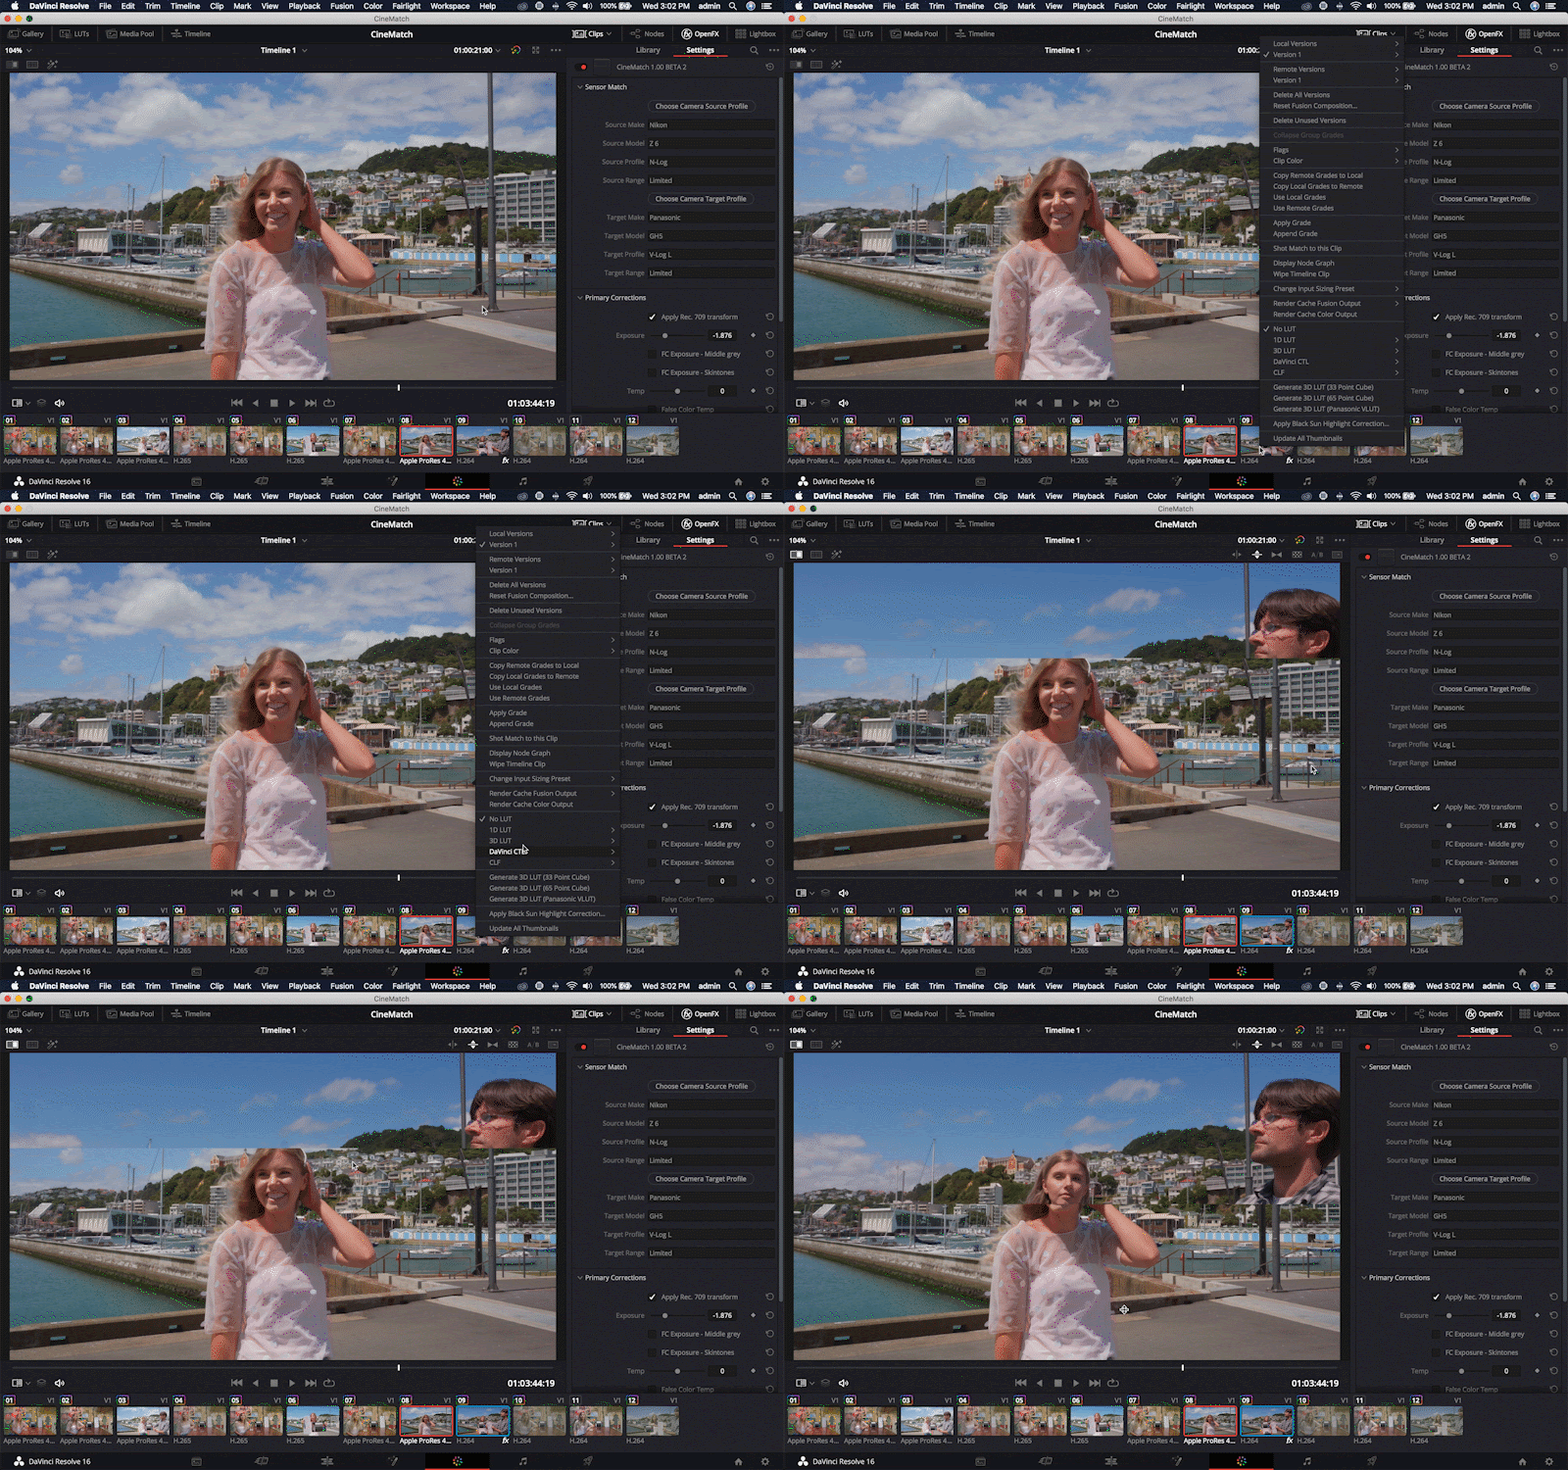
Another method is to reference a clip straight from the timeline. Turn on the Clips timeline by clicking 'Clips' at the top right of the Resolve window.
Right-click on the clip in the timeline that you want to reference and select “Wipe Timeline Clip”. Image Wipe will open on the preview window and your reference clip will be highlighted with a blue border.
Split Screen
Split Screen is a gallery view where you can select more than one clip to reference.
Click the Split Screen button at the top left of the preview window.
In the drop down menu at the top left, choose your Split Screen view.
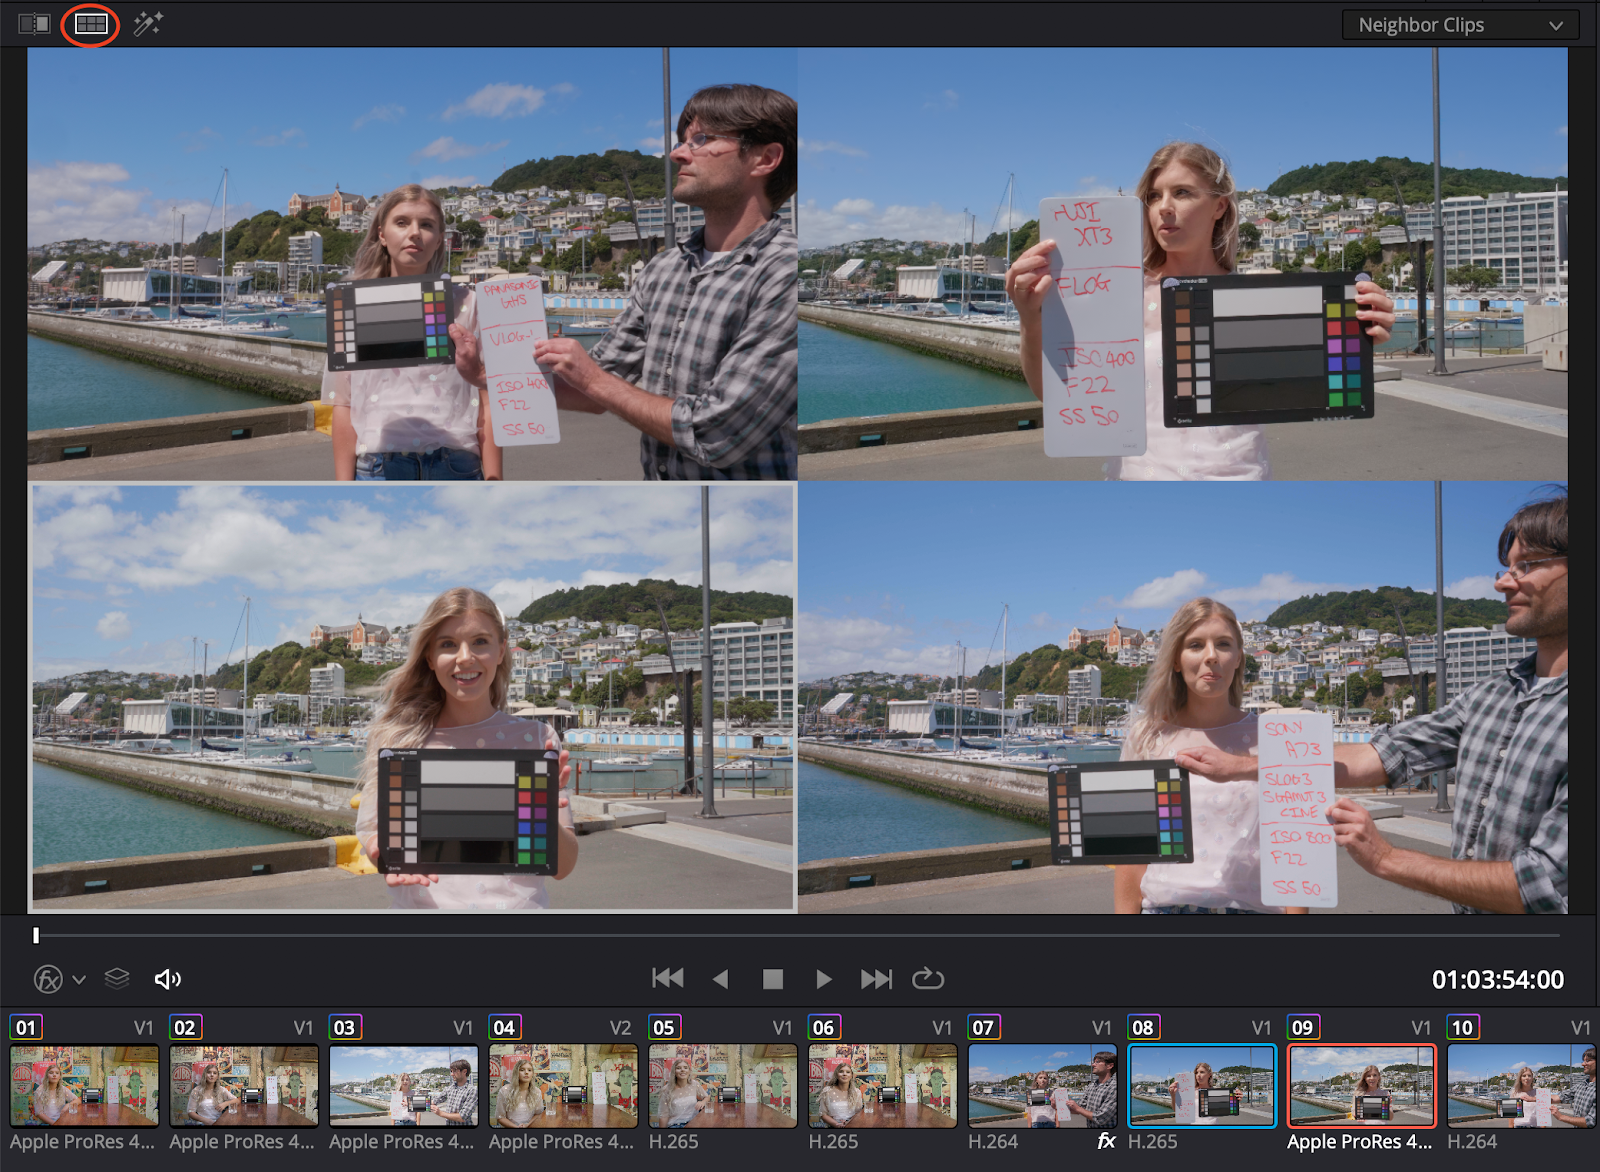
Neighbor clips will display the surrounding 3 clips on your timeline in a 4-up view.
Selected Clips allows you to select up to 16 clips on your timeline and view them in Split Screen.
Switching OpenFX Overlay and Image Wipe
The OpenFX Overlay and Wipe controls are both selected through the button at the bottom left of the Preview window. You'll need to toggle between the two modes to adjust the Wipe settings and the CineMatch overlay controls.
The OpenFX Overlay does not work in Split Screen mode.
Primary Corrections
Once you’ve applied the correct sensor settings, you will be looking at your A-cam and b-cam clips, matched to your target picture style.
Exposure
Use the exposure control to match your exposure across the two shots. The slider has been mapped to your chosen camera profile, so you can adjust the exposure as if you had changed it in camera.
White Balance
Like the Exposure slider, our temperature and tint slider are also mapped to your chosen camera profile, so you can ensure that when you white-balance your footage, it will respond in the camera’s native color science.
Apply REC.709 Transform
We’ve added an optional transform in the primary corrections so you can view your footage in the REC.709 color space. This view can be toggled on and off by clicking the ‘Apply REC.709 Transform’ checkbox.
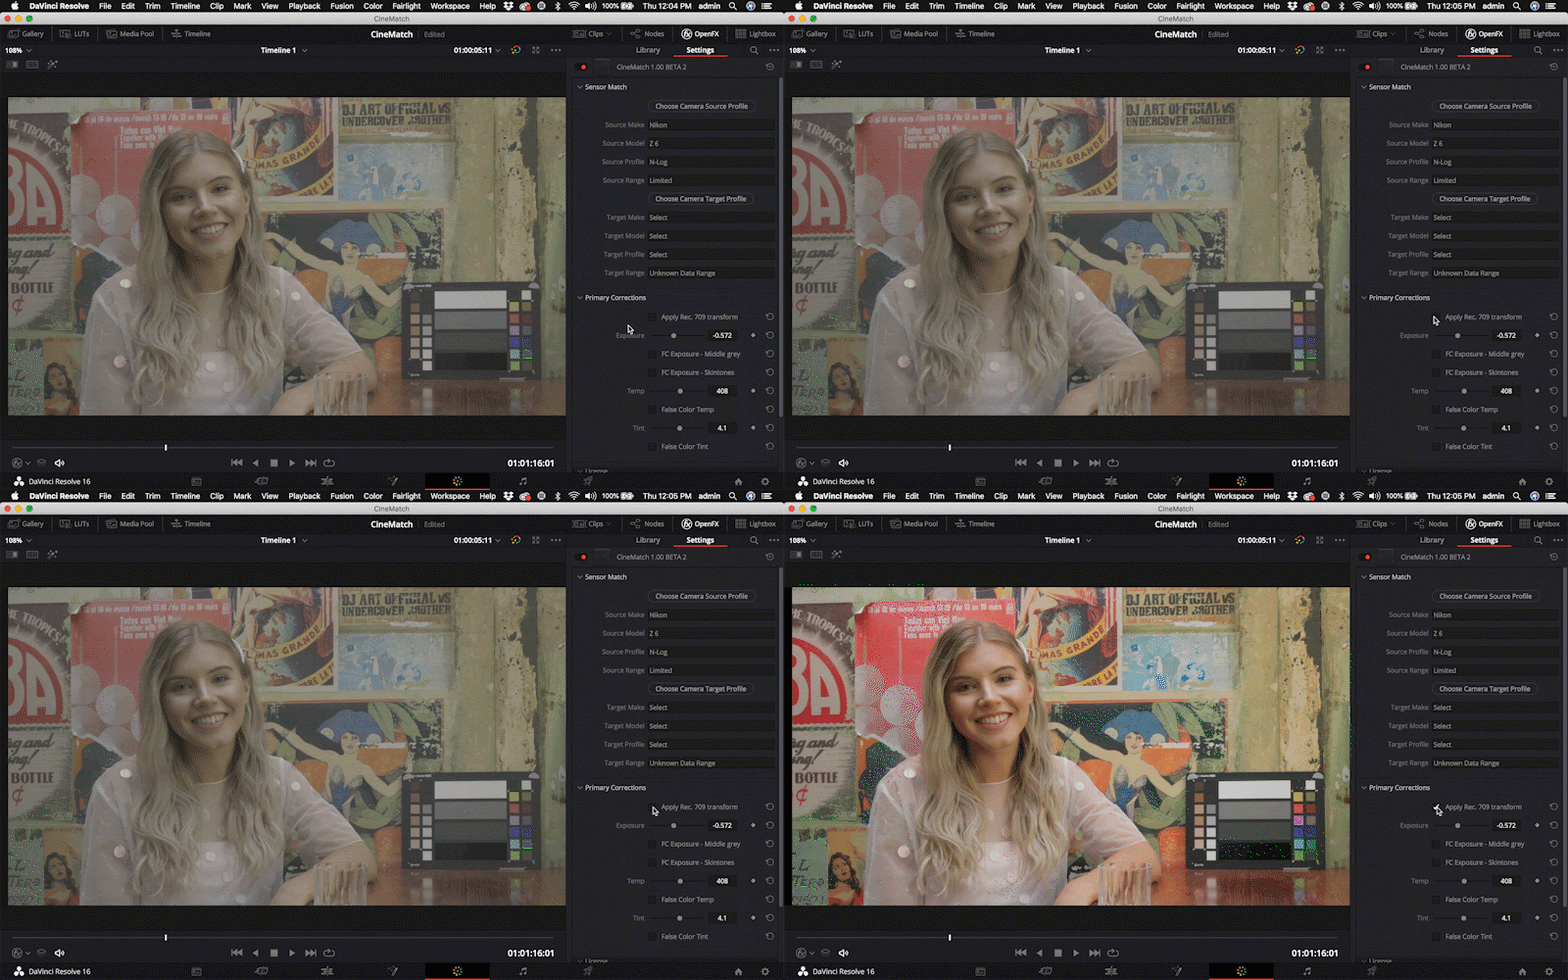
This transform lets you view your footage on a REC.709 monitor, but you can still use the Primary Controls in Log so you’re not losing any color information to clipping.
Tip: Put CineMatch on a node in the “Timeline” node tree instead of the “Clip” node tree for the Rec. 709 transform and False Color guides. This will apply the effect to every clip so you can easily spool through clips and match. Just set the source camera settings in CineMatch on the “Timeline” node to the Camera settings that all the “Clips” are targeted to.
False Color Guide
CineMatch includes several False Color Guides to help evaluate your images.
Exposure – Middle Grey
Green is mapped to the middle grey range for REC.709. Pick the area of the image you would like to expose in the mid-range, and with the false color applied, move the exposure slider until this area appears green. In the example the video chart’s mid grey patch so that is the target for the green.
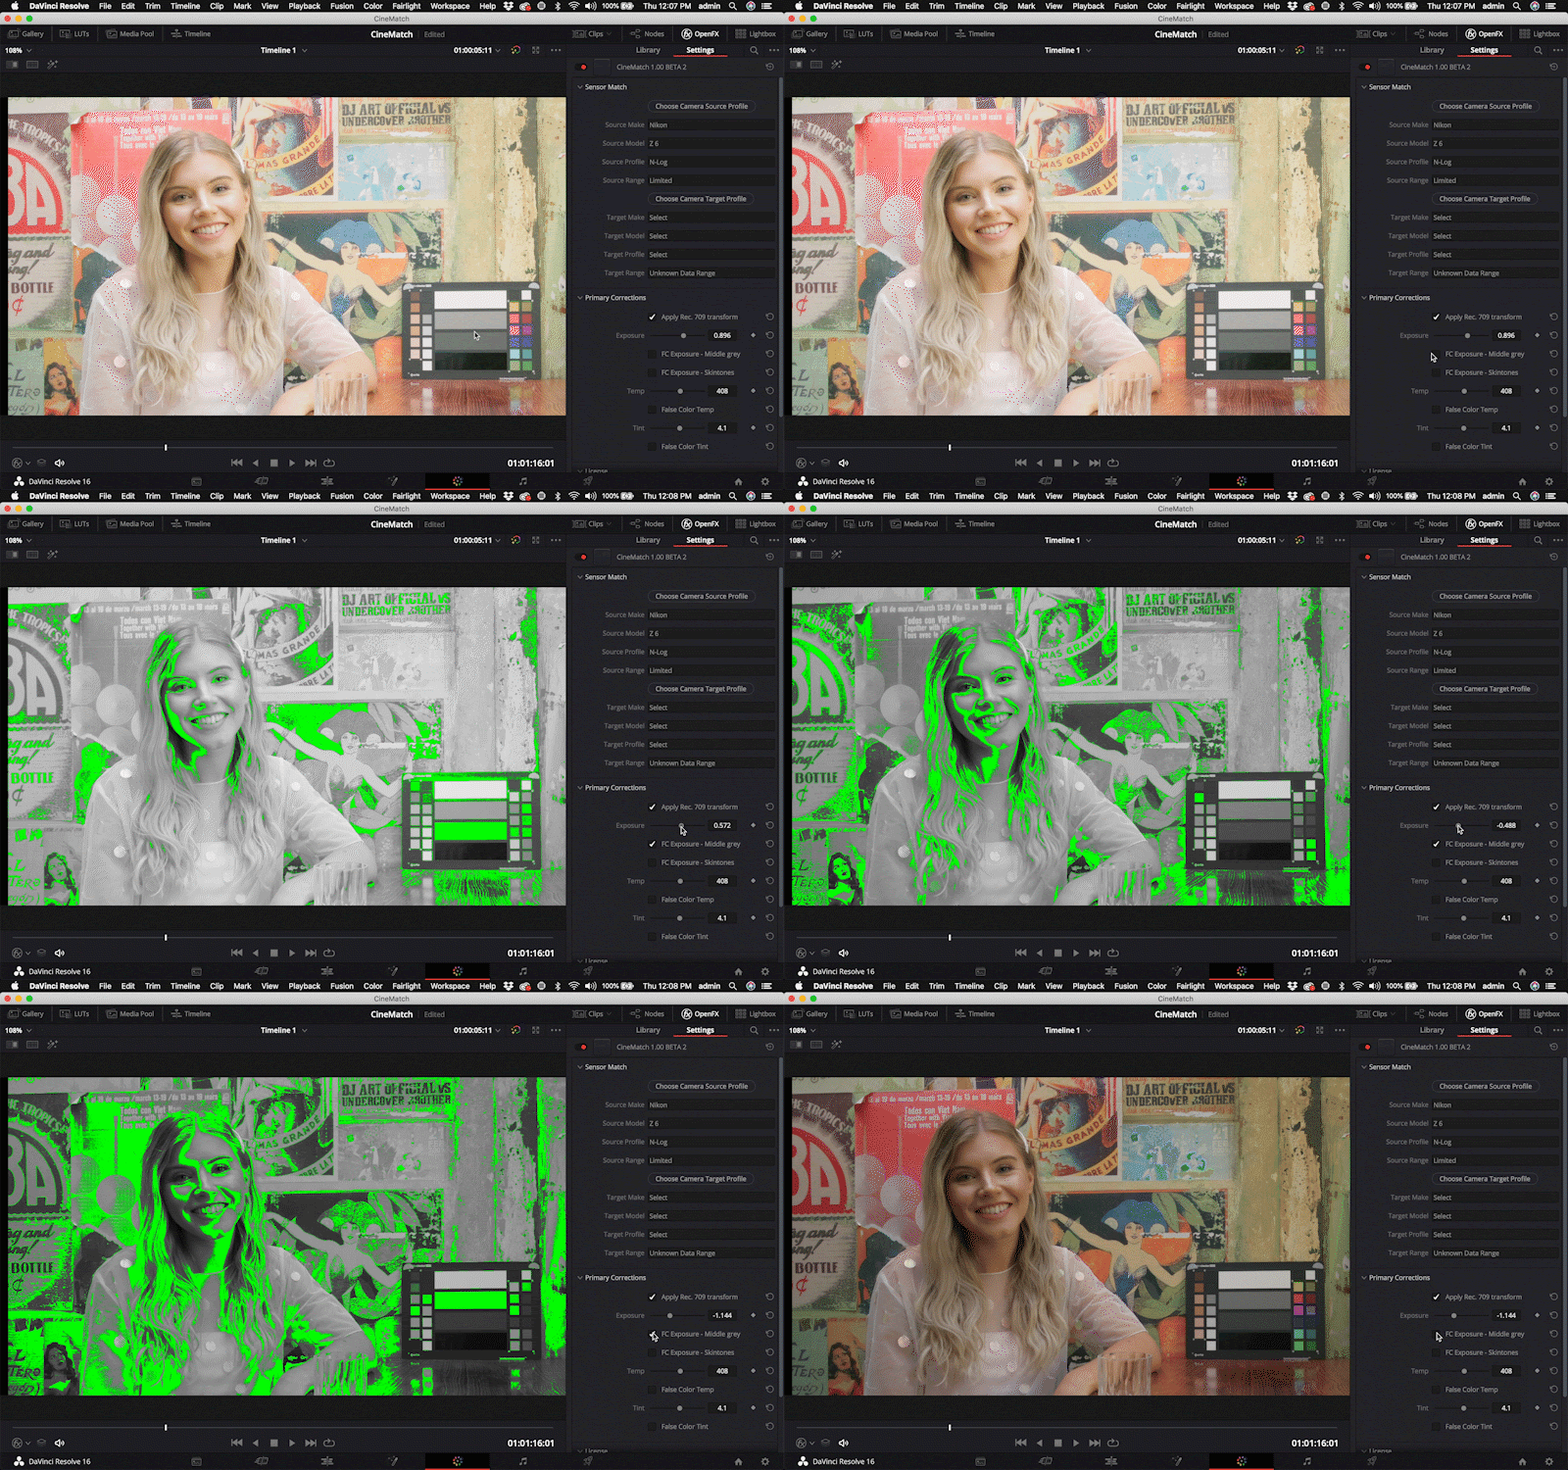
Adjust the exposure in both shots so that the green lines up in the same area. This will ensure that area is exposed at the same level.
Exposure – Skin tones
This False Color view maps orange to a common exposure for skin tones in REC.709. Identify the area of a subject’s face that you want to expose correctly, apply the false color, and adjust the exposure slider until the skin is orange. In the example the right side of the face is the target for the orange.
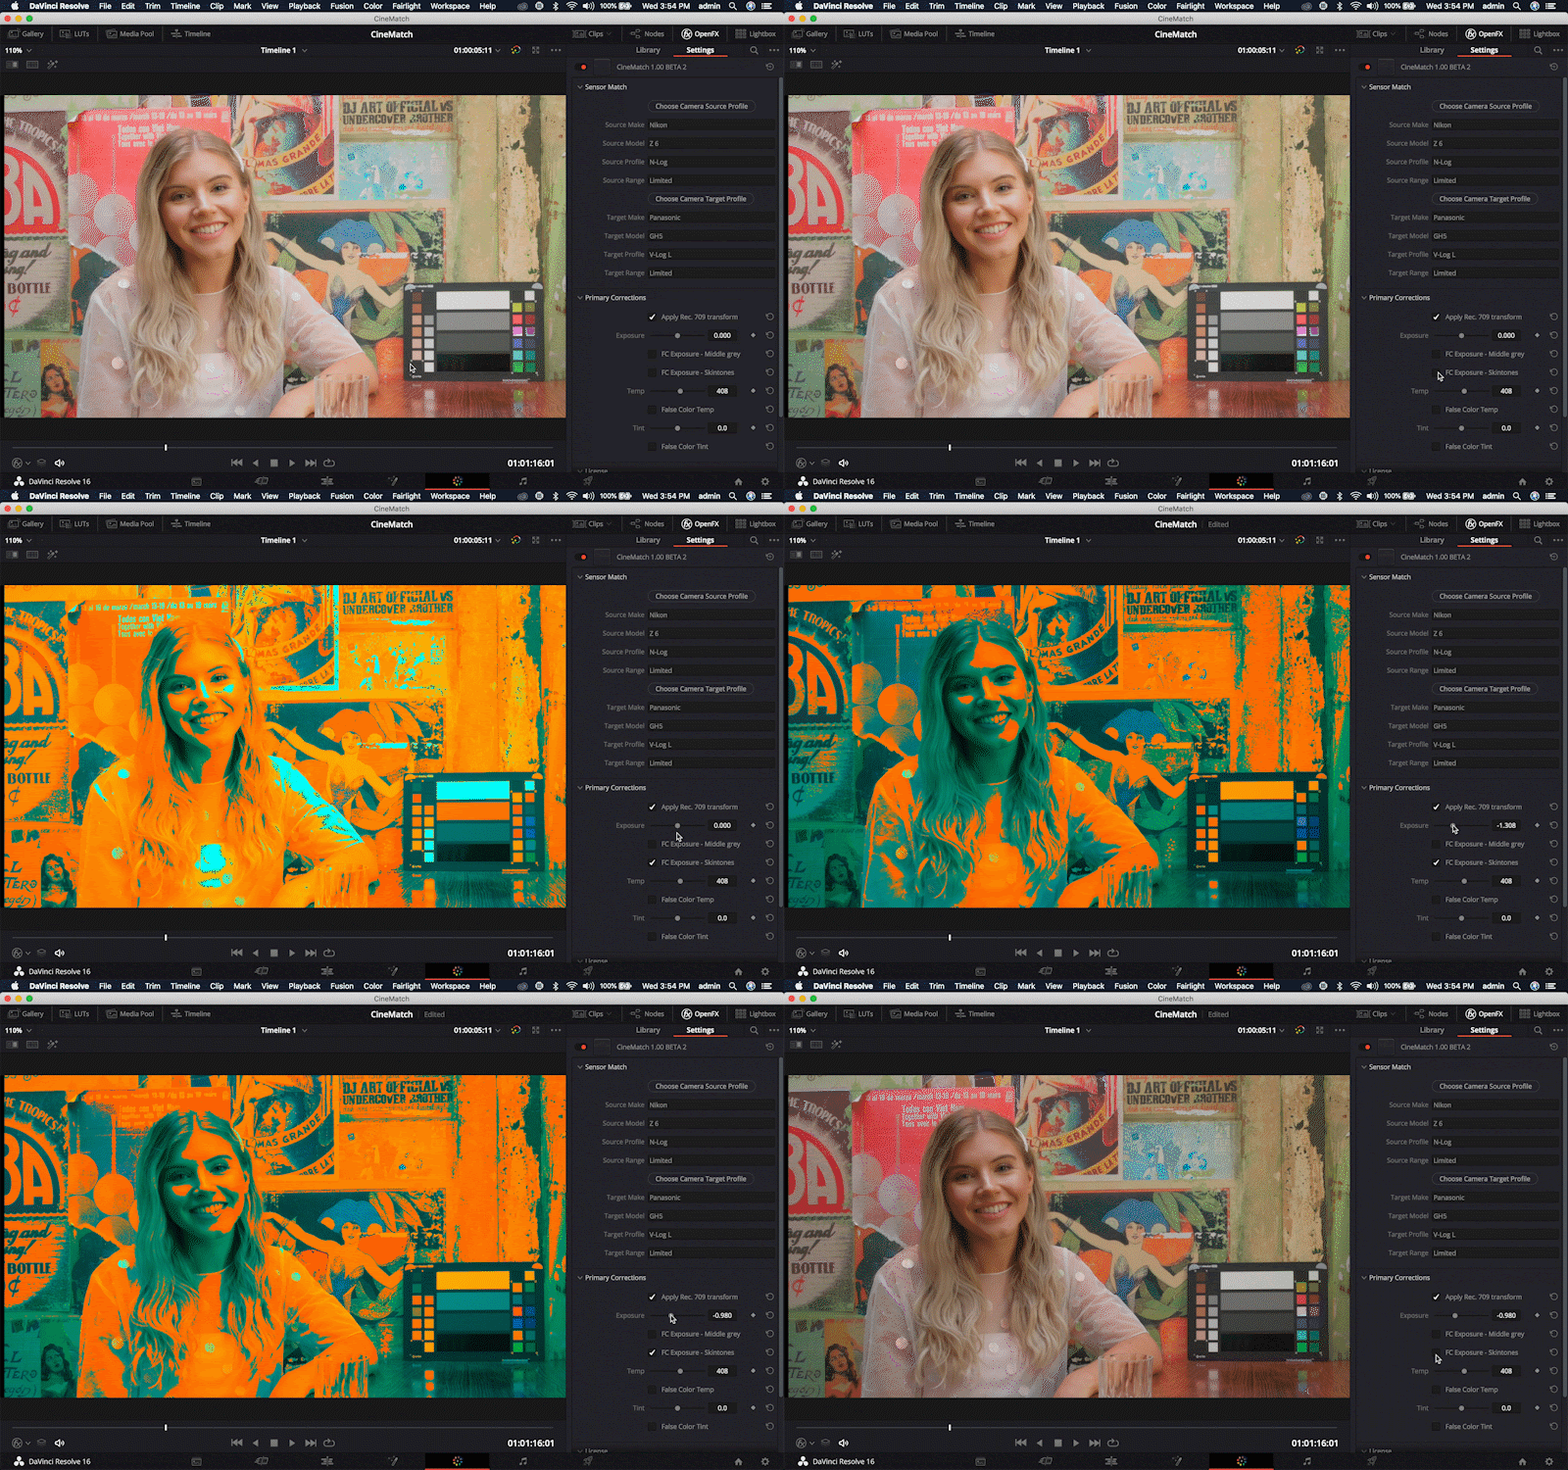
Temperature
This has been designed to help you visualize where the balance in temperature lies within your image. All warm elements are mapped to orange and all cool elements are mapped to blue. To ensure an element in your scene is a neutral color, adjust the temperature slider until it displays as grey. In the example, the grey patch is the neutral reference.
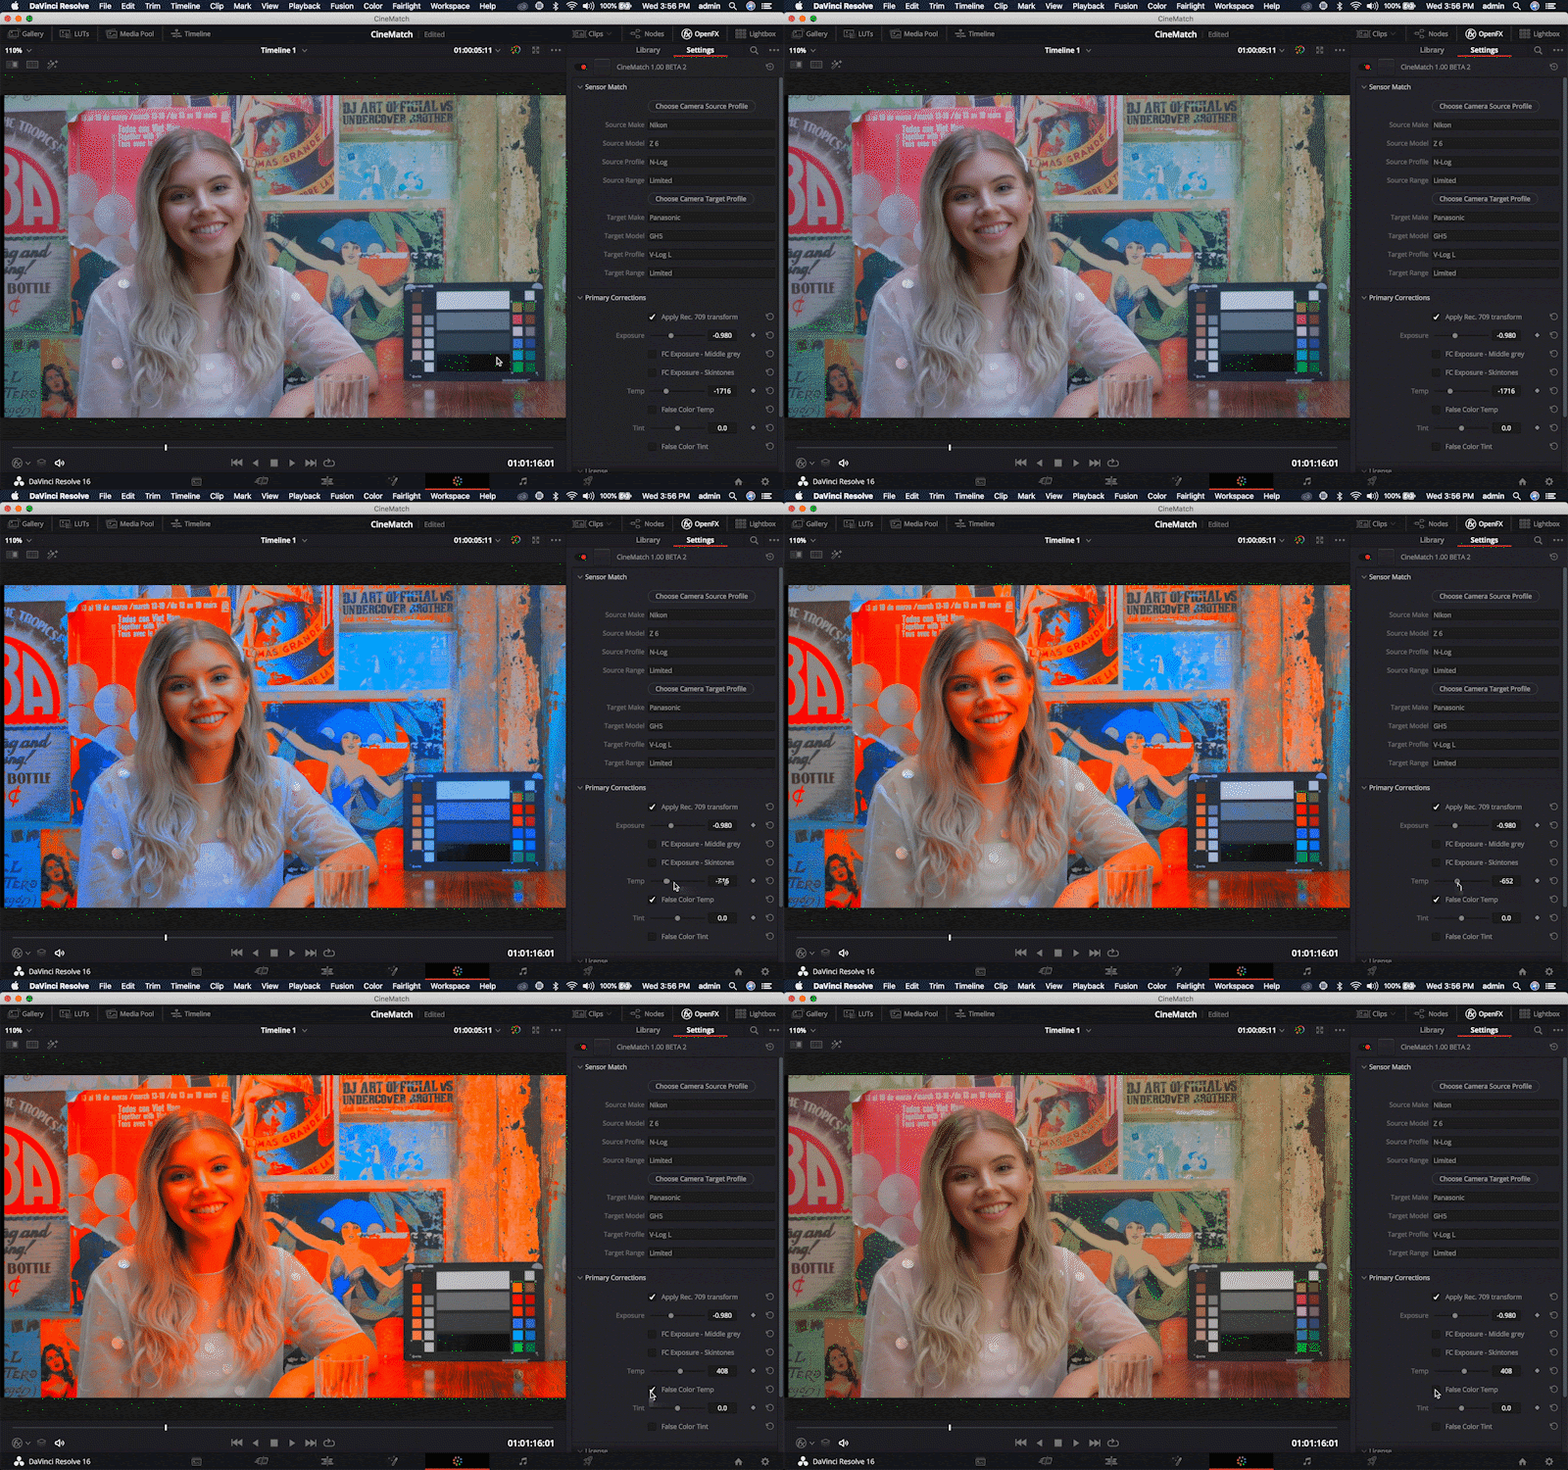
This also works in reference mode to quickly identify if two shots are balanced with each other.
Tint
This false color guide shows all of the green and magenta elements of your image. Like the Temperature false color, you should identify a part of your image that you would like to be neutral and move the tint slider until that area is grey. In the example, the grey patch is the neutral reference.
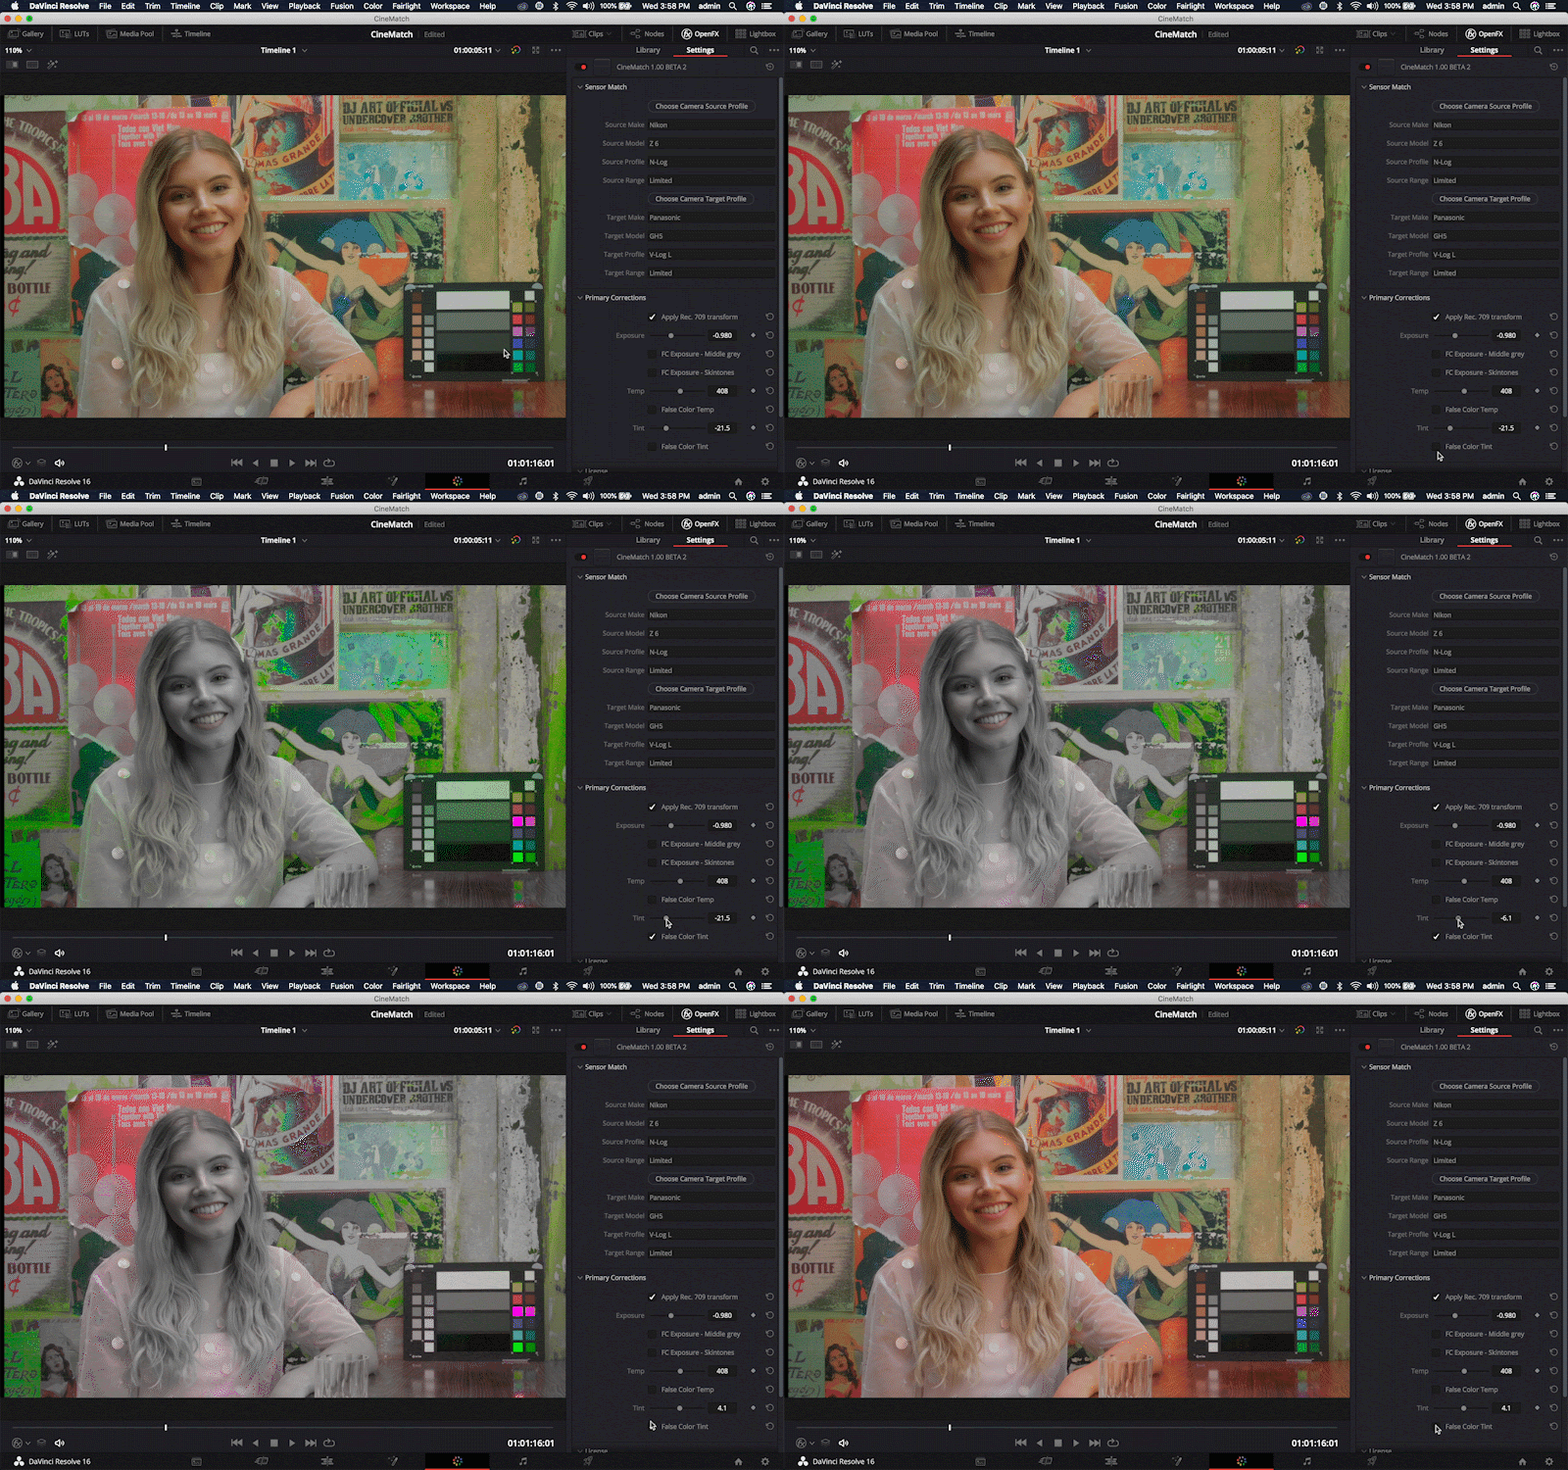
This also can be used in reference mode to quickly identify if your shots are balanced with each other.
Using scopes for camera matching
Scopes are a powerful tool for visualizing the color and light information in your images.
Scopes work by plotting the visual pixel information from your footage numerically, so you can “read” the image the way you would read a chart or graph.
Scopes can help you analyze particular issues or aspects of a picture, and are very helpful for camera matching, as you can often see differences on scopes that will be hard to spot on the program monitor.
Scopes can also be used when you’re using reference mode, so you can analyze the color information in both images simultaneously – perfect for balancing exposure, white points and color temperature.
Below are descriptions of the three main scopes that will be helpful for camera matching. For more information on reading scopes, check out Ollie Kenchington’s Introduction to Scopes article on the FilmConvert Color Hub.
Turning on Scopes in Davinci Resolve
Enable the Video Scopes by selecting the option in the Workspace dropdown menu or clicking the scopes icon on the Color Page.
There are options to change or modify the scopes.
Waveform
TThe Waveform plots the luminance (or brightness) of the pixels in your image, with the brightest at the top and the darkest at the bottom. If the Waveform shows a big cluster of information towards the top of the waveform, it means a lot of your picture contains very bright pixels.
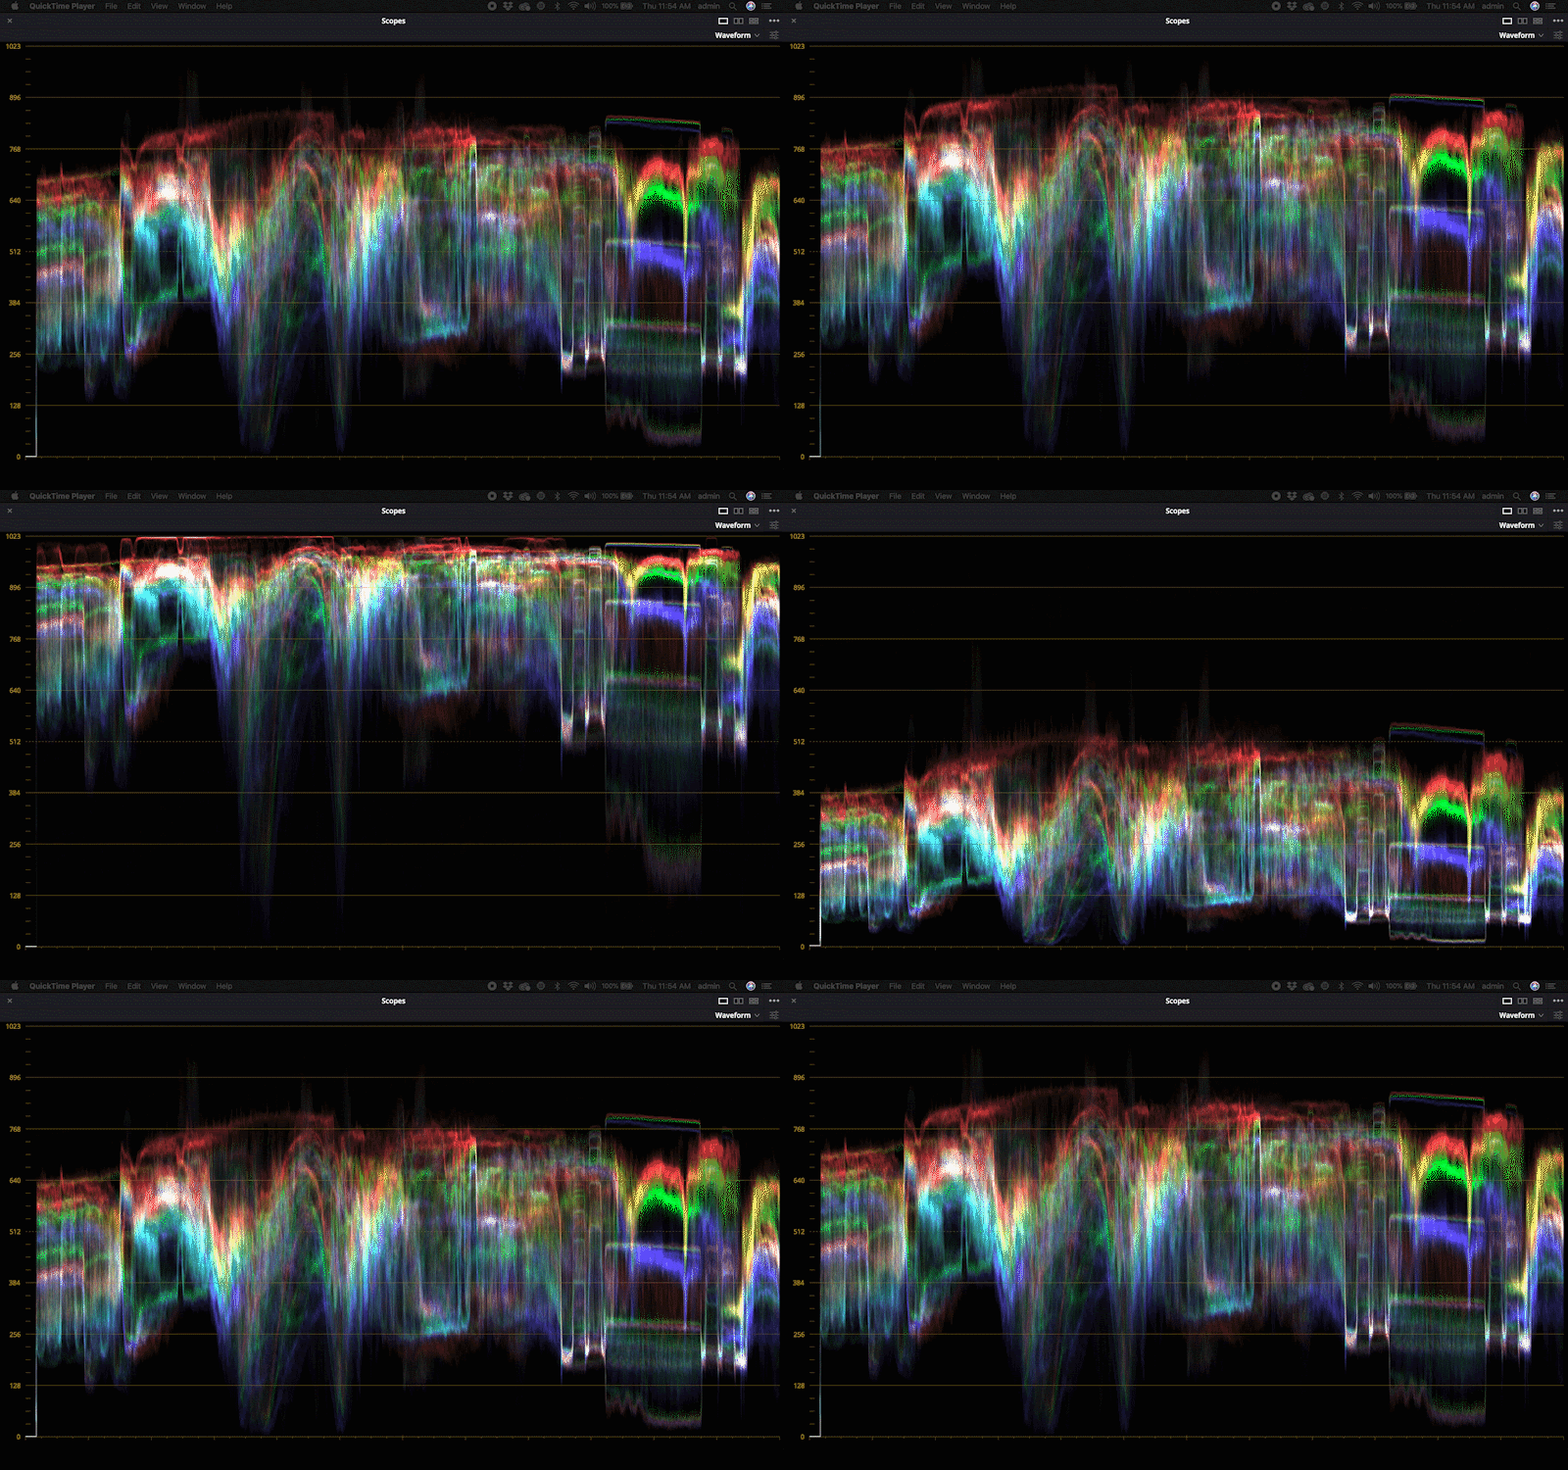
When you use the Exposure control, you will see the entire Waveform shift up and down as you make pixels brighter or darker.
You can align the luminance values of specific ranges in your image (highlights, midtones and shadows) using the Curve controls, Levels, or the sliders underneath each Color Wheel.
For camera-matching, try to match the white point and black point of your images by making sure they hit around the same point on the waveform. Then identify the key part of the image that needs to be the same exposure (e.g. a person’s face) and adjust the Mid Tone range so those areas hit the same point on the waveform.
RGB Parade
The RGB Parade is similar to the Luma Waveform, but it splits the luminance information into 3 channels – red, green and blue. When the 3 channels are at equal levels in the waveform, you know you have a neutral white balance.
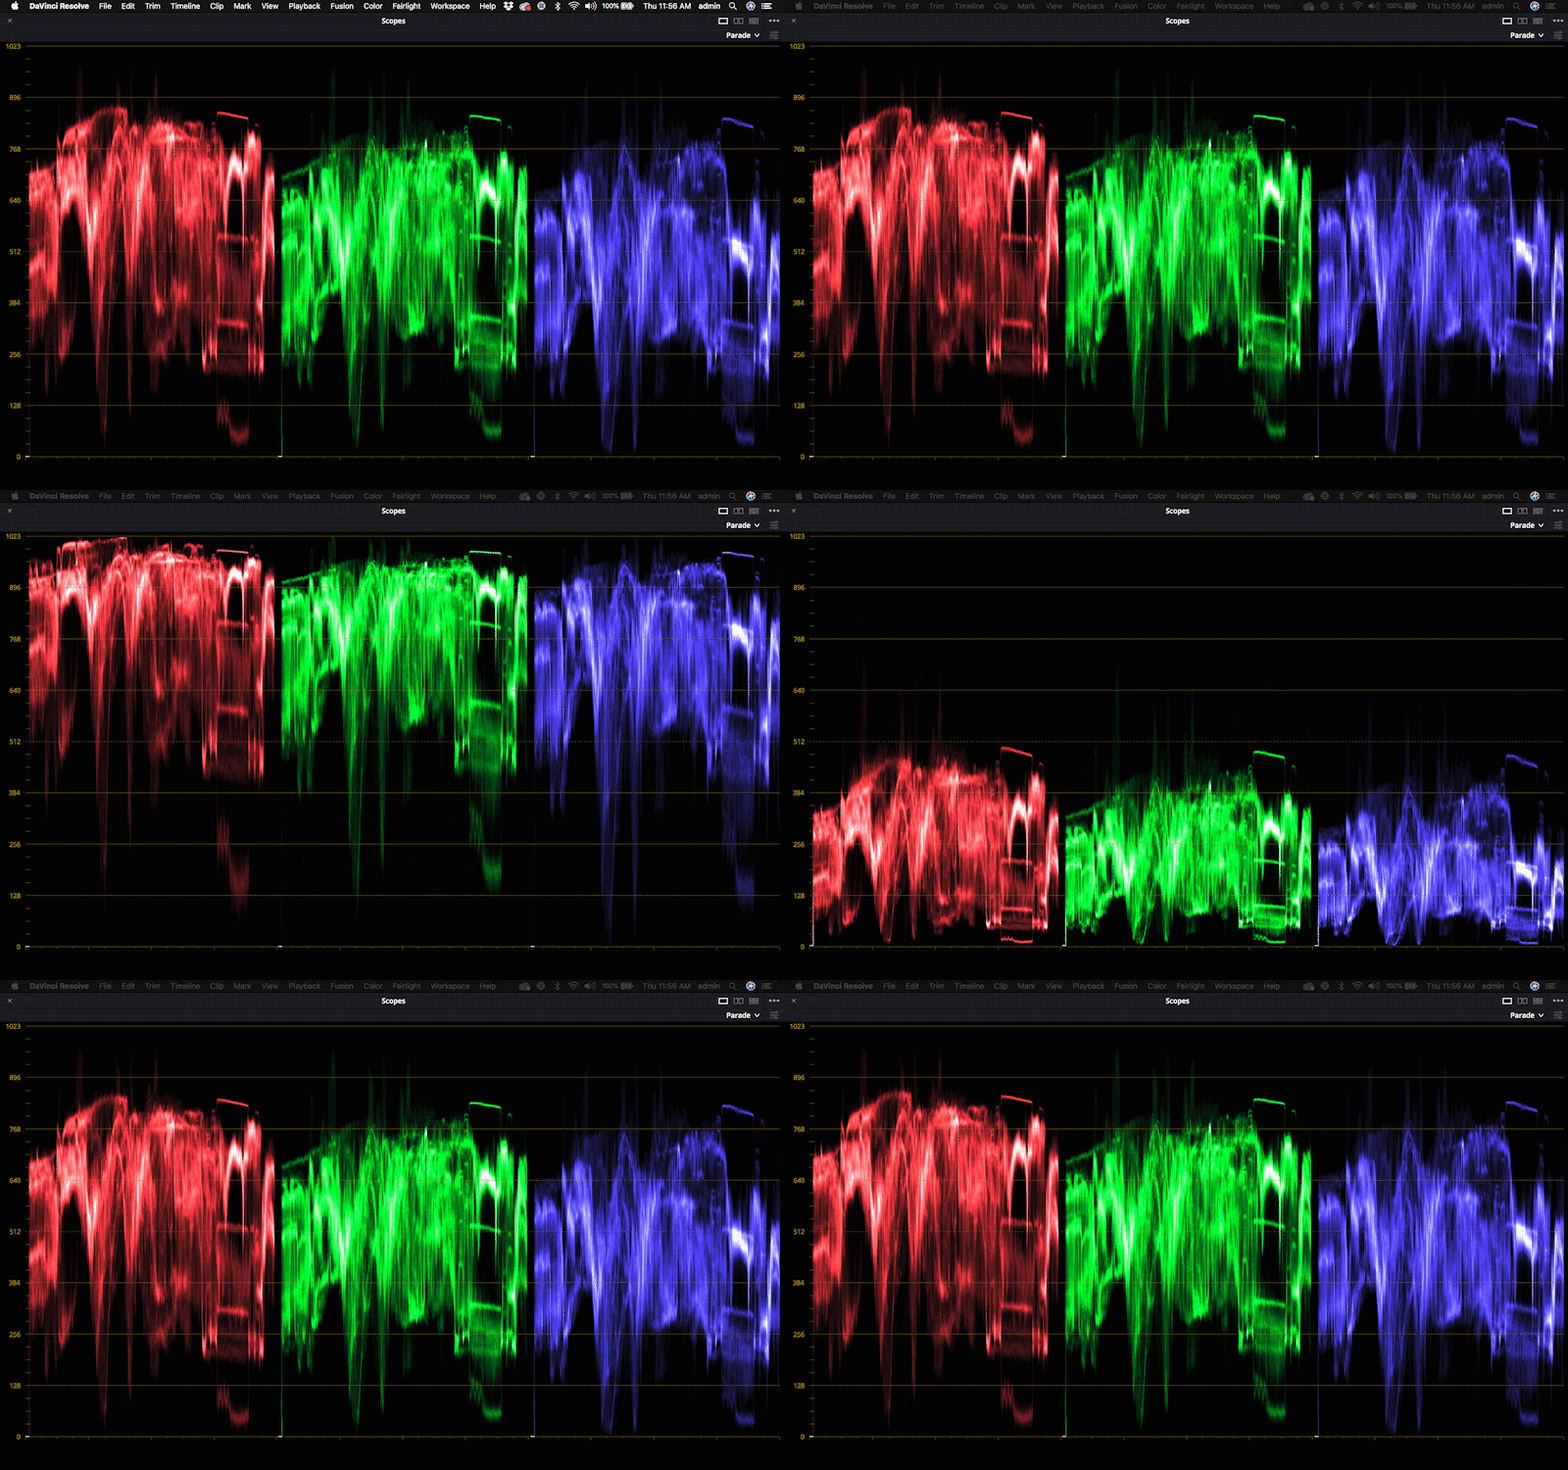
If one channel is higher than the others, you know that color is brighter in your image. You can use the White Balance and Tint sliders, and the Color Wheels in the Secondary Controls, to adjust the balance between the three channels to make sure your images have a similar color balance.
Example: if the image you are matching to has a large amount of blue in the shadows (represented by a strong concentration of blue at the bottom of the Blue channel), make sure the image you’re matching has the same distribution.
Vectorscope
The vectorscope is a circular plot of the hue and saturation values in your image. Around the edge of the circle are boxes which represent the primary colors. Lines extend from the centre of the circle to edges – the closer to the edge, the more saturated that color is in the image.
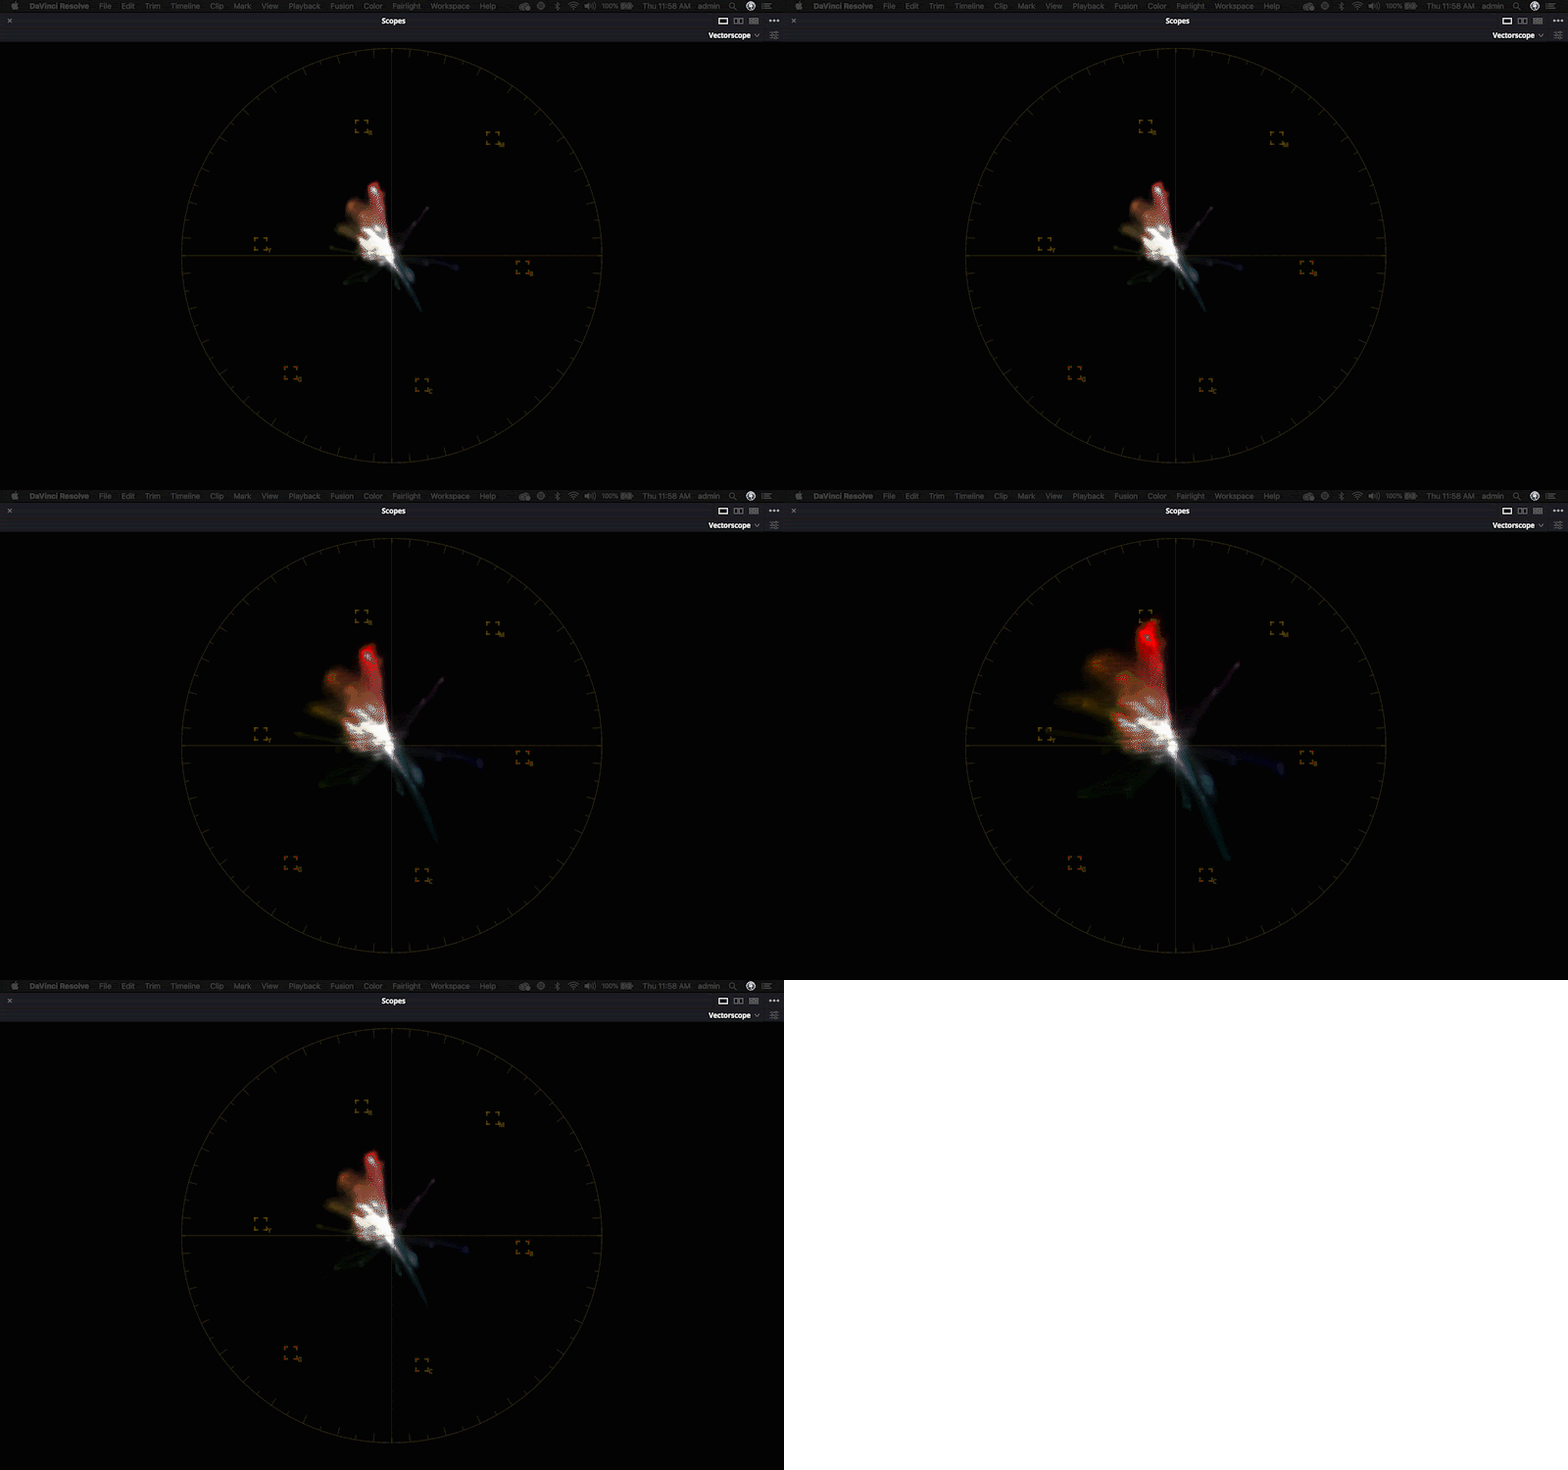
The vectorscope also contains a helpful skintone indicator. You can use this line to help align the skintone of your subject on both A-Cam and b-cam clips to ensure you have well-matched colors. Use the mask tool in Premiere to create a temporary mask on a person’s face to see clearly on the vectorscope where the skin falls on the hue line.
OpenFX Overlay
The OpenFX overlay contains the tools that help you finish off your match.
As soon as you apply CineMatch to a node you will see the OpenFX Overlay appear on your preview window. You can toggle the Overlay on and off by using the OpenX Overlay button at the bottom left-hand corner of the Preview window, and you can minimize the overlay or make the background transparent using controls in the overlay.
Tip: The OpenFX controls work great with the Full Page Viewer mode as you still have access to the controls on a bigger preview window. You can turn on the Full Page Viewer mode by going to Workspace > Viewer Mode > Full Page Viewer.
H/S/L Match Refinement OpenFX Overlay
The HSL Curves are designed to help you correct for any differences in your scene that the sensor match cannot accommodate. Most commonly, this will be differences introduced by a lens or the shooting conditions on the day.
Switch to Image Wipe so you can see an example of the color in both images that you would like to tweak.
Use the Source eyedropper to select the color in the image you wish to adjust. This will create 3 points on the color curve to show you the color you’ve selected.
Use the Target eyedropper to select the color you would like to match to. The HSL tool will automatically try to align these two colors using Hue and Saturation.
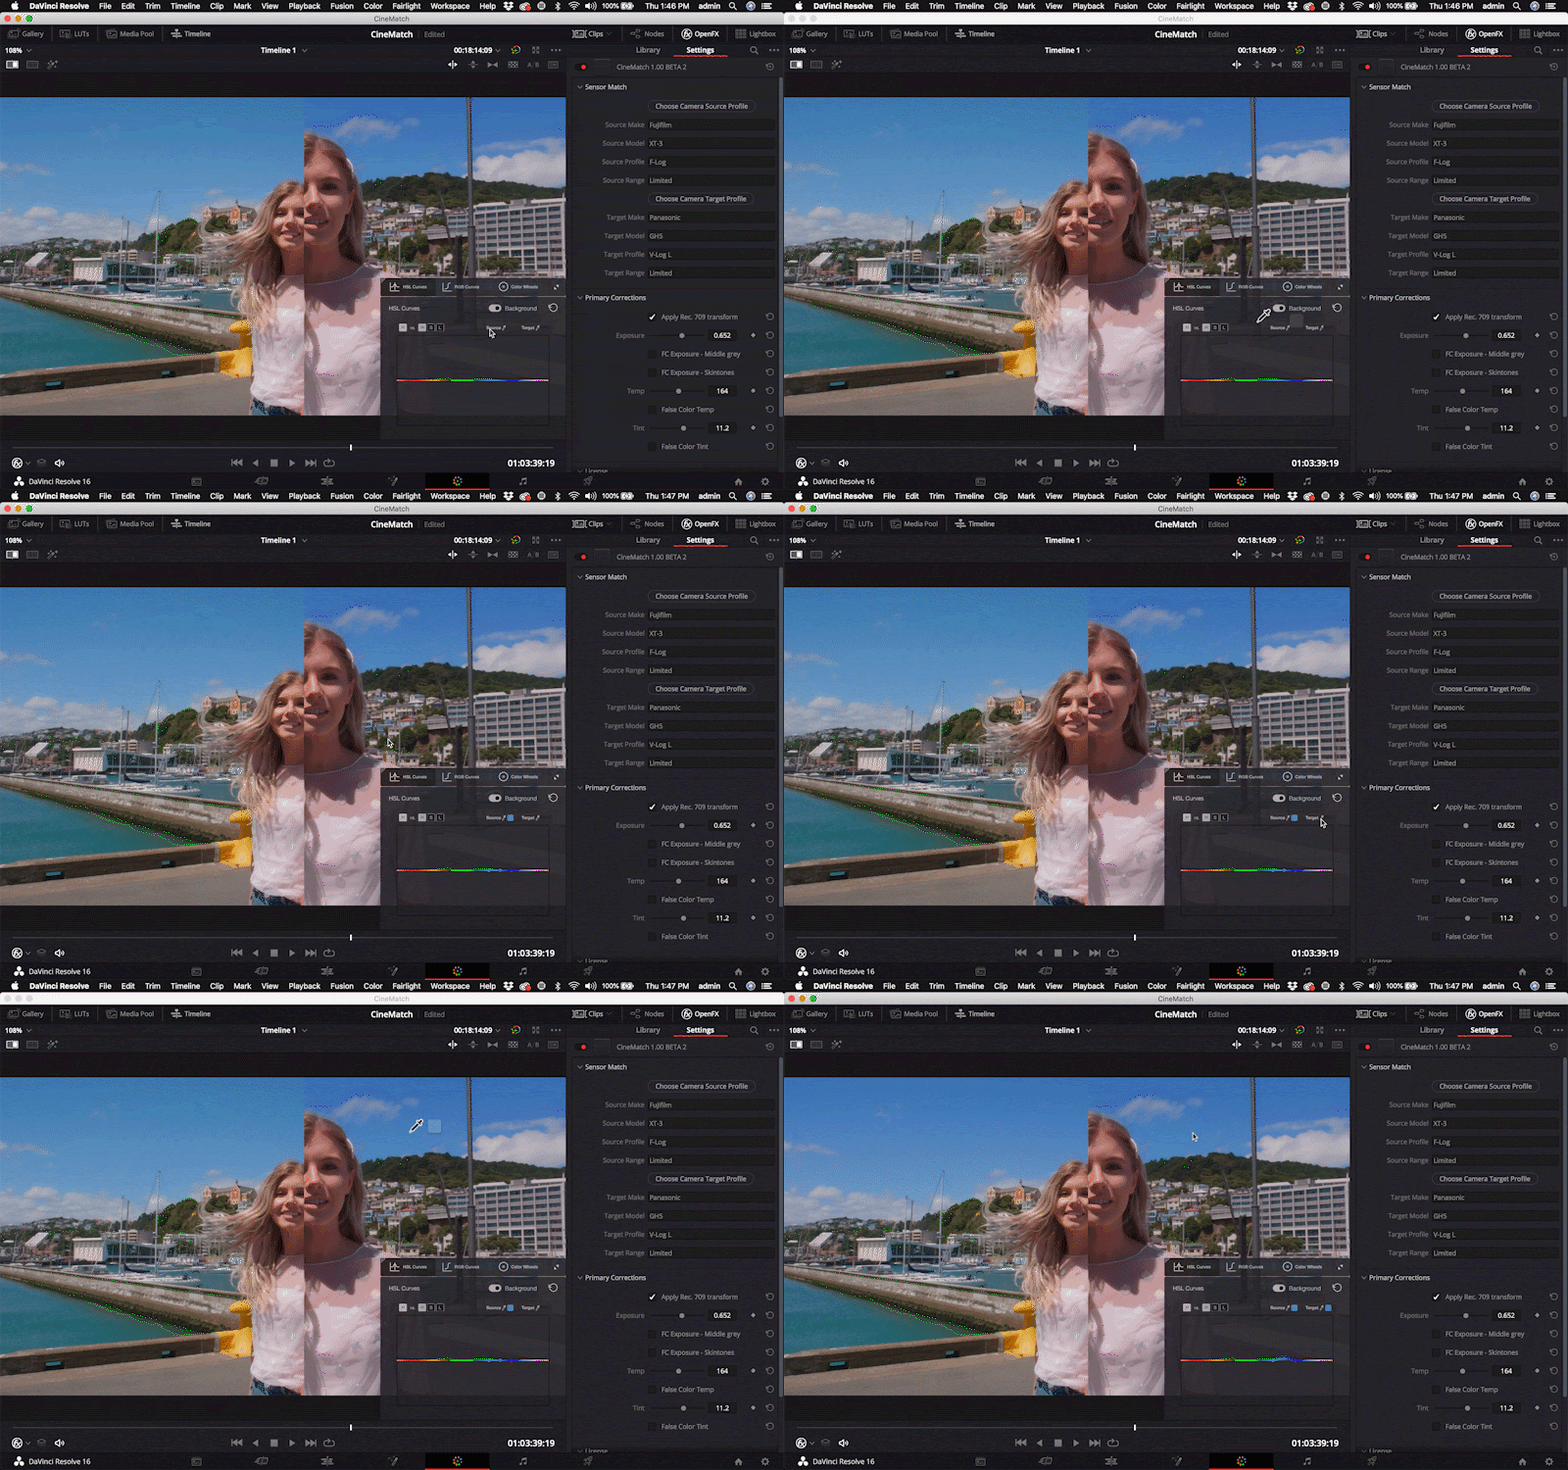
You can refine the adjustment by clicking on the curve points and dragging them around to reshape the curve. The colors on the axes will show you the direction of your adjustments.
The dimmed line will show what changes have been made on the other two curves not currently selected.
There are 3 curves you can adjust – Hue vs. Hue, Hue vs. Saturation, and Hue vs. Lightness. Click the letter icon to switch between the different curves.
Hold down the Shift key to lock your adjustment to the vertical axis.
To remove a point on the curve, double-click the point. You can reset all the points on the curve with the Reset button.
Secondary Color Corrections
After Sensor Match and Primary Corrections, you should be in good shape with your match. CineMatch provides several tools for tweaking your image further in the OpenFX Overlay.
The RGB Curves control allows you to modify the brightness and contrast of your image by plotting the brightness of individual color bands. Click to add points on the curve – dragging downwards will darken that image represented by the curve, pushing the point up will brighten it.
Color wheels allow you to add more of a particular hue to the Shadows, Midtones and Highlights of an image. Use color wheels to neutralize a color cast in the shadows or highlights, or adjust skin tone in the mids.
The Saturation slider modifies the overall saturation of your image.
Uninstalling the plugin and camera packs
Mac OS
To remove the plugin from Mac OS, you’ll need to manually delete the files from your machine using the Finder.
Folders:
Macintosh HD/Library/Application Support/CineMatch
Macintosh HD/Library/OFX/Plugins/CineMatch.ofx.bundle
Windows
To remove the plugin from a Windows machine:
- Select the Start button
- Select Settings > Apps > Apps & features
- Select CineMatch from the list of programs on your machine and select Uninstall
Getting Started
When purchasing your license for CineMatch you will receive an email containing your invoice, installation instructions, and an .fkv file (backup license file).
A user account would have been created under the email address you purchased with, which allows you to activate the plugin, view your license details, and manage which devices are activated. You can reset the password for your account so you can access your license details.
If you are using the free trial of CineMatch, you will be able to use all of the plugin controls, except your footage will remain watermarked until it has been activated.
The first thing you will need to do is make sure you have downloaded and installed the free trial of CineMatch for your editor. Simply fill out the form on our Free Trial page, and your download will begin. Run the installer, and restart your editor to start grading with Nitrate.
- When installing CineMatch for the first time, you'll need to add permission for the plugin to record your screen. This permission is required for the color picker in the plugin to work.
- Under System Preferences > Privacy > Screen Recording, check the box for 'CineMatch' - you may be prompted for your device’s username and password.
- After you've approved the permission request, the installation process will continue.
CineMatch will appear as an effect that can be applied to your clips, either on the timeline or to a master clip.
Add some footage to your timeline, go to the effects tab and find CineMatch by typing "CineMatch” into the search bar. Drag the effect onto your clip to access CineMatch’s controls. Your footage will remain watermarked until activated.
Activating the plugin
Under the ‘Register Plugin’ header, click the ‘Activate License’ button. This will open a pop-up window, where you can enter your account details to login and activate the plugin. If your login does not work, you can select the ‘Use .fkv file’ button to activate the plugin with your .fkv file.
Once your license has been activated, you will see an ‘Activation Successful’ message. Close the pop-up window to begin grading. If you experience issues with your activation, please contact us at support@filmconvert.com
Quick Start Method
For single-camera projects
- Add your clips to the timeline. Leave your footage in Log, don't apply LUTs or make other adjustments
- Add CineMatch from the Effects menu to your clips
- Under the Effects Controls, set the Source settings to match how the footage was shot. Leave the target dropdowns blank, or pick a camera that you want to match to (e.g. Arri Alexa > ARRI LogC)
- Apply the Output Transform, and adjust your exposure, white balance and tint
- Once your clips are balanced, toggle off the Output Transform to begin your creative grade, or leave it on if you're happy with the look
For projects with multiple footage sources that require matching:
- Add two clips you want to match to your timeline. Leave clips in Log, don’t apply LUTs or make other adjustments
- Add CineMatch from the Effects menu to both clips
- Under the Effects Controls, set the Source settings for each clip to match how the footage was shot
- On your first clip, leave the Target blank. On your second clip, set the Target to match the Source of your first clip
- Toggle off the Output Transform, and adjust your exposure, white balance and tint
- Use the HSL Match Refinement tool to modify specific colors which need tweaking to match the target
- Once your clips are matched, toggle off the output transform to begin your creative grade, or leave it on if you’re happy with the look
That’s it!
Full Workflow Guide
CineMatch is a set of color grading tools designed to help you complete tricky color correction tasks, so you can spend more time on the creative side of grading.
The CineMatch workflow includes sensor-matching technology which aligns the color values of your Log footage, RAW-like controls for exposure, white-balance and tint for applying primary corrections, and an intuitive collection of tools for final tweaks. We’ve also included False Color views to help visualize the color information in your images and guide your corrections.
You can use CineMatch as a single-camera shooter to take advantage of the grading tools that are tailored to your camera, the False Color views and the ability to use LUTs designed for other cameras on your own footage.
If you work on multi-camera projects or projects with footage from multiple sources, the Sensor Match technology in CineMatch will help massively speed up your grading process, so you match footage to a seamless baseline grade in seconds, ready for creative grading.
While CineMatch provides extremely accurate results, it’s unlikely you’ll get a 100% perfect match just by dropping the plugin on your footage. Even with perfectly balanced footage from both cameras, differences in shooting conditions and sometimes the materials present in the scene can throw off the sensor match.
However, if you follow good shooting practices and the steps below, CineMatch will significantly speed up your workflow for matching footage from multiple sources, giving you more time to spend on the creative side of your grading.
Shooting for the match
To ensure your best chances of getting well-matched footage, try to follow good shooting principles:
- Shoot in a Log or RAW picture style. This will maximize the dynamic range able to be captured by your camera, and give CineMatch the most data to work with. Most modern cameras and monitors will allow you to apply a display LUT to help you monitor exposure while shooting, but make sure not to bake this in to your footage
- White-balance each camera using a white or grey card. If you don’t have a white or grey card, you can use a phone app to get a light temperature reading and dial that into your camera. Ensuring your camera is capturing the correct white value for your scene’s lighting is essential. Redo your white balance at every new setup or change in lighting
- Don’t adjust too many other parameters in-camera, such as contrast or saturation. CineMatch is designed to accept the camera’s default settings, and may not be able to recover if the image recorded departs wildly from the neutral settings.
- Shoot a few seconds of a chart on both cameras. If you can get a common reference in both shots, it will give you a much better idea of what the colors looked like on the day
Terms to know: A-Cam and b-cam footage
On most projects, you’ll have a primary or “hero” camera that will be the source of most of your footage. We call this your A-Cam footage.
Then, you will have additional “b-cam” or “b-roll” footage, shot on a second camera, drone, action cam, or archival footage.
Think about the various footage sources you have in your project, and pick which will be the “target” for your matching. Normally this will be the camera you shot on for the majority of the project, to minimize the amount of matching you have to do.
Example: if 80% of your footage is shot in S-Log3, and you have some additional V-Log footage you’d like to match, you’ll apply CineMatch to your V-Log clips, with the Source set to V-Log and the Target set to S-Log3. For other camera sources in your project, you’ll set the Source to match how the footage was shot, and the Target to S-Log3 as well.
Selecting Source and Target Cameras
CineMatch is designed to work on Log footage straight from the camera. Don’t apply any other LUTs or corrections to the clip before CineMatch, or else the matching engine won’t be able to apply the correct transformation.
On each clip, simply tell the plugin what profile you shot in (Source) and what profile you want to convert it to (Target).
Example: to match S-Log3 SGamut.Cine footage from the Sony A73 to C-Log2 from the Canon C200, choose the following settings:
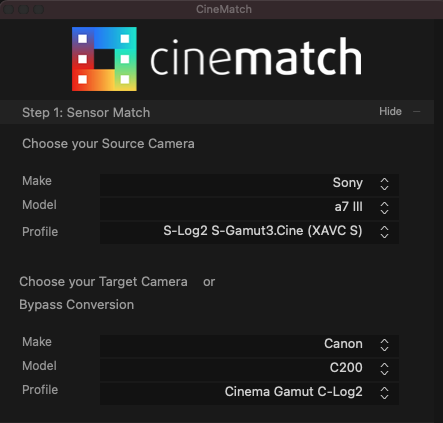
Apply CineMatch to all your b-cam clips the same way. You can copy and paste the effect, or apply it at the Master Clip level if you’ve got several instances of the clip in your project.
Do I need to apply CineMatch to my A-Cam footage?
We recommend adding CineMatch to your A-Cam clips as well. To do this, drag CineMatch onto the A-Cam clip, specify the Source camera settings, but leave the Target Camera Settings blank.
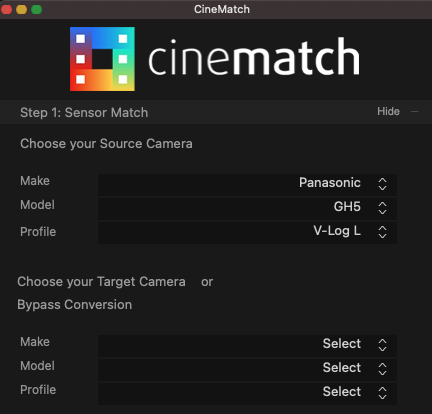
The Primary Corrections in CineMatch are customized to the response curve of your camera, so you will get more accurate and intuitive results with the CineMatch controls than the generic sliders in your editor.
The CineMatch controls operate on the underlying Log footage, even with the REC.709 transform applied, so you can make corrections without fear of clipping your footage.
Do I need to apply CineMatch to my A-Cam footage?
If you’re starting with RAW footage (e.g. .R3Ds, BMFilm, Canon Raw Lite etc), you’ll need to debayer it to a Log source that CineMatch supports first. Consult the software provided by your camera manufacturer to debayer the footage before you apply CineMatch.
Working in a REC.709 Project

If you intend to export in REC.709, apply the REC.709 Output Transform to view your footage in a REC.709-compatible space.
Working in an HDR Project
If you are targeting an HLG or PQ profile (e.g. Canon C70 > PQ REC.2020 Neutral, Sony A7SIII > HLG3 REC.2020, etc), and you're working in a corresponding HDR project, use CineMatch as normal but leave the Output Transform box unchecked, as Final Cut Pro will handle the output transform automatically.
For other Log targets, apply the CineMatch Output Transform that matches your project settings (e.g HLG or PQ) to get the correct viewable image.
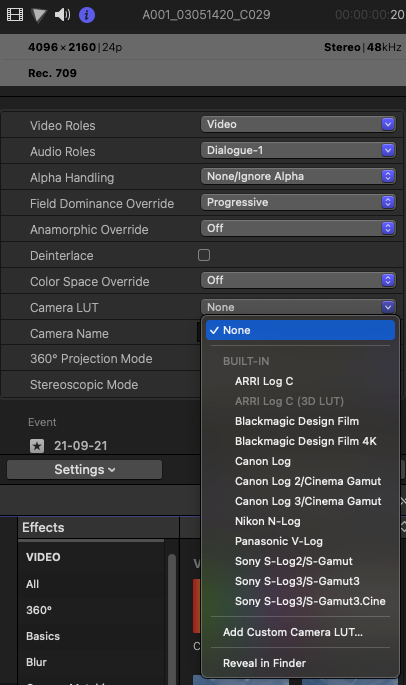
Remove Camera LUT
For certain footage codecs, Final Cut Pro will automatically apply a camera LUT to convert your footage to their viewing space. CineMatch has its own conversion built-in, so if your match results don't look right, make sure that the camera LUT is not applied to your clip:
- Select the clip and go to the Inspector
- Next to the Camera LUT label, make sure the selection is set to 'None'
Advanced Settings
Limited vs. Full Data Range
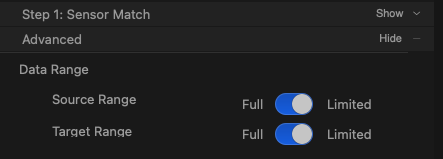
By default, the CineMatch profile you use will be applied using the data range native to the in-camera setting.
However, if your footage has been transcoded or recorded to an external device, this can change the data range for your footage, so CineMatch won’t interpret the footage correctly.
The Data Range tool allows you to specify the data range of your footage. If your contrast doesn’t look right after applying CineMatch and making your primary corrections, try switching the Data Range.
Sensor Match + Color Space Transform or Color Space Transform

CineMatch gives you two options for matching your footage.
The Sensor Match + Color Space Transform uses our detailed camera sensor knowledge to align the color values of your footage between your source and target cameras prior to applying the color space transform. You should use this option by default, as it will give you the most accurate match results.
If you just want to work in the color space of the target camera without applying the Sensor Match, select 'Color Space Transform'.
Compare two video frames in Final Cut Pro
Final Cut Pro has a handy comparison viewer next to the main viewer that lets you compare any two frames of video side by side - perfect for checking the match between clips with CineMatch.
To show the Comparison view in Final Cut Pro, click Window > Show in Workspace > Comparison Viewer.
The comparison viewer appears next to the main viewer.
Note: You can’t show the comparison viewer and the event viewer at the same time.
Timeline View Mode
In Timeline View mode, you can quickly compare a frame in your project with a frame from the previous or next clip in the timeline. As you move the playhead in the timeline, the comparison viewer updates automatically to show either the last frame of the previous clip or the first frame of the next clip.
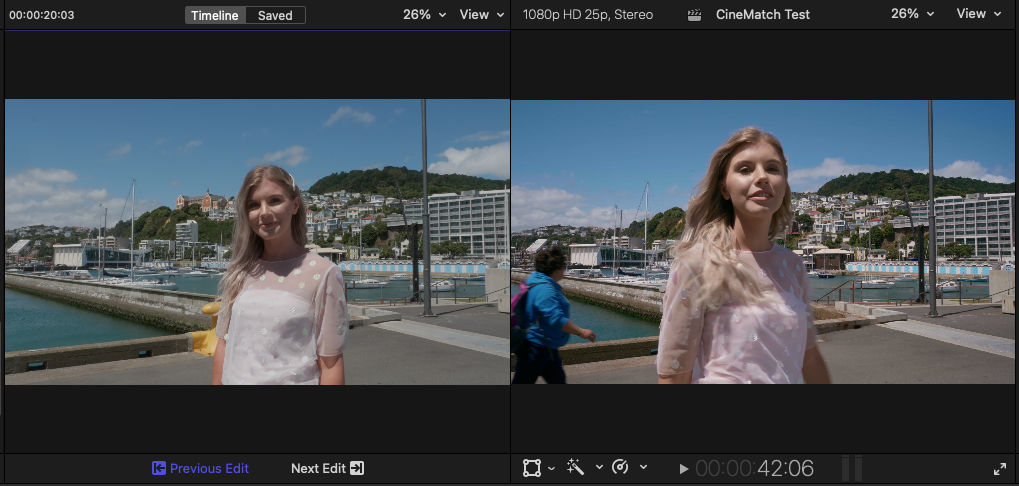
The Previous Edit and Next Edit buttons in the comparison viewer’s Timeline mode let you quickly compare a frame in the timeline with frames in adjacent clips. This is particularly useful for color correcting a series of shots in a scene that requires continuity in color and exposure.
- Click the Timeline button at the top of the comparison viewer.
- In the timeline, position the playhead on the frame you want to compare to a frame in an adjacent clip.
- The video frame appears in the viewer.
To choose which frame appears in the comparison viewer, click Previous edit or Next Edit at the bottom of the comparison viewer.
Saving Frames for comparison
In Saved mode, you can use the comparison viewer with a frame browser that shows thumbnails of your saved frames. You can save up to 30 frames from anywhere in your project or library, and you can display saved frames in the comparison viewer with just a click.
This is perfect for comparing "hero" shots from throughout your project to ensure your color correction is consistent across the entire project.
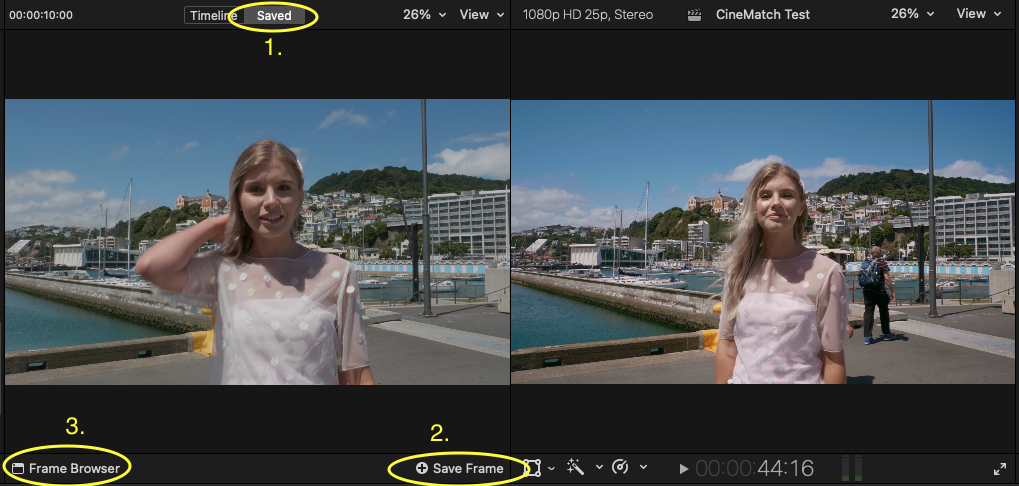
In Final Cut Pro, show the comparison viewer next to the viewer by choosing Window > Show in Workspace > Comparison Viewer (or pressing Control-Command-6).
- Click the Saved button at the top of the comparison viewer.
- In the timeline or the browser, position the playhead on the frame you want to save to the comparison viewer, then click the Save Frame button in the lower-right corner of the comparison viewer to load it in the comparison viewer and save a copy to the frame browser.
In the timeline or the browser, position the playhead on the frame you want to compare with, so that it appears in the viewer.
When the frame browser reaches 30 saved frames, the oldest image will be deleted to make room for newly saved frames. You can access saved frames from any project in the current library, but they are not available across libraries.
Display video scopes in the comparison viewer
You can display video scopes in the comparison viewer, just as you can in the main viewer.
In Final Cut Pro, show the comparison viewer next to the viewer by choosing Window > Show in Workspace > Comparison Viewer (or pressing Control-Command-6).
In the upper-right corner of the comparison viewer, choose View > Video Scopes, or press Command-7 while the comparison viewer is active.
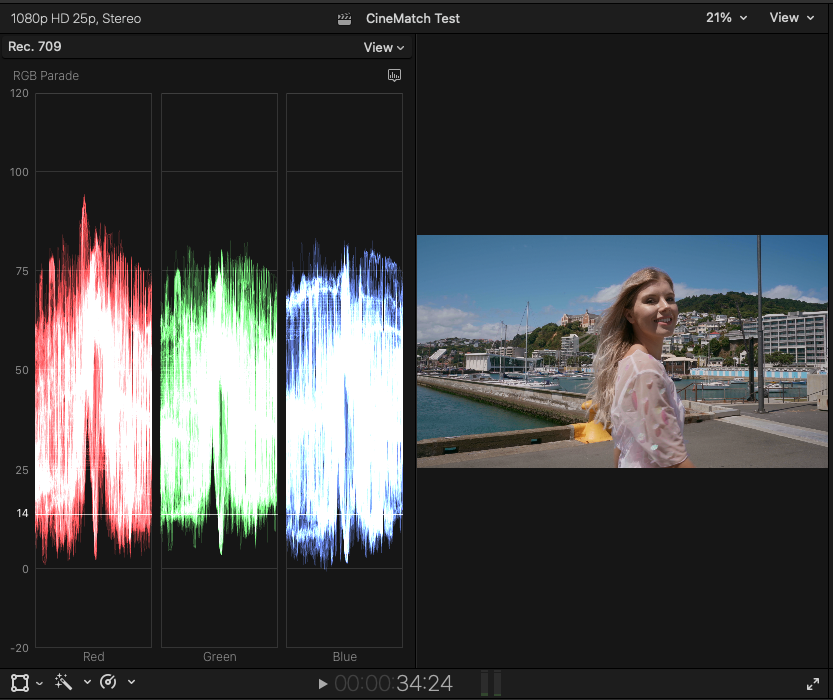
Primary Corrections
Once you’ve applied the correct sensor settings, you will be looking at two Log images for your A-cam and b-cam clips, matched to a single Log picture style.
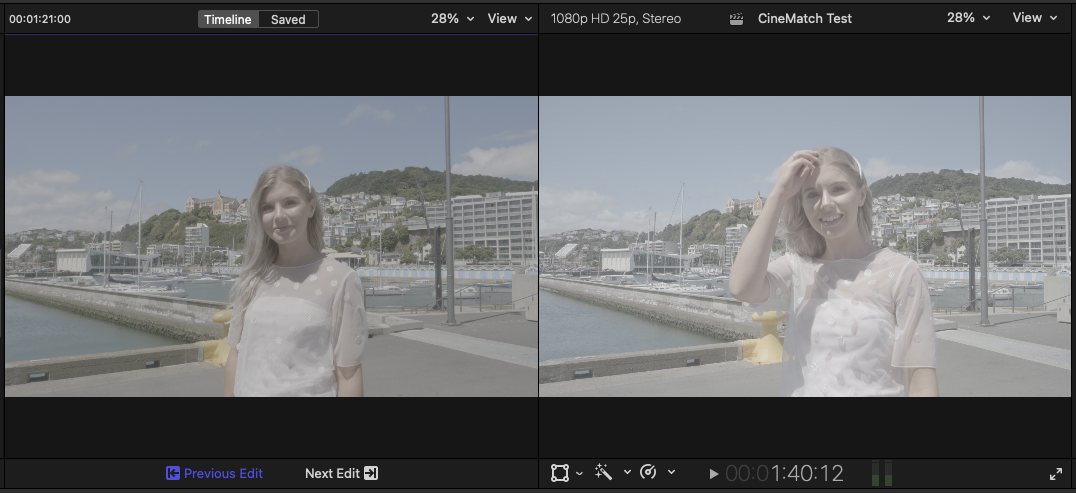
Use the exposure control to match your exposure across the two shots. It’s best to use the Luma Waveform in your scopes to match exposure – ideally, you’ll have an object in both frames which should be exposed to the same level, such as a person’s face.
Apply Output Transform
We’ve added some optional transforms in the primary corrections so you can view your footage in the following color managed spaces:
This includes options for:
- REC.709
- REC.2100 HLG
- REC.2100 PQ

This transform makes your image viewable in your chosen space but you can still use the Primary Controls in Log so you’re not losing any color information to clipping.
Alternatively, you can leave your images in Log and apply your favorite creative LUT (or FilmConvert) as an Adjustment Layer over your entire timeline.
False Color Guide
CineMatch includes several False Color Guides to help evaluate your images.
Exposure – Middle Grey
Green is mapped to the 18% reflectance middle grey point for your camera's profile. Pick the area of the image you would like to expose in the mid-range, and with the false color applied, move the exposure slider until this area appears green.
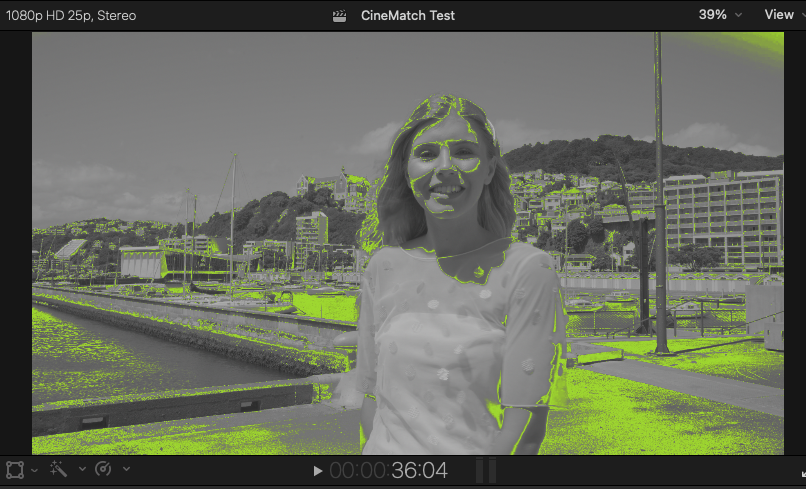
In Comparison View, adjust the exposure in both shots so that the green lines up in the same area. This will ensure that area is exposed at the same level.
Exposure – Skin tones
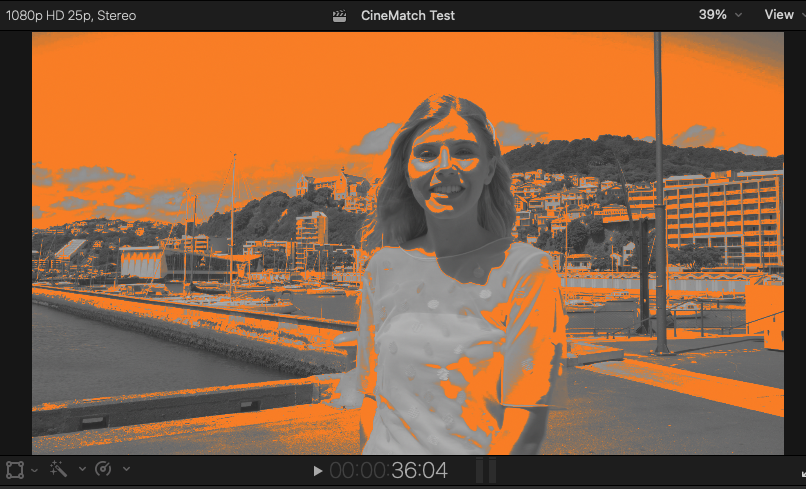
This False Color view maps orange to a common exposure for skin tones.
Temperature
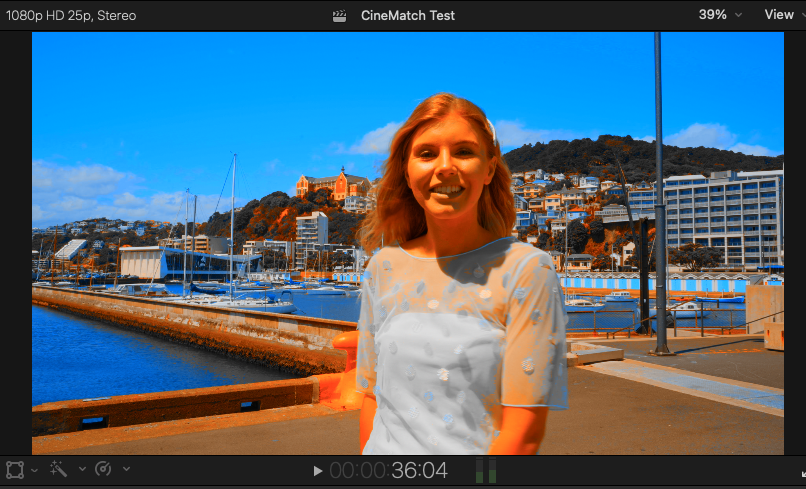
This has been designed to help you visualize where the balance in temperature lies within your image. All warm elements are mapped to orange and all cool elements are mapped to blue. To ensure an element in your scene is a neutral color, adjust the temperature slider until it displays as grey.
This also works in Comparison View to quickly identify if two shots are balanced with each other.
Tint
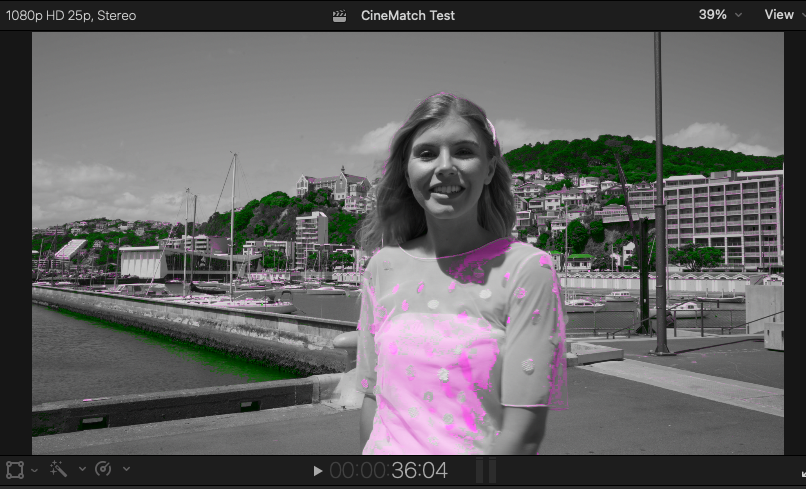
This false color guide shows all of the green and magenta elements of your image. Like the Temperature false color, you should identify a part of your image that you would like to be neutral and move the tint slider until that area is grey. This also can be used in Comparison View to quickly identify if your shots are balanced with each other.
Using scopes for camera matching
Scopes are a powerful tool for visualizing the color and light information in your images.
Scopes work by plotting the visual pixel information from your footage numerically, so you can “read” the image the way you would read a chart or graph.
Scopes can help you analyze particular issues or aspects of a picture, and are very helpful for camera matching, as you can often see differences on scopes that will be hard to spot on the program monitor.
Scopes can also be used when you’re using Comparison View, so you can analyze the color information in both images simultaneously – perfect for balancing exposure, white points and color temperature.
Below are descriptions of the three main scopes that will be helpful for camera matching. For more information on reading scopes, check out Ollie Kenchington’s Introduction to Scopes article on the FilmConvert Color Hub.
Turning on Scopes in Final Cut Pro
Enable the Video Scopes in Final Cut Pro by clicking on View > Show in Viewer > Video Scopes.
Luma Waveform
The Luma Waveform plots the luminance (or brightness) of the pixels in your image, with the brightest at the top and the darkest at the bottom. If the Luma Waveform shows a big cluster of information towards the top of the waveform, it means a lot of your picture contains very bright pixels.
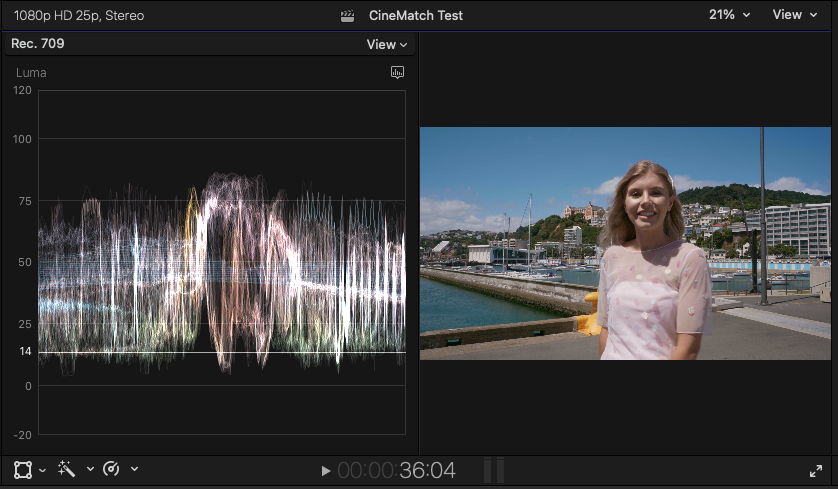
When you use the Exposure control, you will see the entire Luma Waveform shift up and down as you make pixels brighter or darker.
You can align the luminance values of specific ranges in your image (highlights, midtones and shadows) using the Curve controls, Levels, or the sliders underneath each Color Wheel.
For camera-matching, try to match the white point and black point of your images by making sure they hit around the same point on the waveform. Then identify the key part of the image that needs to be the same exposure (e.g. a person’s face) and adjust the Midtone range so those areas hit the same point on the waveform.
RGB Parade
The RGB Parade is similar to the Luma Waveform, but it splits the luminance information into 3 channels – red, green and blue. When the 3 channels are at equal levels in the waveform, you know you have a neutral white balance.
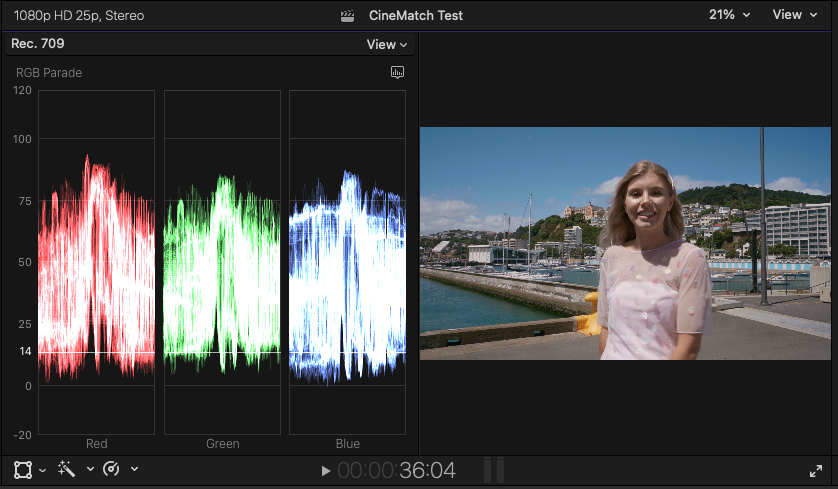
If one channel is higher than the others, you know that color is brighter in your image. You can use the White Balance and Tint sliders, and the Color Wheels in the Secondary Controls, to adjust the balance between the three channels to make sure your images have a similar color balance.
Example: if the image you are matching to has a large amount of blue in the shadows (represented by a strong concentration of blue at the bottom of the Blue channel), make sure the image you’re matching has the same distribution.
YUV Vectorscope
The YUV vectorscope is a circular plot of the hue and saturation values in your image. Around the edge of the circle are boxes which represent the primary colors. Lines extend from the centre of the circle to edges – the closer to the edge, the more saturated that color is in the image.
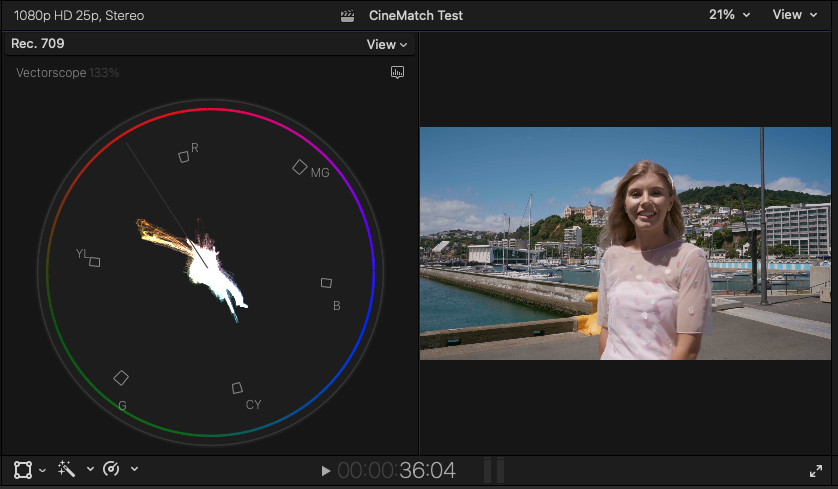
The vectorscope also contains a helpful skintone indicator. You can use this line to help align the skintone of your subject on both A-Cam and b-cam clips to ensure you have well-matched colors. Use the mask tool in Final Cut to create a temporary mask on a person’s face to see clearly on the vectorscope where the skin falls on the hue line.
H/S/L Match Refinement
The HSL tools are designed to help you correct for any differences in your scene that the sensor match cannot accommodate. Most commonly, this will be differences introduced by a lens or the shooting conditions on the day.
Switch to Comparison View so you can see an example of the color in both images that you would like to tweak.
Use the Source eyedropper to select the color in the image you wish to adjust. This will create 3 points on the color curve to show you the color you’ve selected.
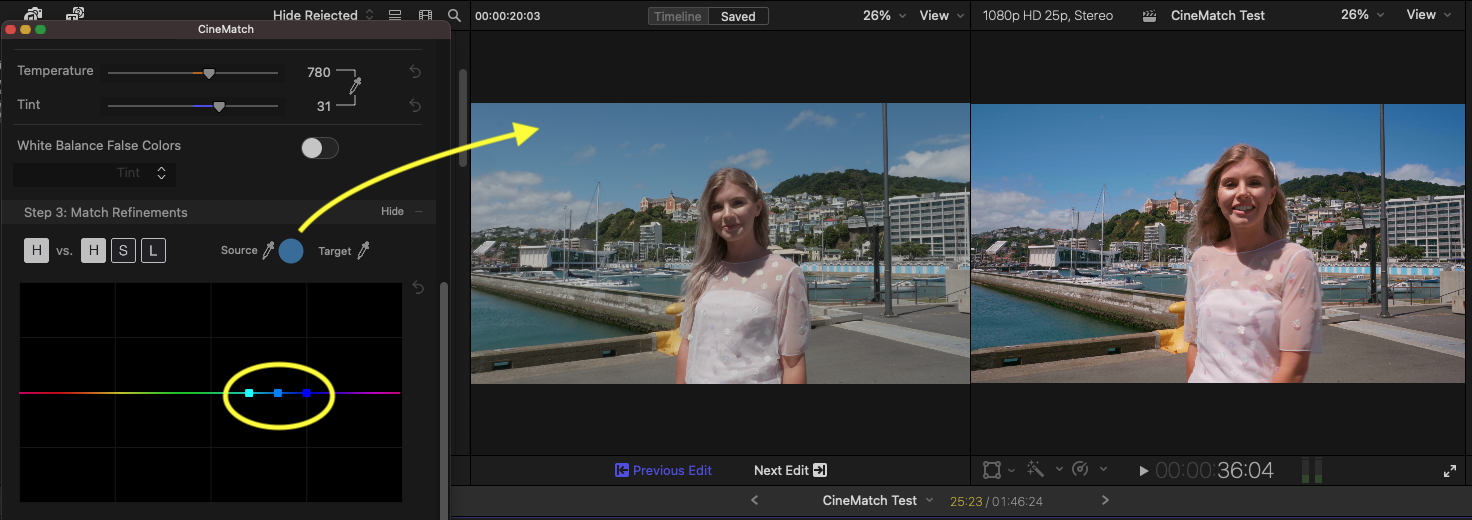
Use the Target eyedropper to select the color you would like to match to. The HSL tool will automatically try to align these two colors using Hue and Saturation.
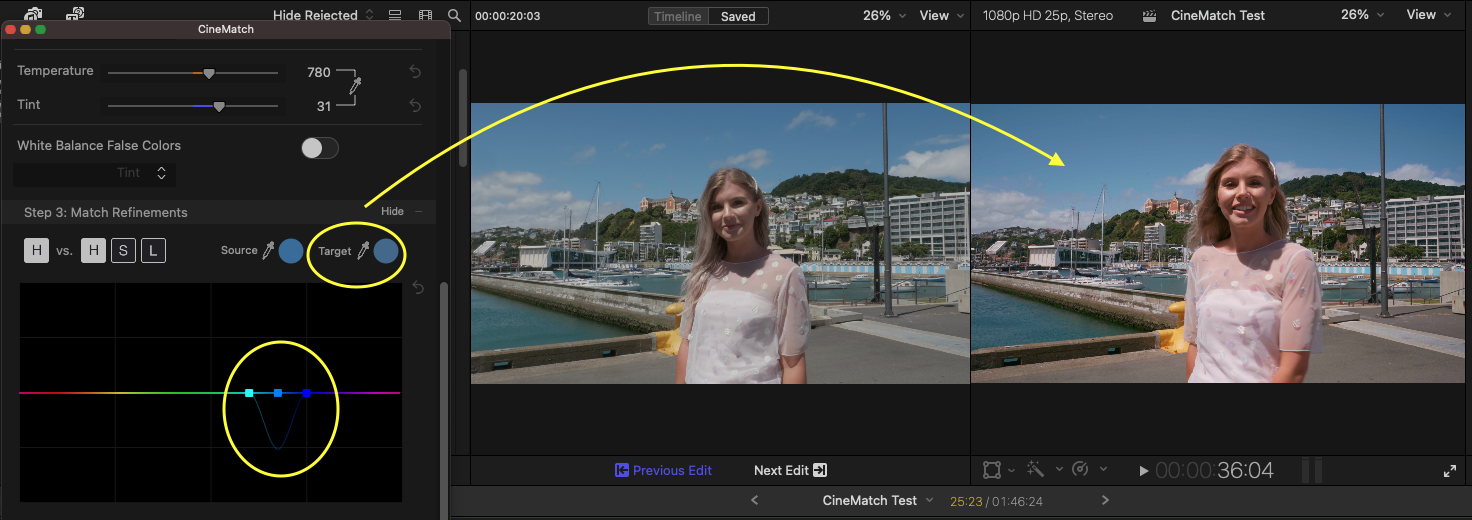
You can refine the adjustment by clicking on the curve points and dragging them around to reshape the curve. The colors on the axes will show you the direction of your adjustments.
The dimmed line will show what changes have been made on the other two curves not currently selected.
There are 3 curves you can adjust – Hue vs. Hue, Hue vs. Saturation, and Hue vs. Lightness. Click the letter icon to switch between the different curves.
Hold down the Shift key to lock your adjustment to the vertical axis.
To remove a point on the curve, double-click the point. You can reset all the points on the curve with the Reset button.
Additional Color Grading Controls
After Sensor Match and Primary Corrections, you should be in good shape with your match. CineMatch provides several tools for tweaking your image further.
Color wheels allow you to add more of a particular hue to the Shadows, Midtones and Highlights of an image. Use color wheels to neutralize a color cast in the shadows or highlights, or adjust skin tone in the mids.
The Saturation slider modifies the overall saturation of your image.
The Curves control allows you to modify the brightness and contrast of your image by plotting the brightness of individual color bands. Click to add points on the curve – dragging downwards will darken that image represented by the curve, pushing the point up will brighten it.
The Levels histogram plots the light values of your image horizontally so you can see the distribution from dark to light. Adjust the handles to change the white point, black point and midpoint of your image.
Exporting a LUT
With the paid version of the plugin, you can export a LUT which will contain all the adjustments you’ve made in the CineMatch plugin. You can use this LUT during shooting, either importing it in-camera or use it on a monitor to help set exposure and white-balance.
At the bottom of the CineMatch plugin settings, by the label Export LUT, click Select Size and choose the size of the LUT you require (consult the manual for your camera or monitor to see what size is compatible).
The LUT will be generated and saved to your Desktop.
Uninstalling the plugin and camera packs
Mac OS
To remove the plugin from Mac OS, you’ll need to manually delete the files from your machine using the Finder.
The CineMatch plugin is located here:
/Library/Plug-Ins/FxPlug


