We’re Here To Help
Installation and Activation Guide

Adobe Premiere Pro Plugin

DaVinci Resolve Plugin

FCPX Plugin

Adobe Lightroom Plugin
We have introduced a new activation system, where you can activate using your Account Details. These accounts are associated with the email address your license was purchased with, and you can reset your password for your account here.
Activating your Plugin
- Download and install the latest version of your selected plugin from here.
- Open Premiere Pro and start a new project, or open a pre-existing project.
- In the Effects panel, search for your chosen plugin and drag the plugin onto a clip in your timeline. You will see a logo appear on your clip as a watermark.
- Under the Effect Controls, find the plugin settings and scroll to the bottom of the settings list.
- Under the ‘Register Plugin’ heading, click the Activate License button. A pop-up window will appear that you can enter your email address and password into.
- You should see a pop up message saying 'Activation Successful!'. Click Ok to close.
If the watermark does not disappear automatically, please try re-rendering your timeline, or adjust one of the sliders to refresh the image.
Uninstalling
For Windows devices, you can uninstall the plugin by going to Settings > Apps > Apps & Features and then searching for plugin name and clicking Remove.
On MacOS, you will need to manually delete the plugin from the following locations:
The following paths can all be found in the Finder, if you press SHIFT+COMMAND+C, and then go to "Macintosh HD”.
Library/Application Support/Adobe/Common/Plug-ins/yourversion/MediaCore
We have introduced a new activation system, where you can activate using your Account Details. These accounts are associated with the email address your license was purchased with, and you can reset your password for your account here.
Activating your Plugin
- Download and install the latest version of your selected plugin from here.
- Open Final Cut Pro and start a new project, or open a pre-existing project.
- In the Effects panel, search for your chosen plugin, and drag the plugin onto a clip in your timeline. You will see a logo appear on your clip as a watermark.
- Under the Effect Controls, find the Hazy settings and scroll to the ‘License’ section of the plugin. Click ‘Select Operation’ and select ‘Activate’.
- A pop-up window will appear that you can enter your email address and password into.
- You should see a pop up message saying 'Activation Successful!'. Click Ok to close.
If the watermark does not disappear automatically, please try re-rendering your timeline, or adjust one of the sliders to refresh the image.
Uninstalling
For Windows devices, you can uninstall the plugin by going to Settings > Apps > Apps & Features and then searching for plugin name and clicking Remove.
On MacOS, you will need to manually delete the plugin from the following locations:
The following paths can all be found in the Finder, if you press SHIFT+COMMAND+C, and then go to "Macintosh HD”.
Library/Application Support/Adobe/Common/Plug-ins/yourversion/MediaCore
We have introduced a new activation system, where you can activate using your Account Details. These accounts are associated with the email address your license was purchased with, and you can reset your password for your account here.
Activating your Plugin
- Download and install the latest version of your selected plugin from here.
- Open DaVinci Resolve and start a new project, or open a pre-existing project.
- In the OpenFX panel, search for your selected plugin, and drag the plugin onto a clip in your timeline. You will see a logo appear on your clip as a watermark.
- Under the Effect Controls, find the plugin settings and scroll to the ‘Export and License’ section of the plugin. Click the Activate License button.
- A pop-up window will appear that you can enter your email address and password into.
- You should see a pop up message saying 'Activation Successful!'. Click Ok to close.
If the watermark does not disappear automatically, please try re-rendering your timeline, or adjust one of the sliders to refresh the image.
Uninstalling
For Windows devices, you can uninstall the plugin by going to Settings > Apps > Apps & Features and then searching for plugin name and clicking Remove.
On MacOS, you will need to manually delete the plugin from the following locations:
The following paths can all be found in the Finder, if you press SHIFT+COMMAND+C, and then go to "Macintosh HD”.
Library/Application Support/Adobe/Common/Plug-ins/yourversion/MediaCore
Hazy Adobe installation and activation guide for macOS
System Requirements
- OS: macOS 10.15 Catalina or later.
Activating your Plugin
To activate Hazy, use your Account Details. Your account is tied to the email address used to purchase your license. You can reset your password here.
Download & Installation
- Close Photoshop, Lightroom Classic, and Lightroom CC if they are currently running.
-
Download and run the latest Hazy macOS installer package here.
Note: The first time you run the installer, your Mac will ask for your computer password to set up a Helper Tool. This is just a standard step that lets the installer automatically place Hazy into your Adobe folders so it's ready to use. - Once the installation is complete, you can safely move the installer file to the Bin.
-
Reopen the Adobe application you want to use.
Note: Adobe applications automatically scan for new plugins when they launch. Reopening them after the installer finishes ensures Hazy is loaded and ready to use.
Photoshop Guide
How to Use Hazy
- Open Photoshop and open an image.
-
In the top menu, choose Filter > Filmconvert > Hazy.
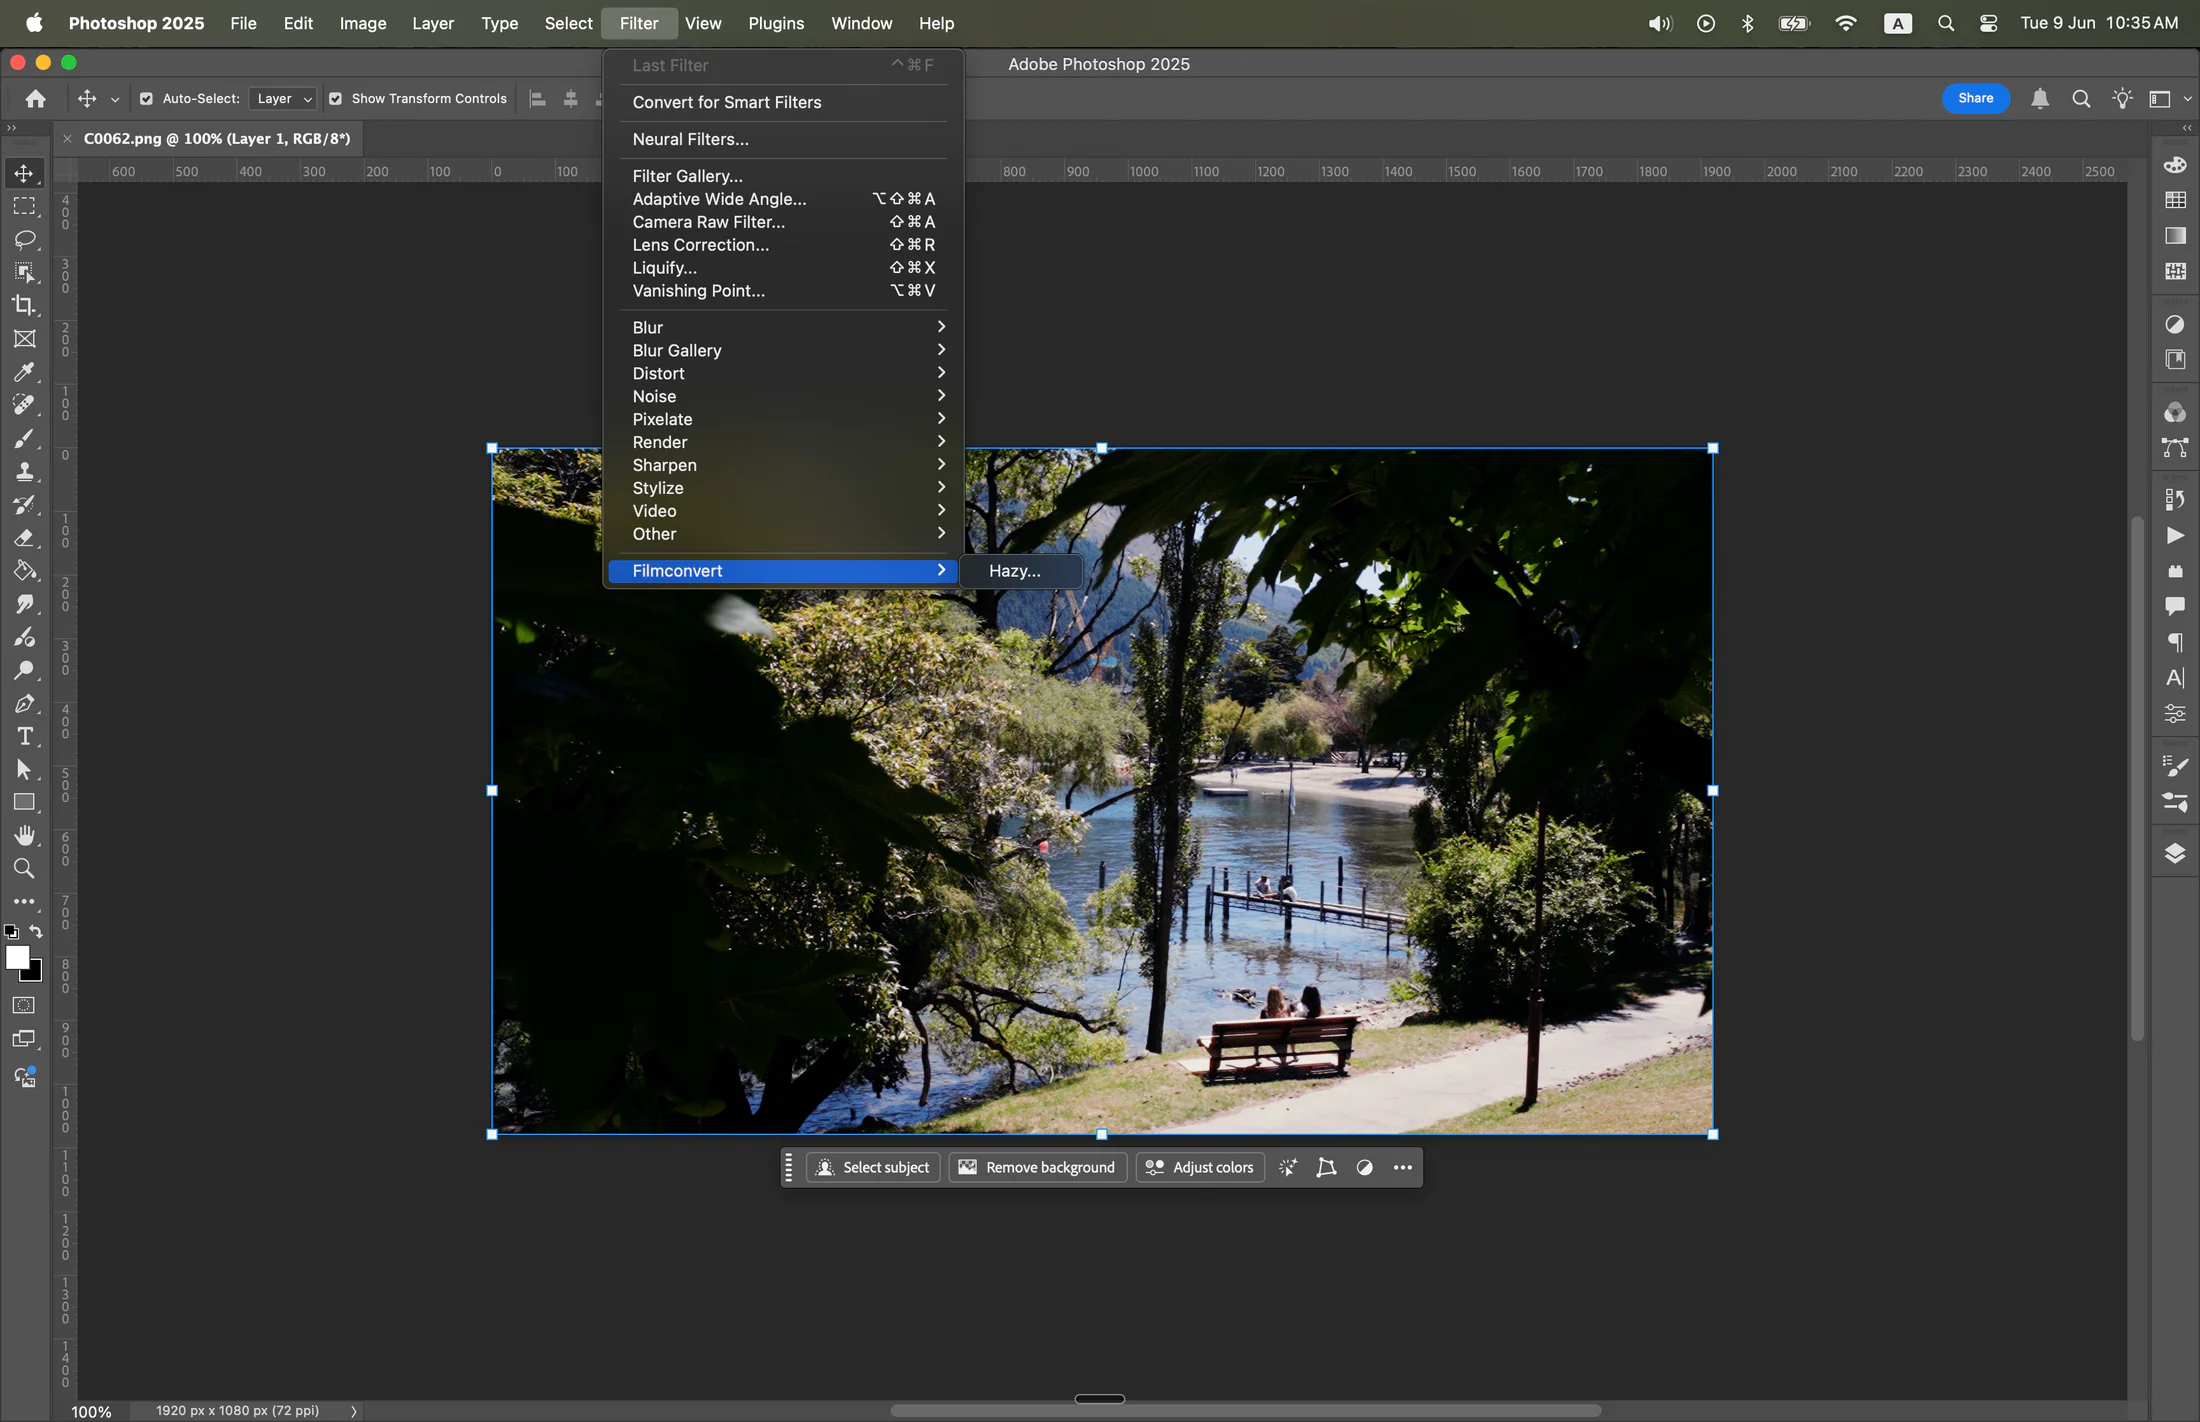
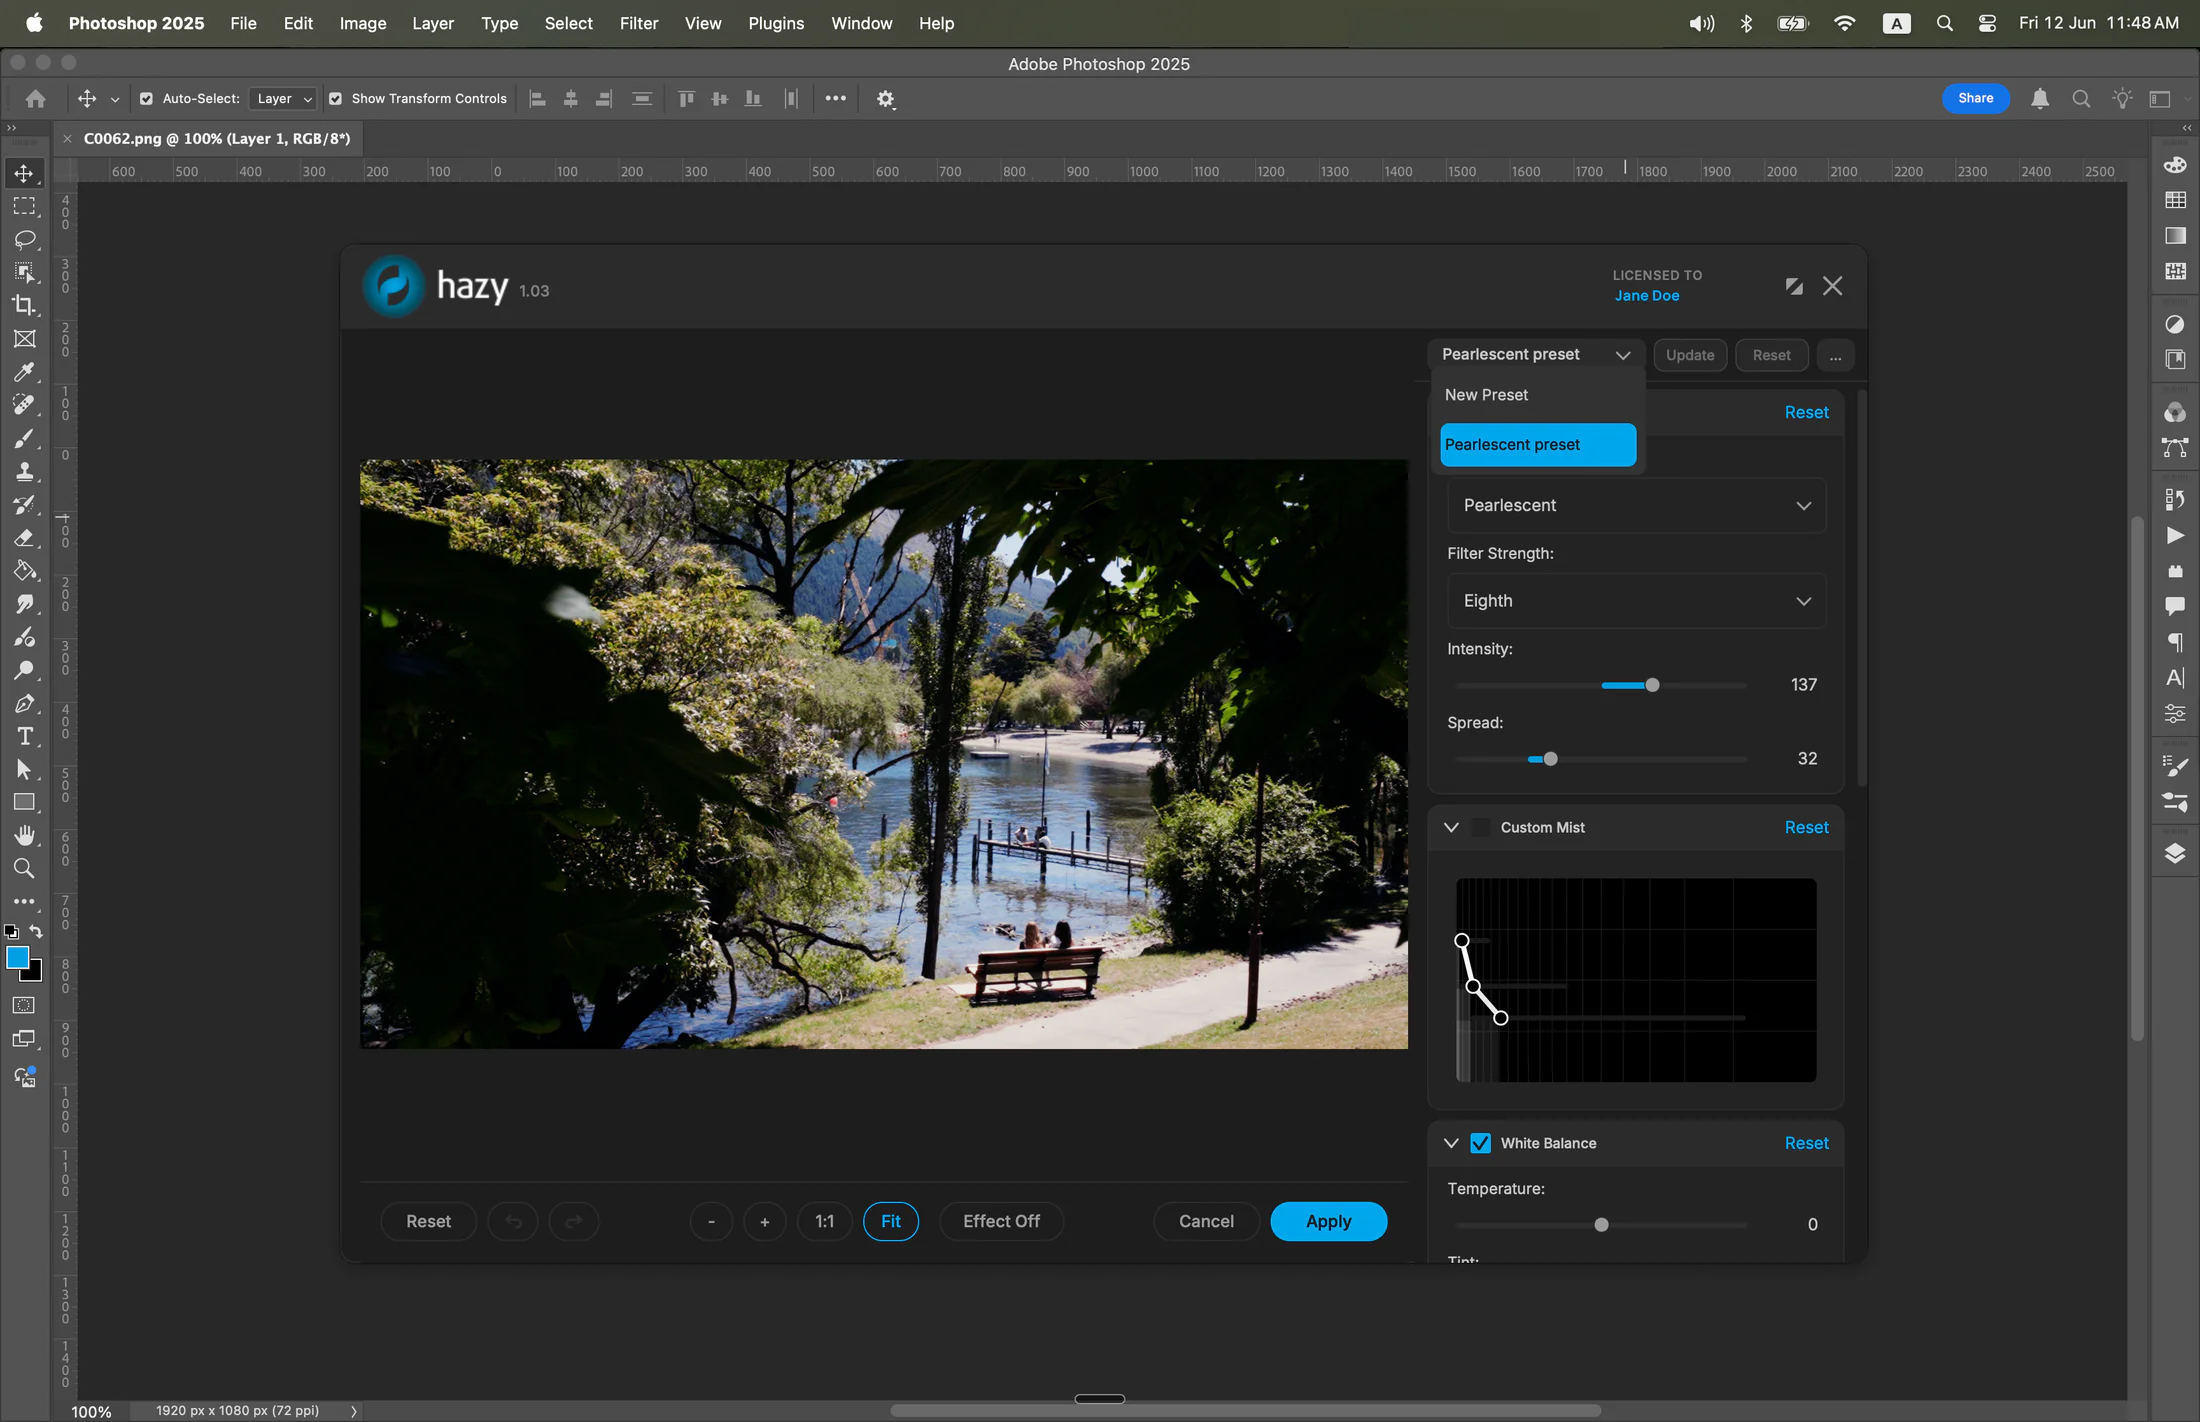
- Edit your image using Hazy’s tools. When you are done, click Apply to save your changes and send the image back to Photoshop, or click Cancel to return without making changes.
Tip: Repeat Last Edit
To quickly reapply your most recent Hazy edit during a session, use Photoshop’s Last Filter command. This processes the image using your previous settings without the need to reopen the Hazy interface.
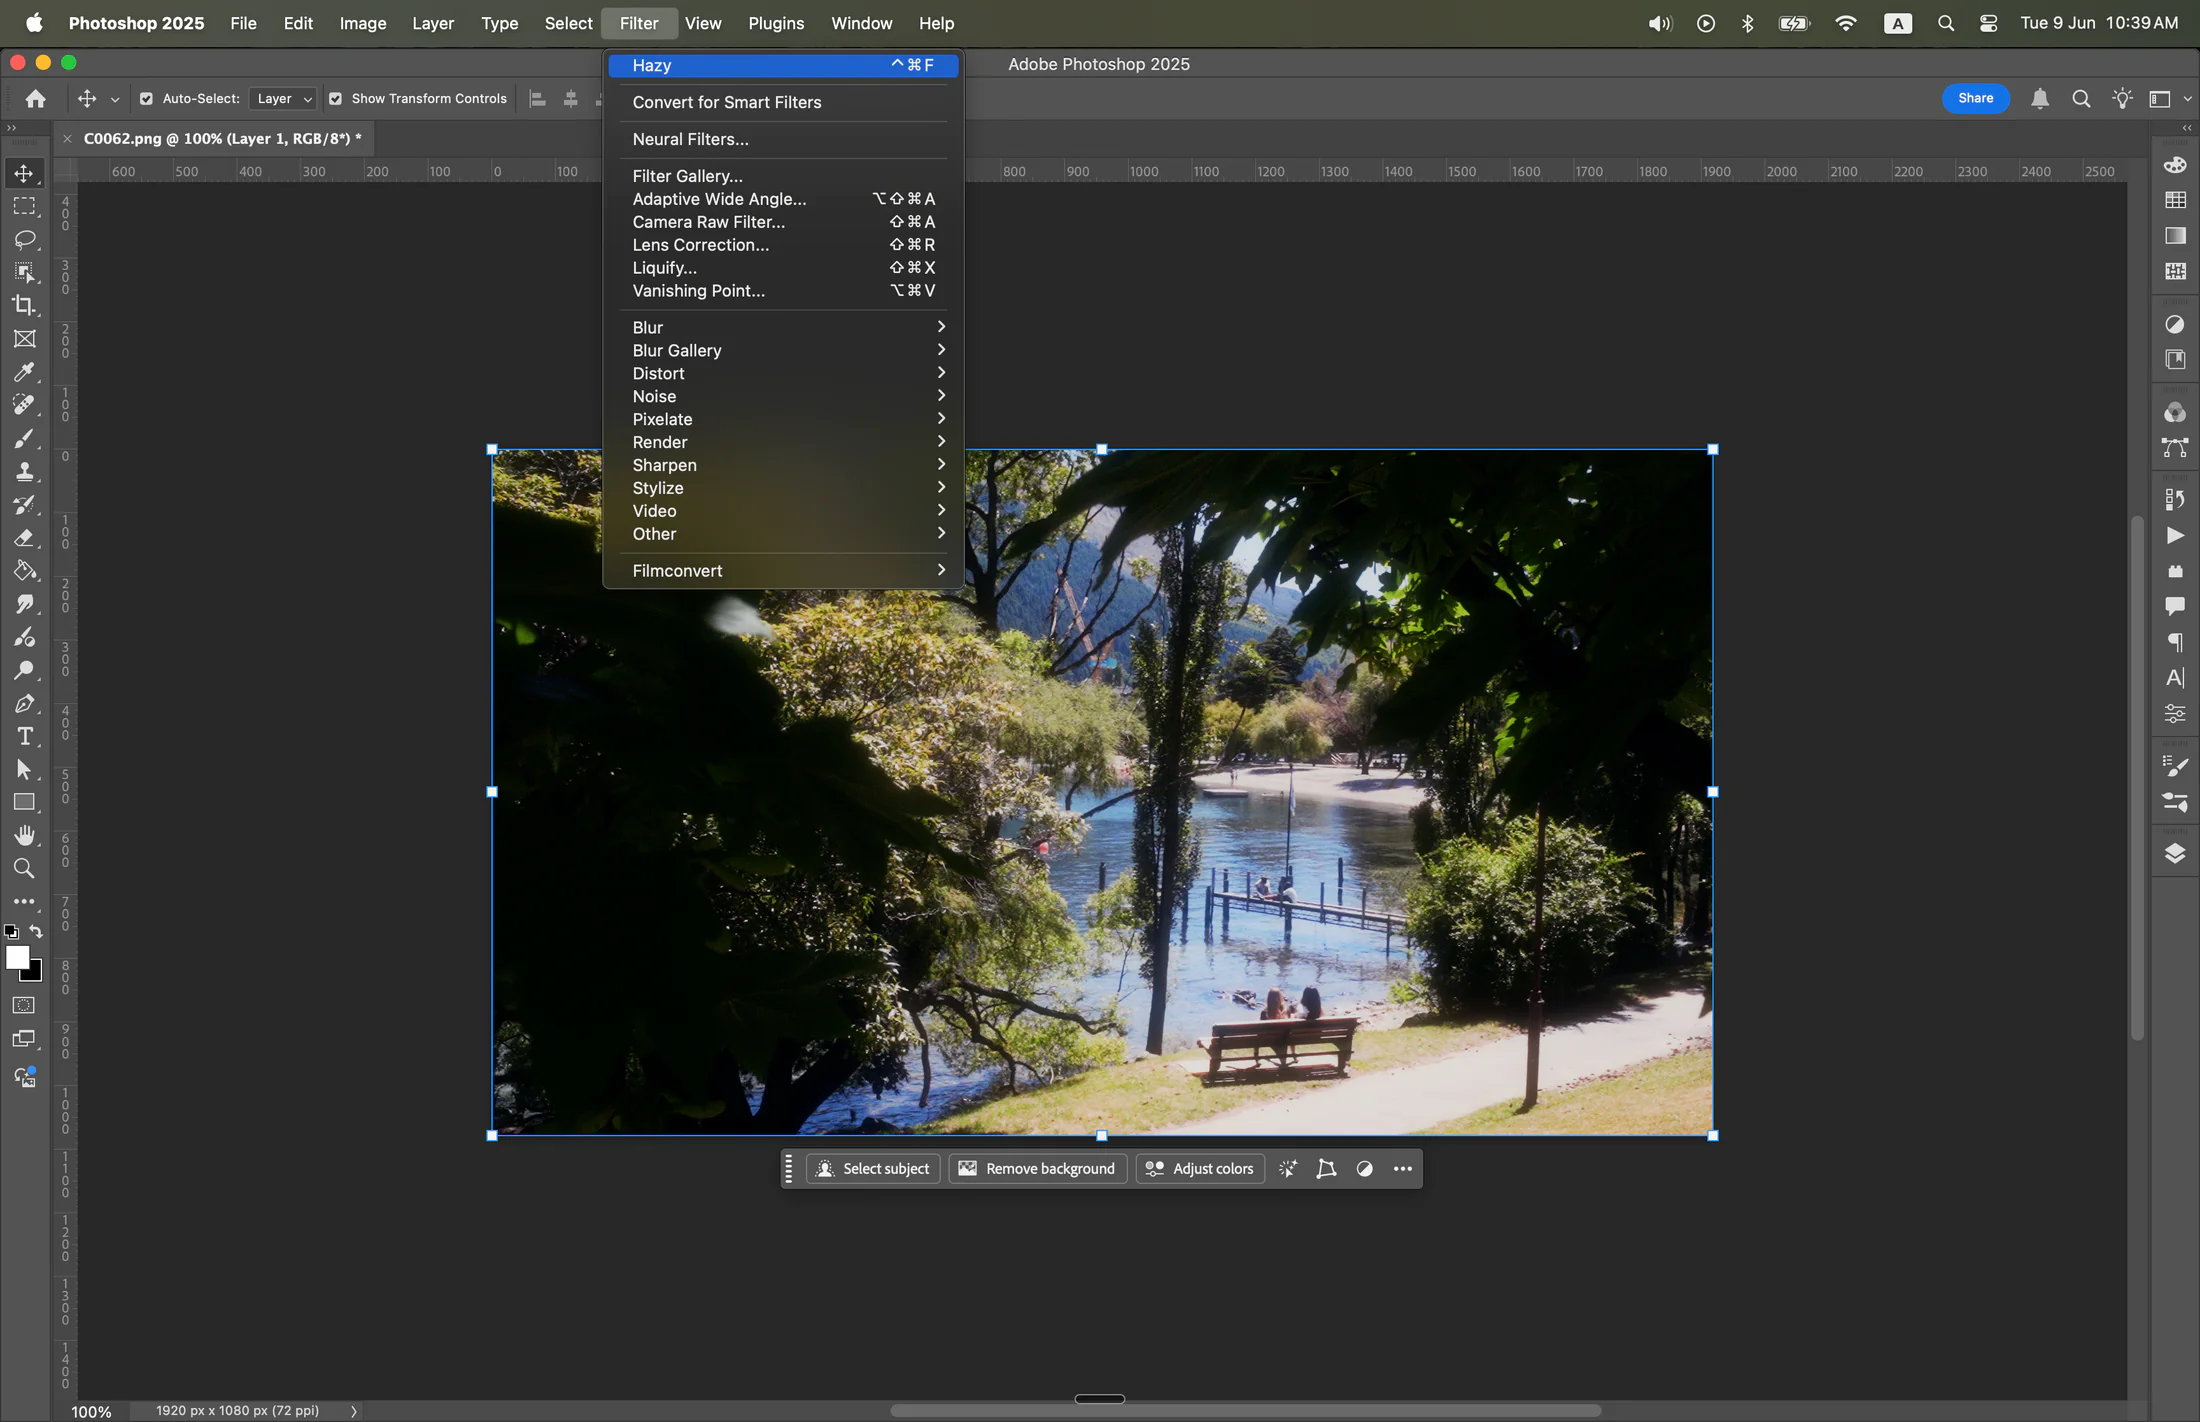
Saved Settings and Presets
Hazy automatically saves your last applied settings. Launching the plugin via Filter > Filmconvert > Hazy... will open with your previous settings loaded, even after restarting Photoshop. You can also save and name custom presets within the Hazy interface for looks you want to reuse later.
Lightroom Classic Guide
First-Time Setup: Register Hazy
Before using Hazy for the first time, you need to register it as an external editor in Lightroom Classic:
- Open Lightroom Classic.
-
In the top menu, choose Lightroom Classic > Settings... (or Preferences... on older macOS versions).
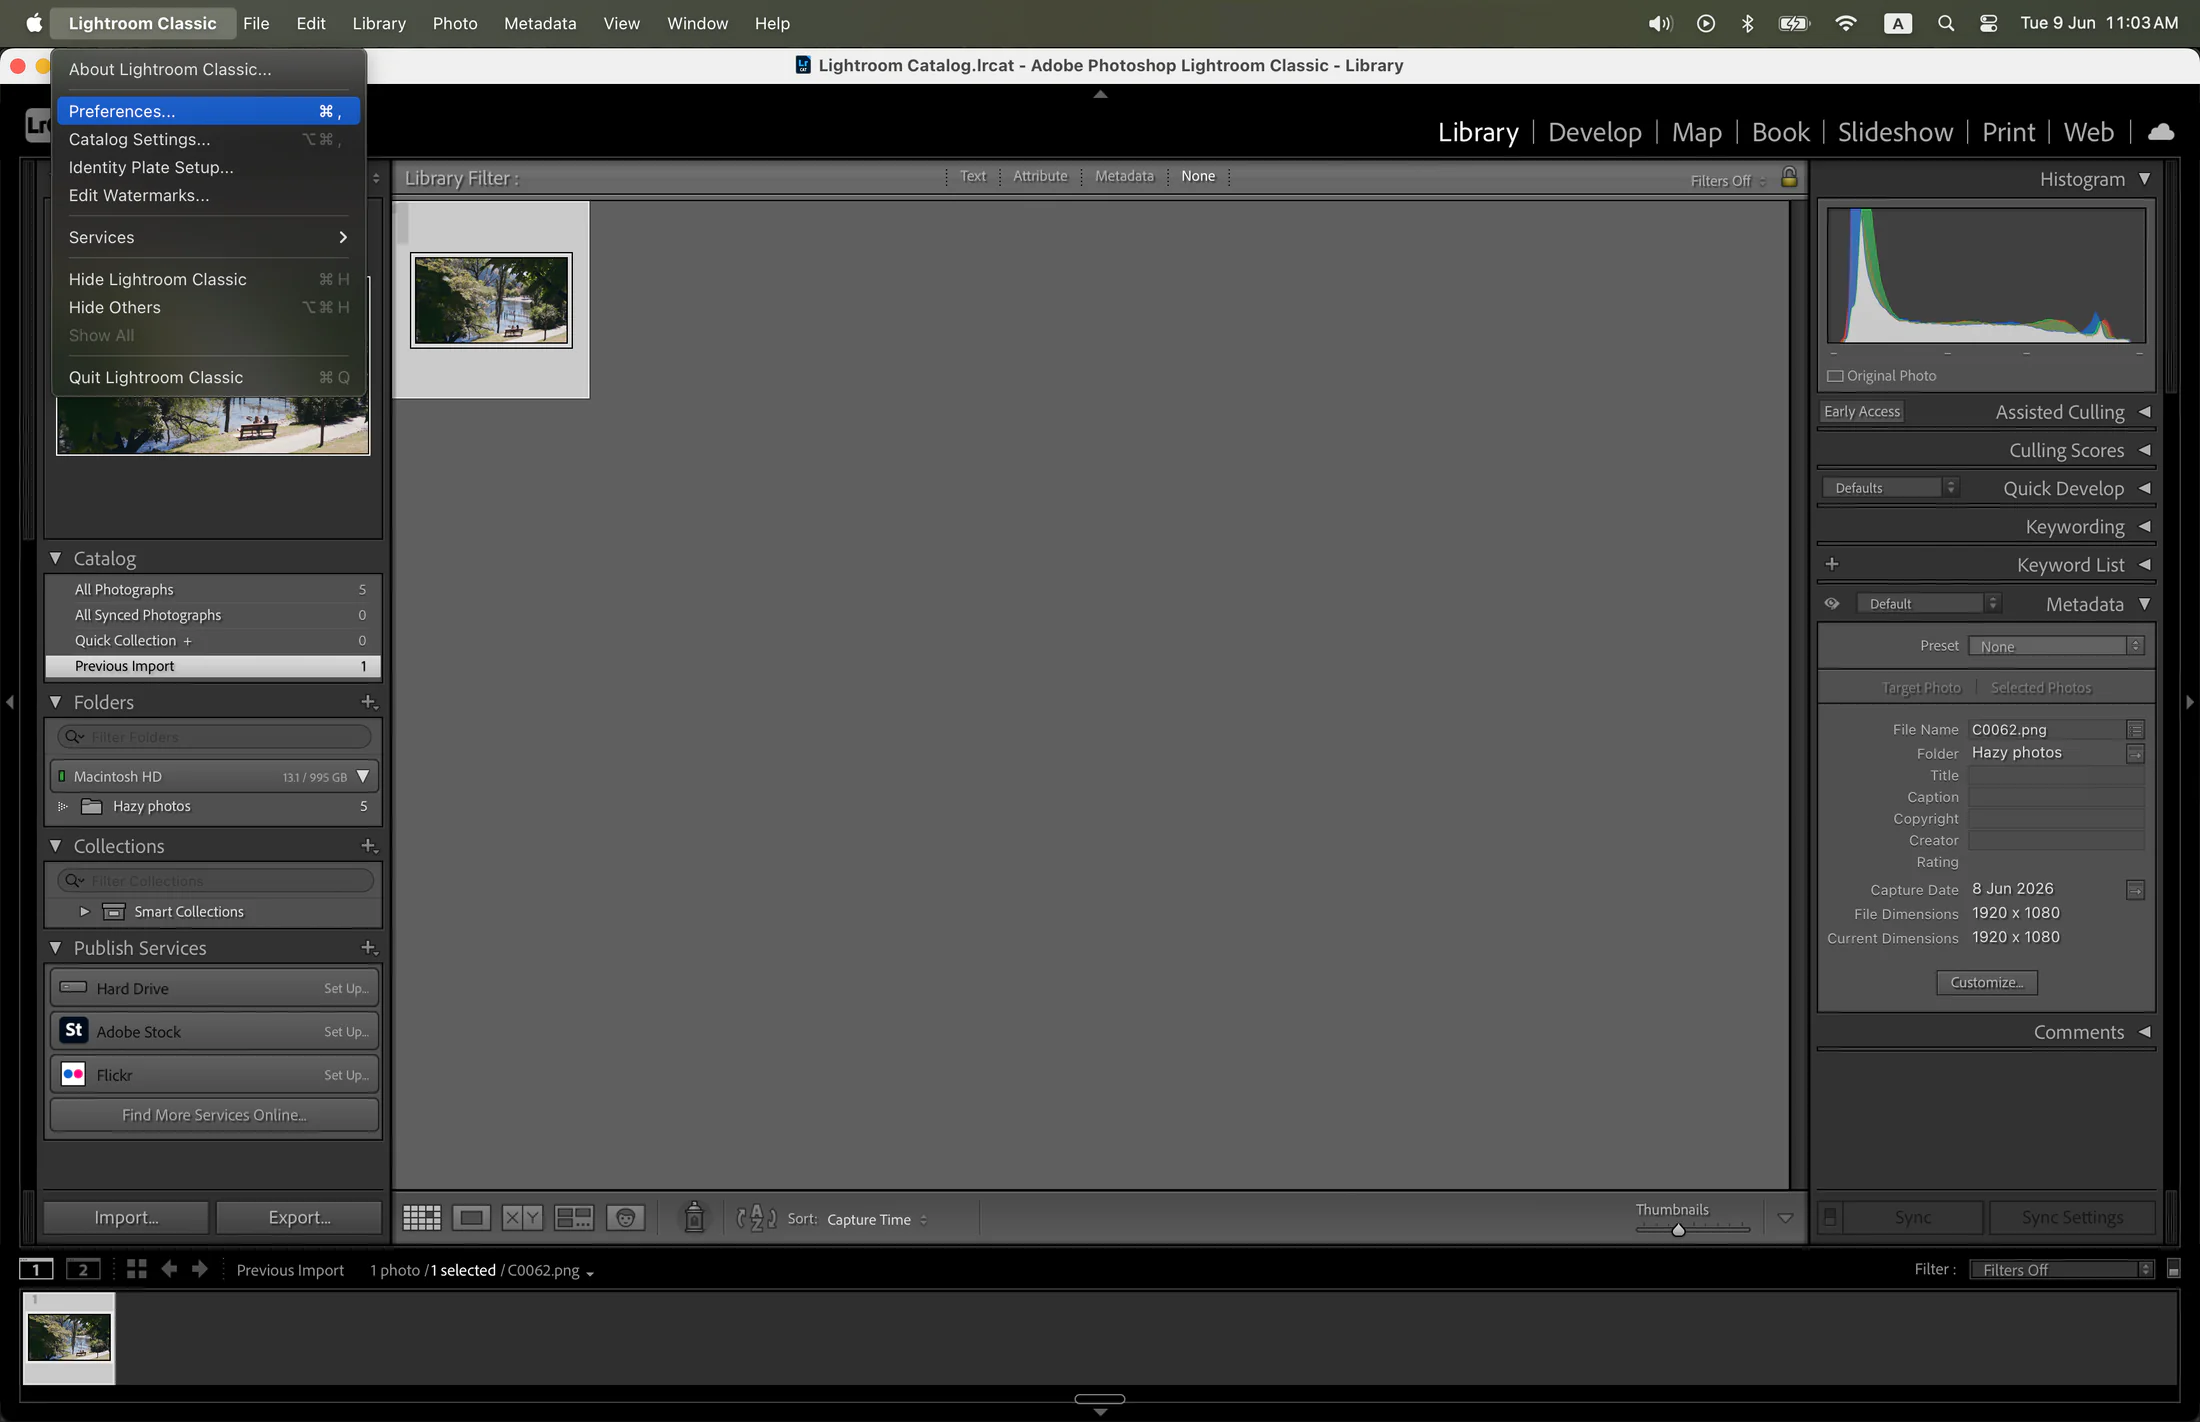
-
Go to the External Editing tab.
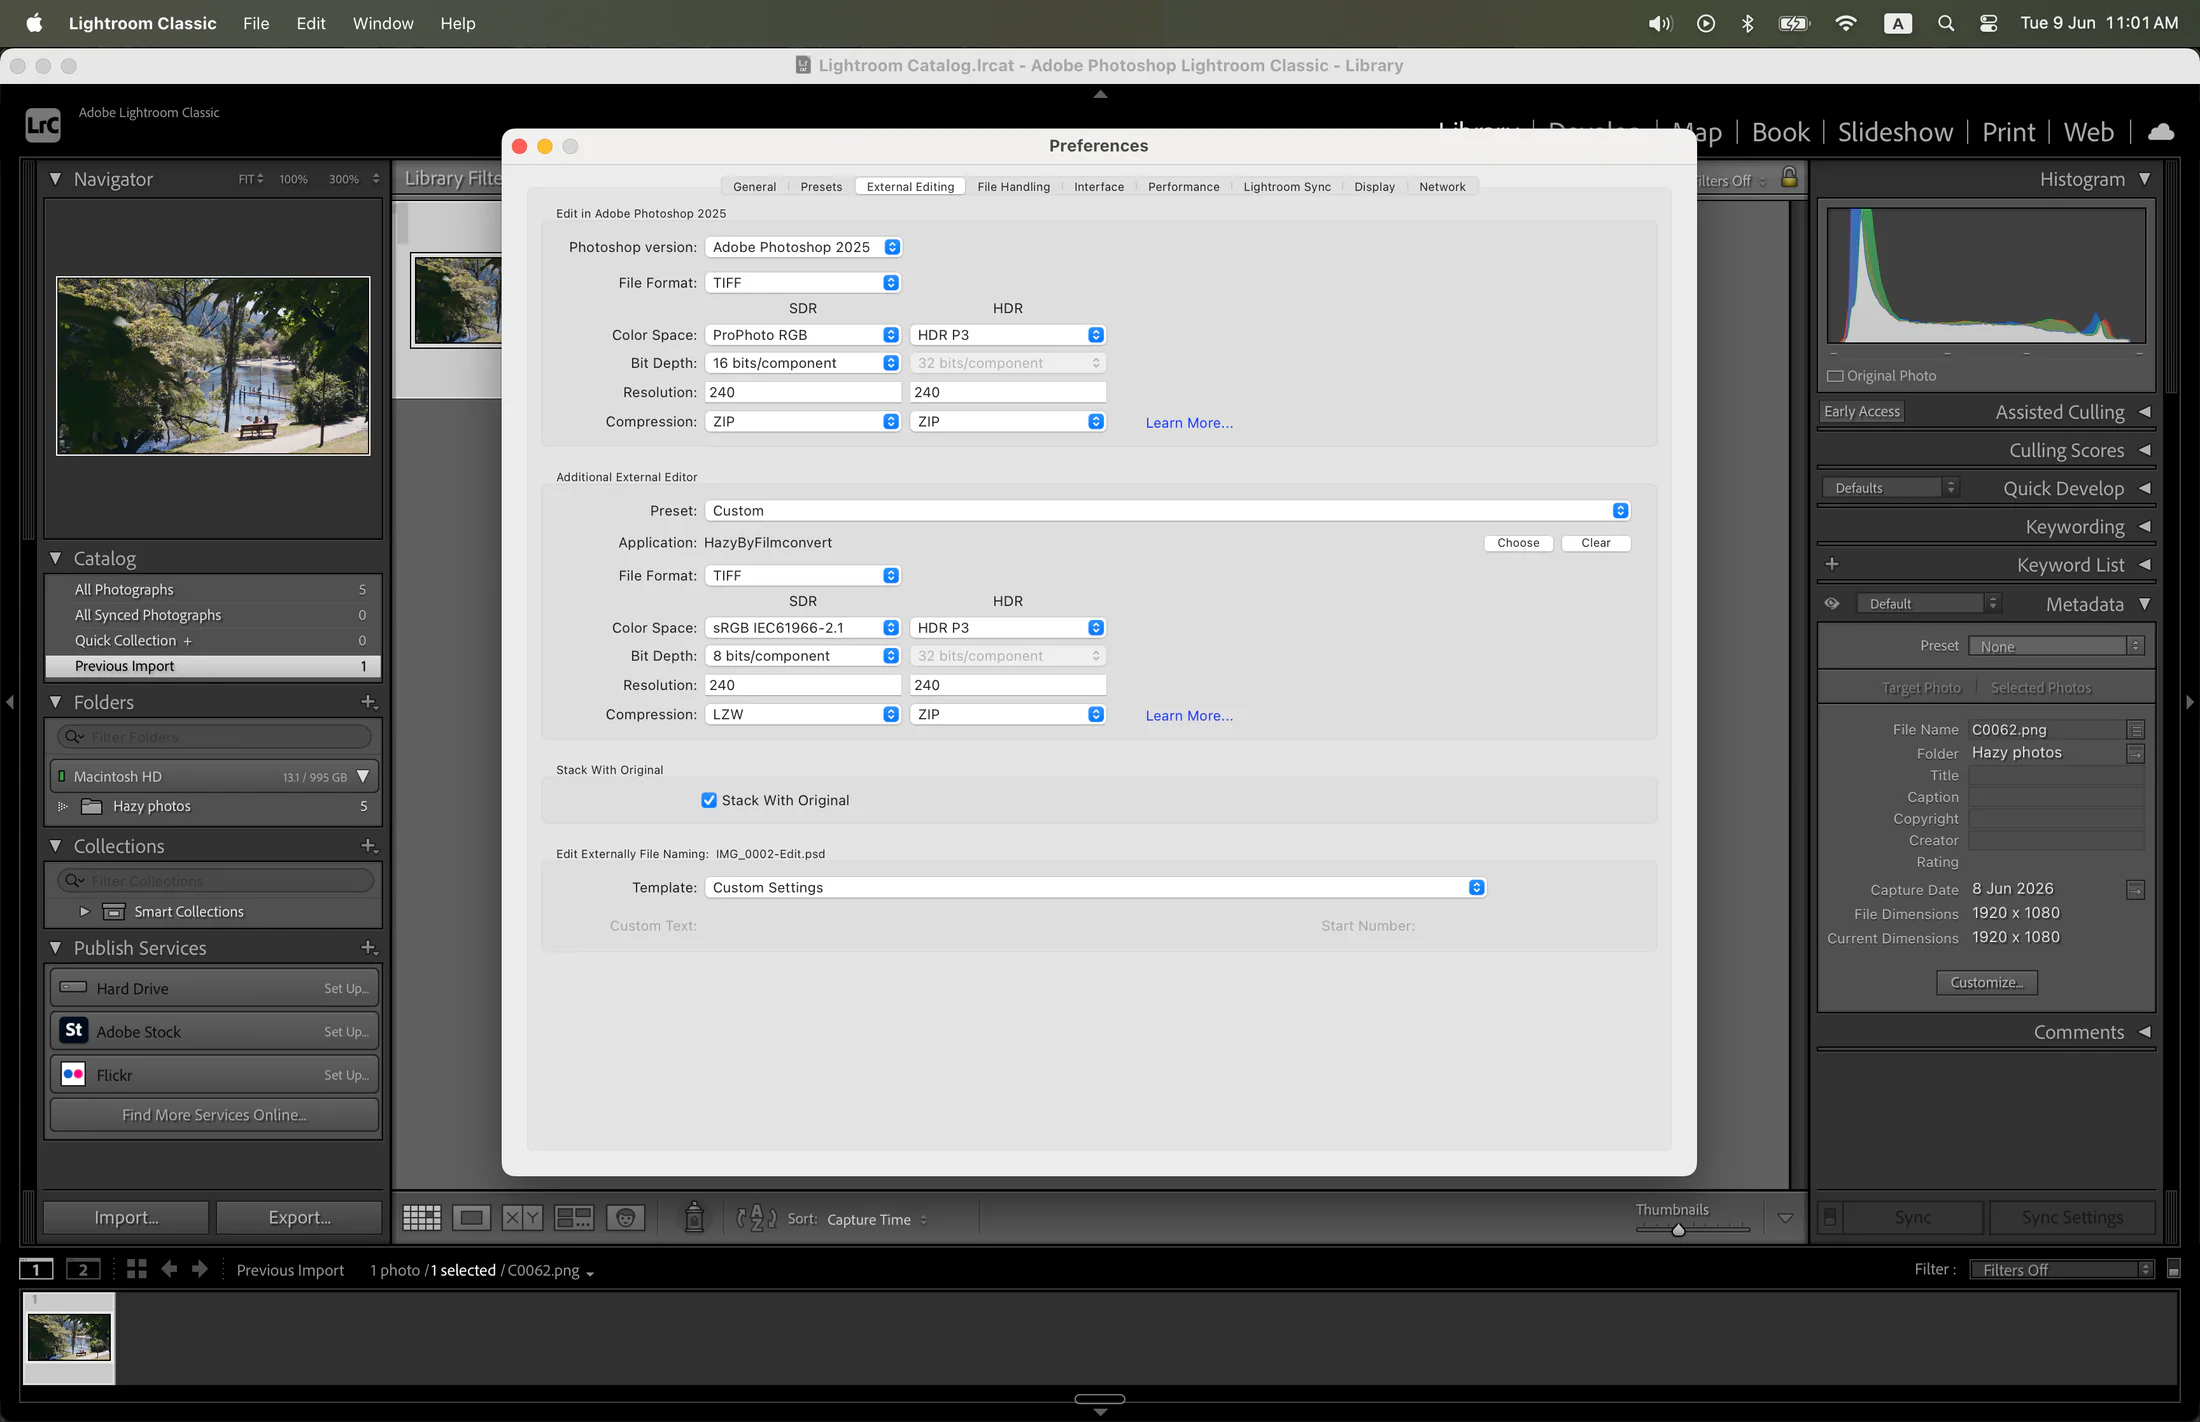
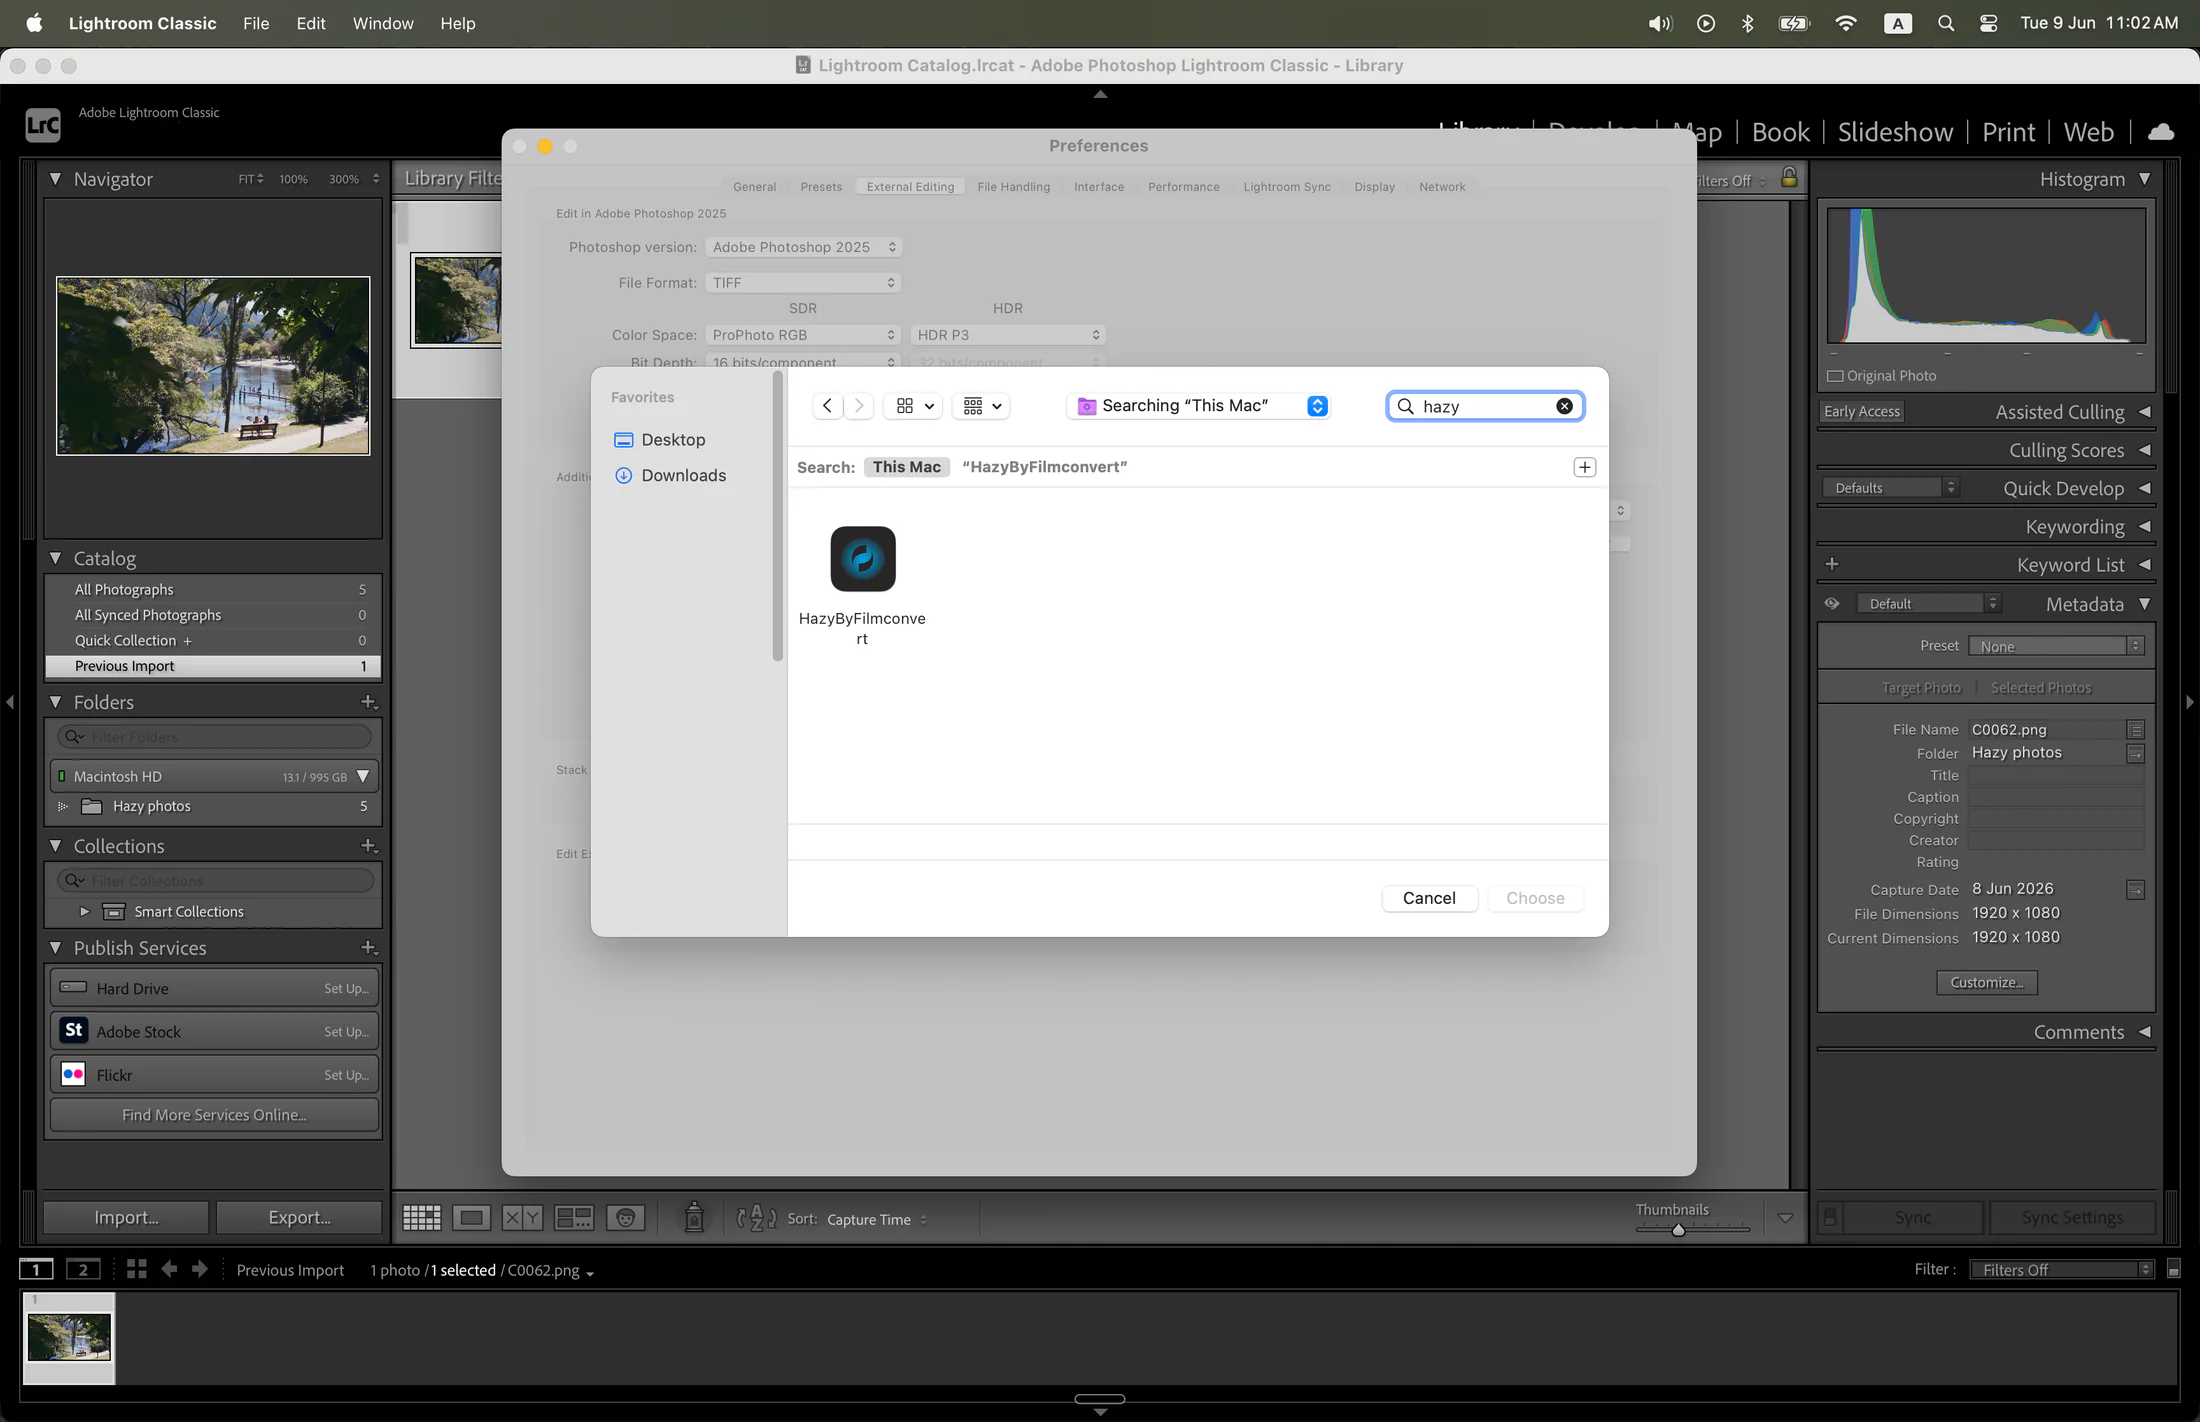
- Under the Additional External Editor section, click Choose.
-
Navigate to your Applications folder and select HazyLightroom.app.
How to Use Hazy
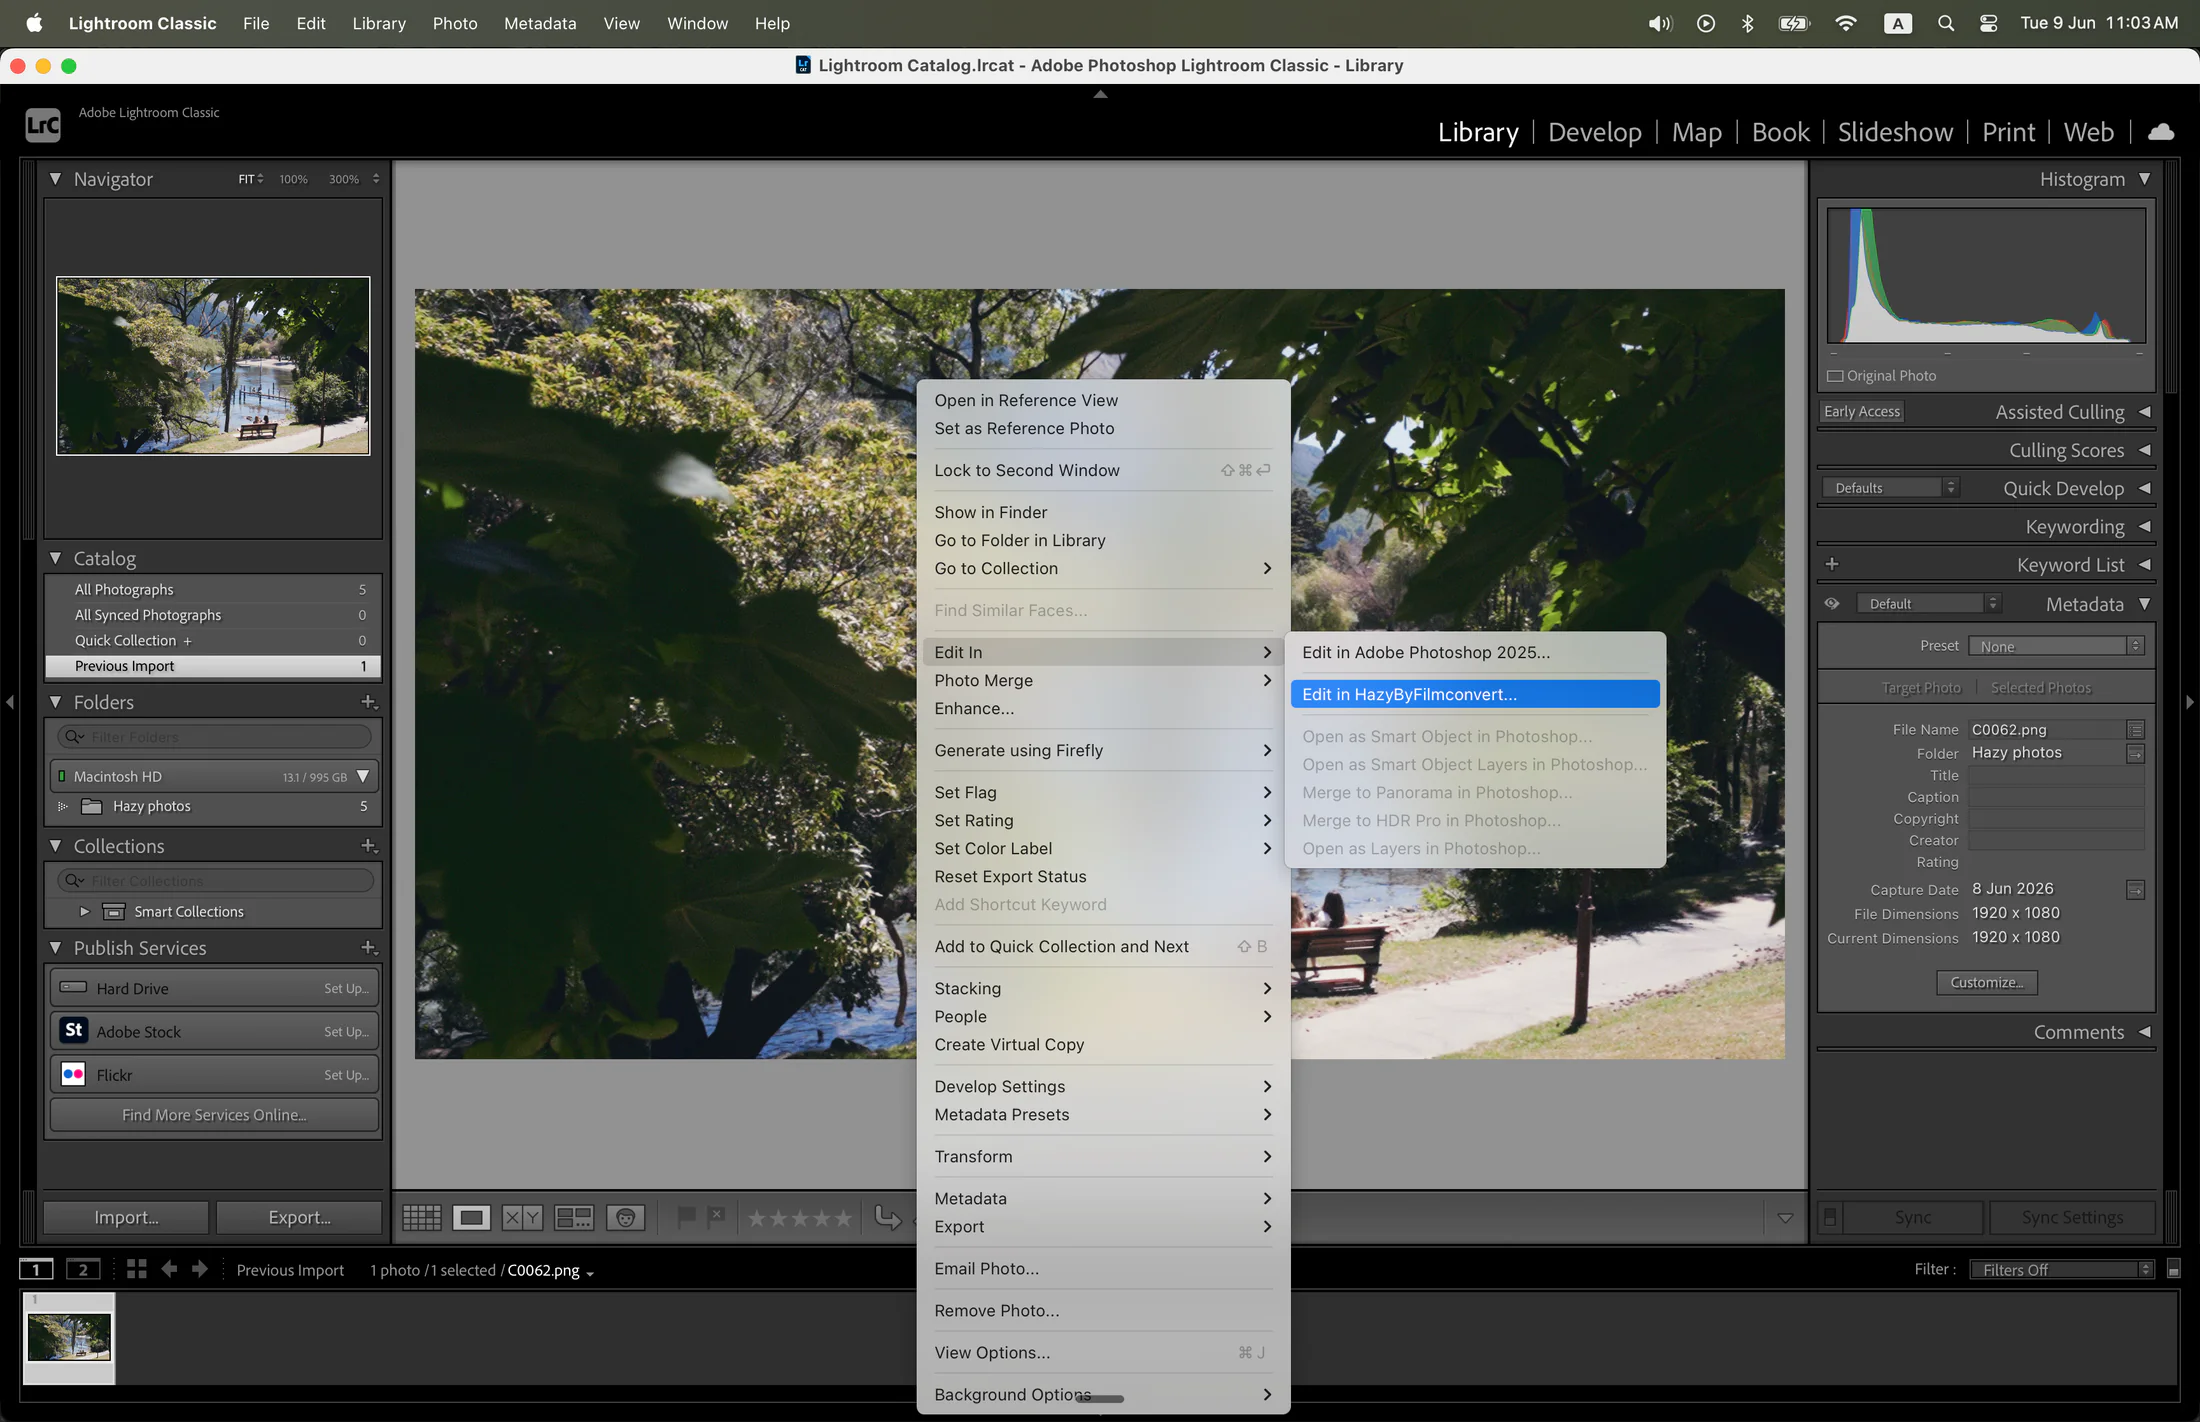
- Select a photo in Lightroom Classic.
-
Right-click the photo and choose Edit In > HazyLightroom.
- When prompted by Lightroom, choose to create an editable copy with Lightroom adjustments.
- Edit your image using Hazy’s tools. When you are done, click Apply to save the edited copy back into Lightroom, or click Cancel to return without making changes.
Lightroom CC Guide
For Lightroom CC, you only need to link Hazy the first time you use it. After that, Lightroom CC will remember it automatically.
First-Time Setup & Use
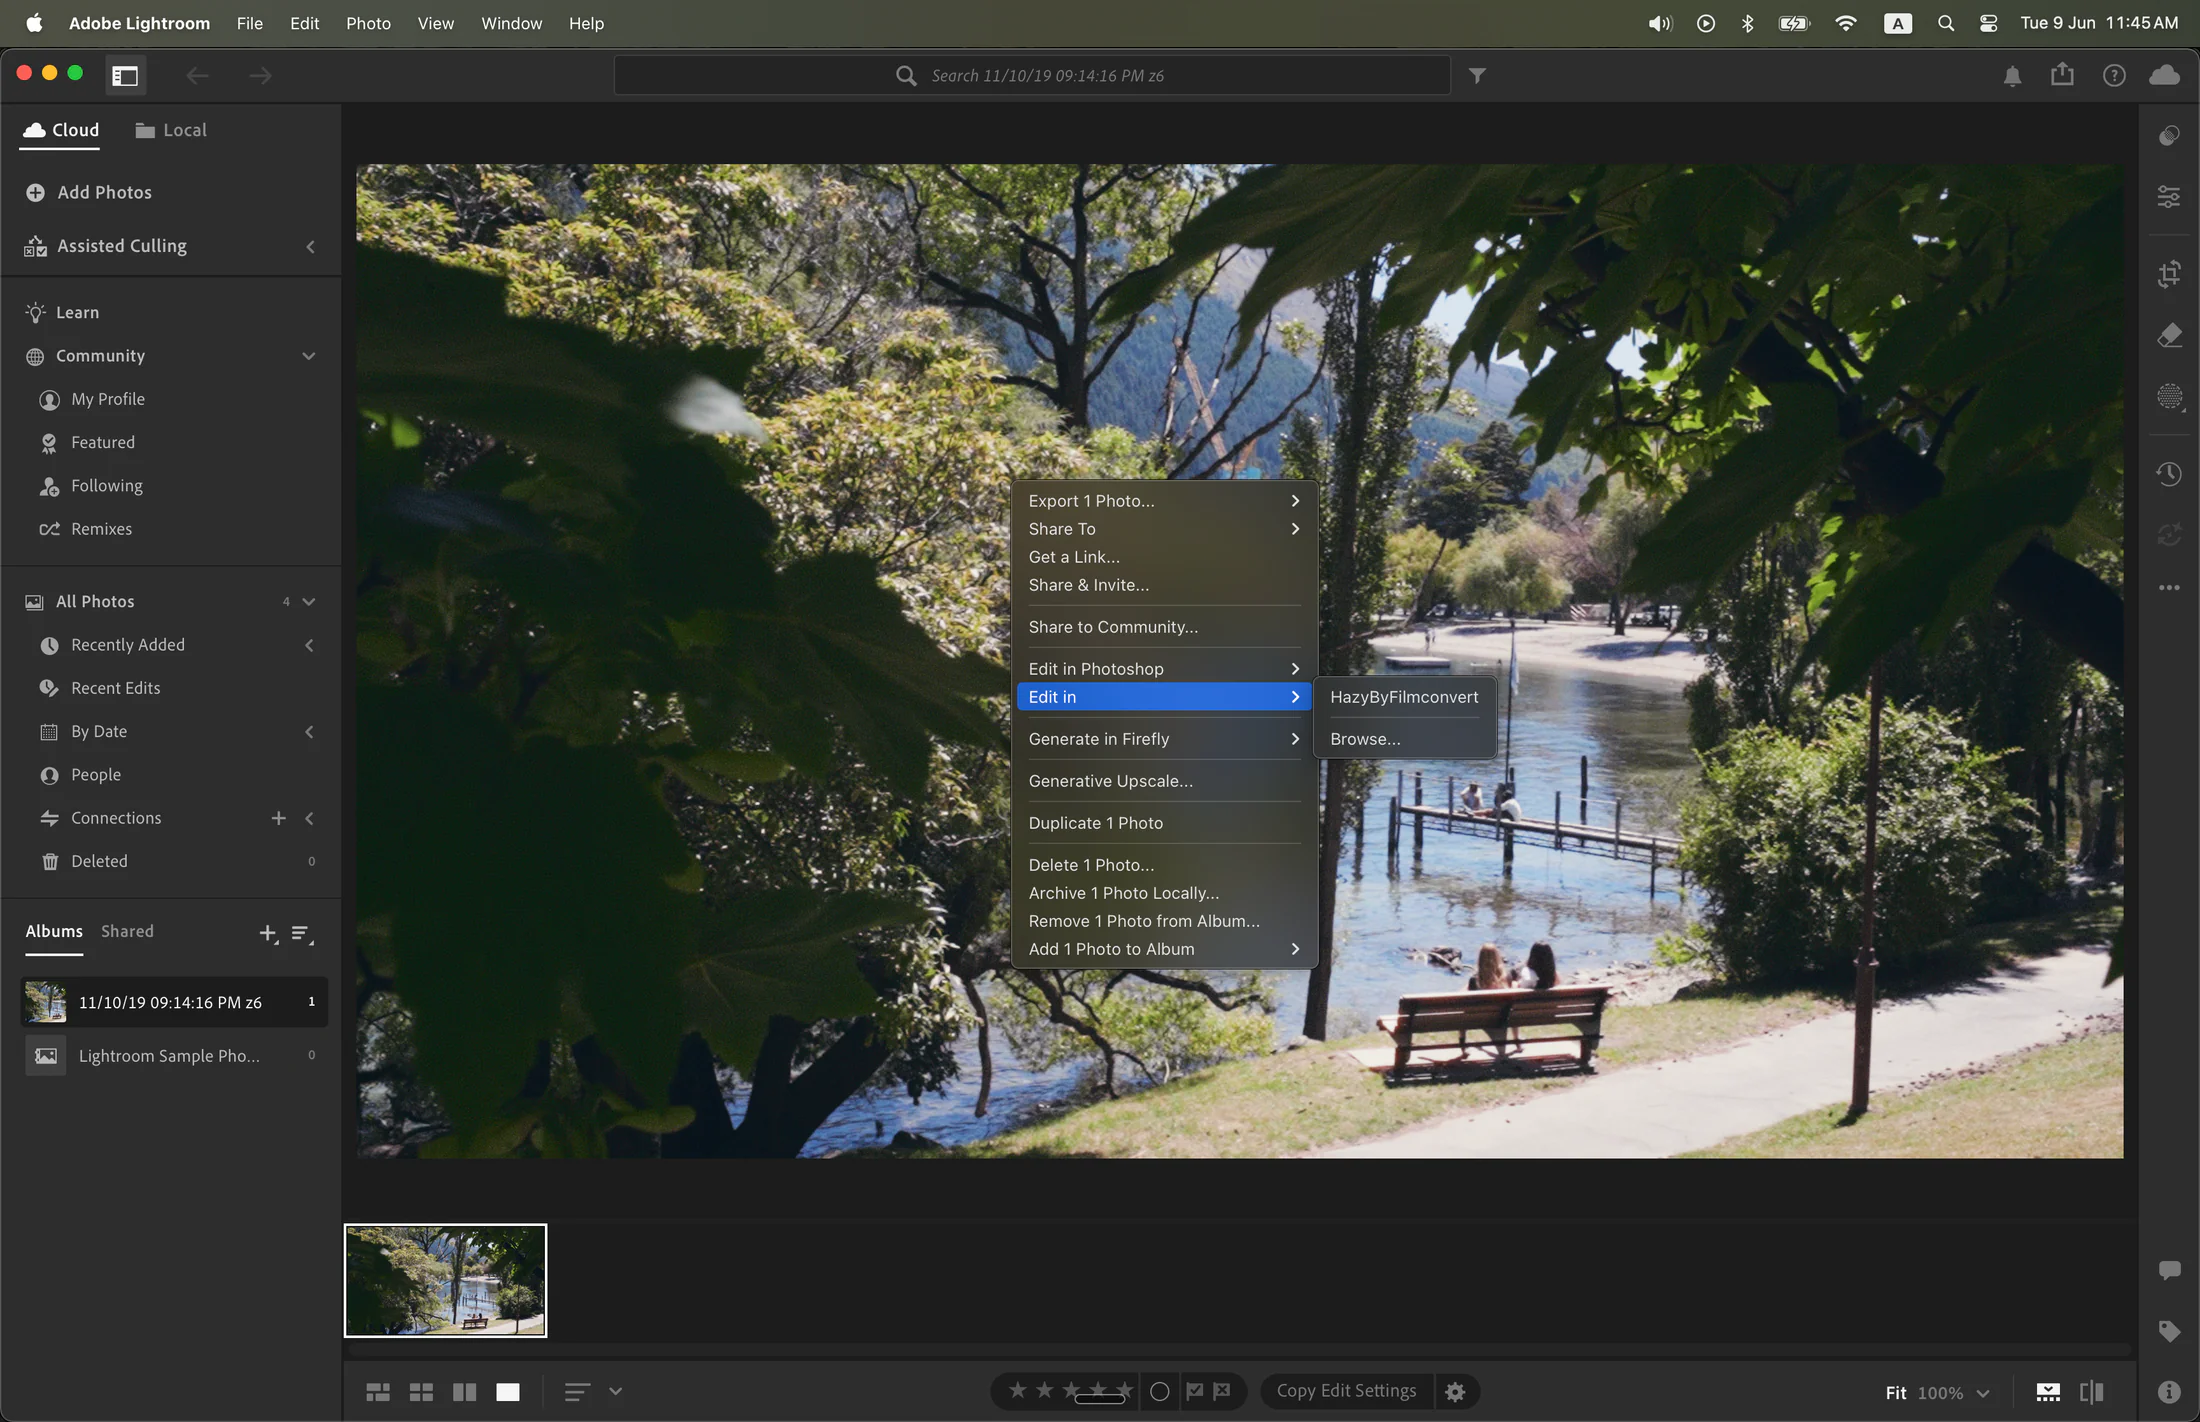
- Open Lightroom CC.
-
Right-click a photo and choose Edit In > Browse....
-
Select HazyLightroom.app.
Note: After you select the app once, Lightroom CC will keep Hazy available directly in your Edit In list for future use. - Edit your image using Hazy’s tools. When you are done, click Apply to save your changes and send the image back to Lightroom CC, or click Cancel to return without making changes.
Uninstalling Hazy
If you ever need to remove Hazy from your computer, follow the steps below for the application you use.
For Photoshop:
- Open Finder.
- Press SHIFT + COMMAND + C on your keyboard to open your computer's main directory.
-
Open Macintosh HD and navigate to:
Library/Application Support/Adobe/Plug-Ins/CC/Filters/ - Locate HazyLightroom.plugin and drag it to the Bin.
For Lightroom Classic & Lightroom CC:
- Open Finder and go to your Applications folder.
- Locate HazyLightroom.app (or HazyLightroom.plugin on older macOS versions).
- Drag it to the Bin.
Hazy Adobe installation and activation guide for Windows
System Requirements
- OS: Windows 10 or later (64-bit).
Activating your Plugin
To activate Hazy, use your Account Details. Your account is tied to the email address used to purchase your license. You can reset your password here.
Download & Installation
- Close Photoshop, Lightroom Classic, and Lightroom CC if they are currently running.
- Download and run the latest Hazy Windows installer package here.
-
Once the installation is complete, you can safely reopen the Adobe application you want to use.
Note: Adobe applications automatically scan for new plugins when they launch. Reopening them after the installer finishes ensures Hazy is loaded and ready to use.
Photoshop Guide
How to Use Hazy
- Open Photoshop and open an image.
-
In the top menu, choose Filter > Filmconvert > Hazy....
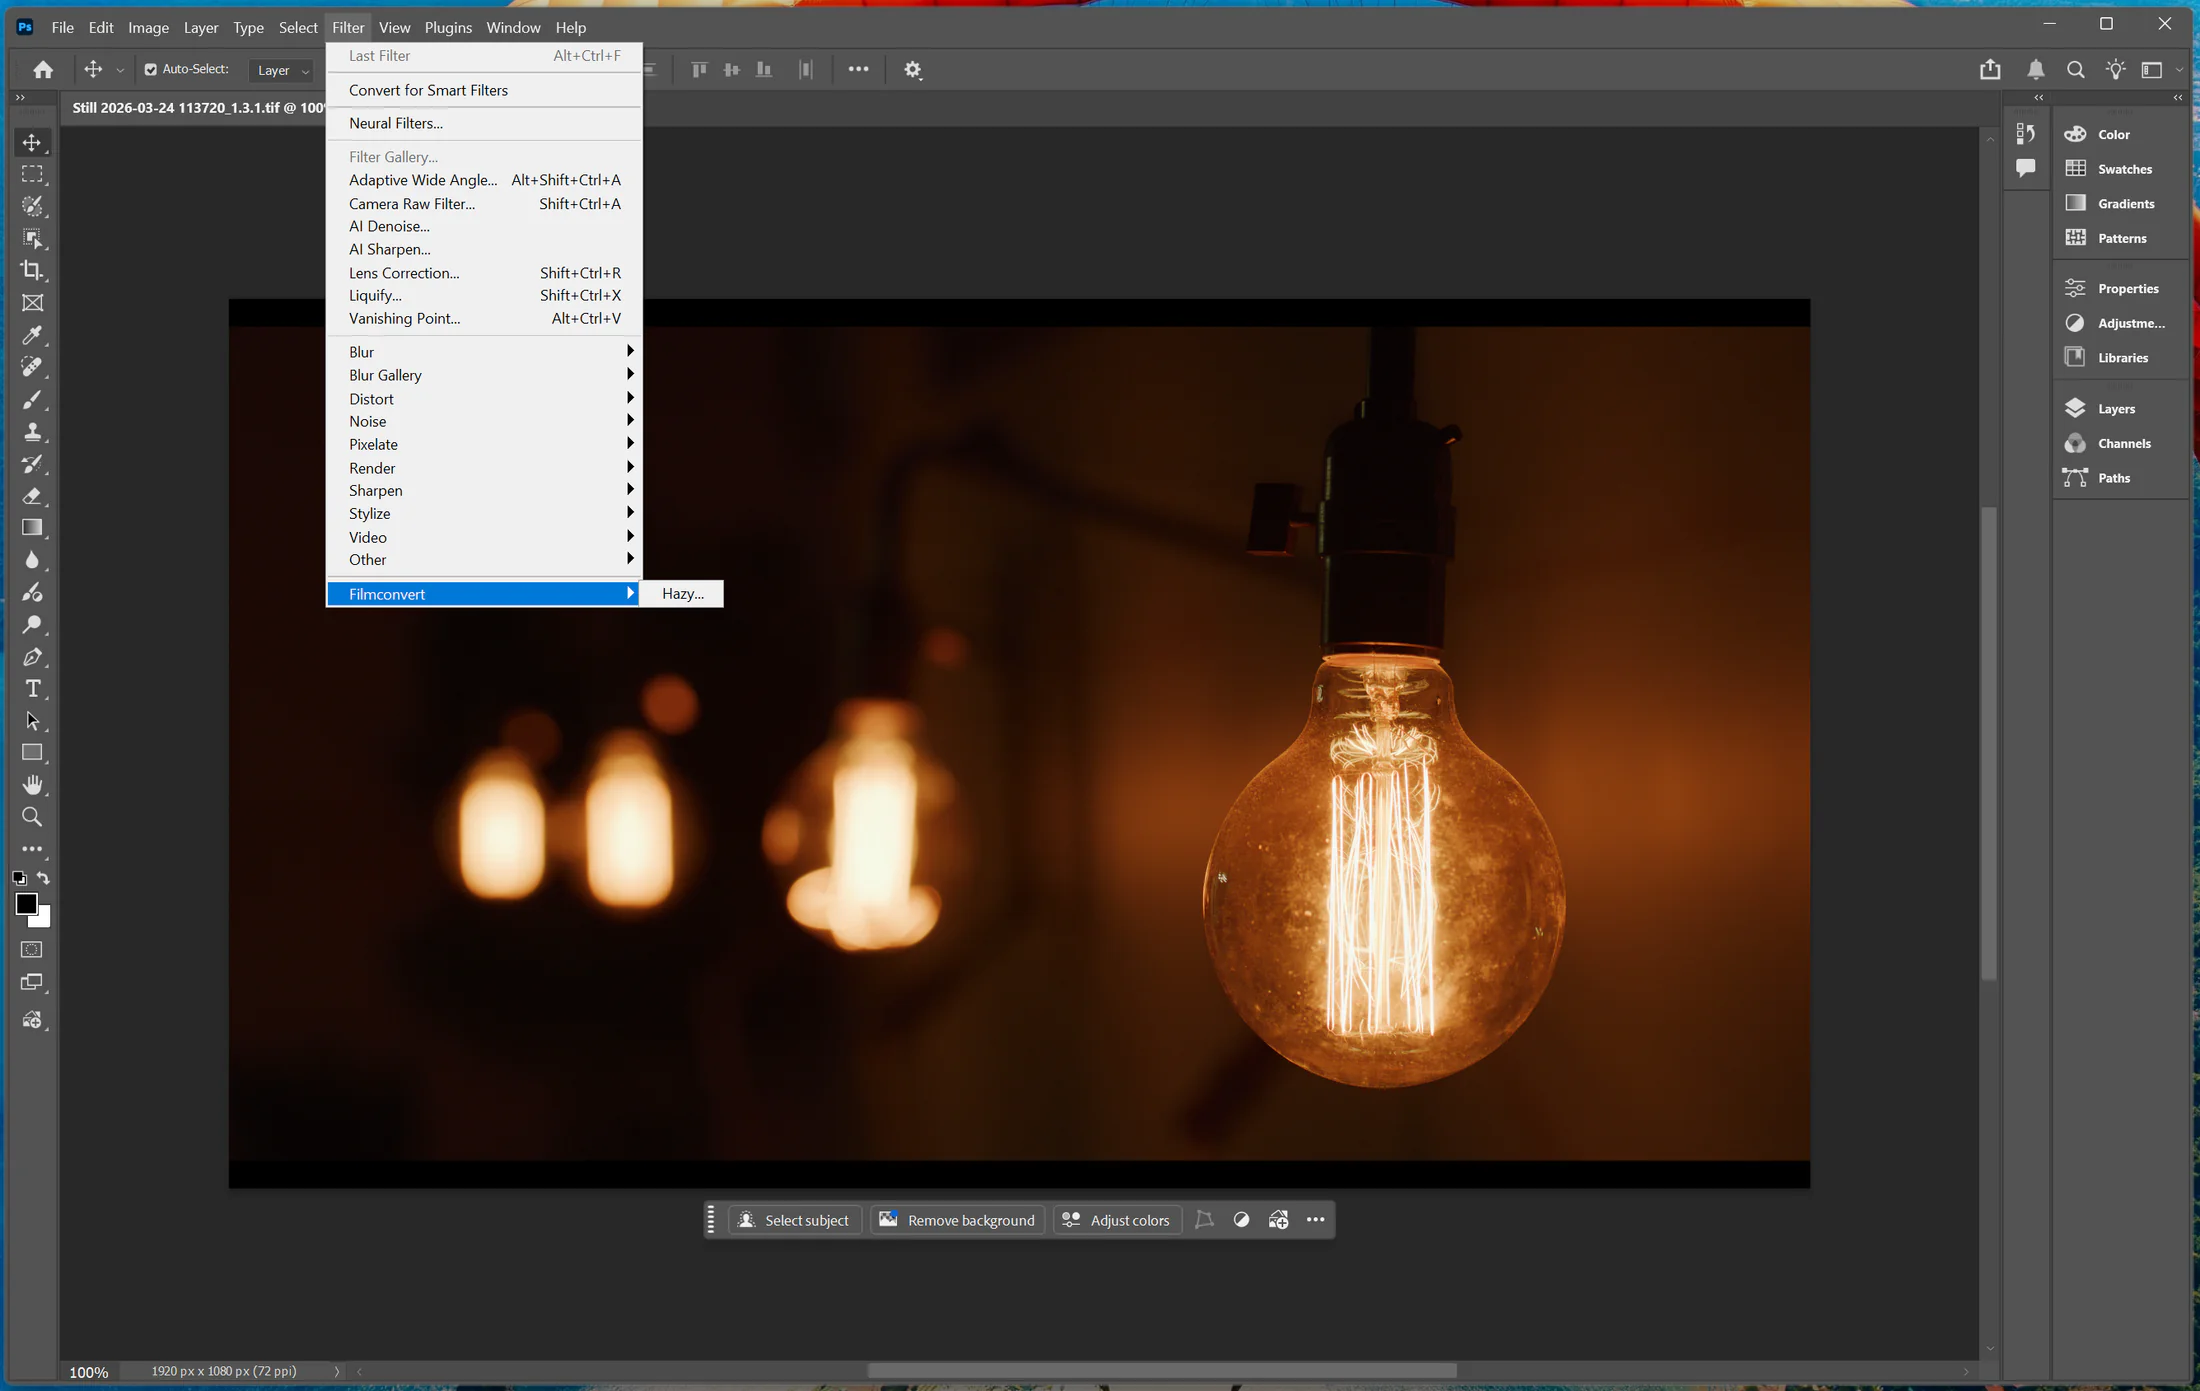
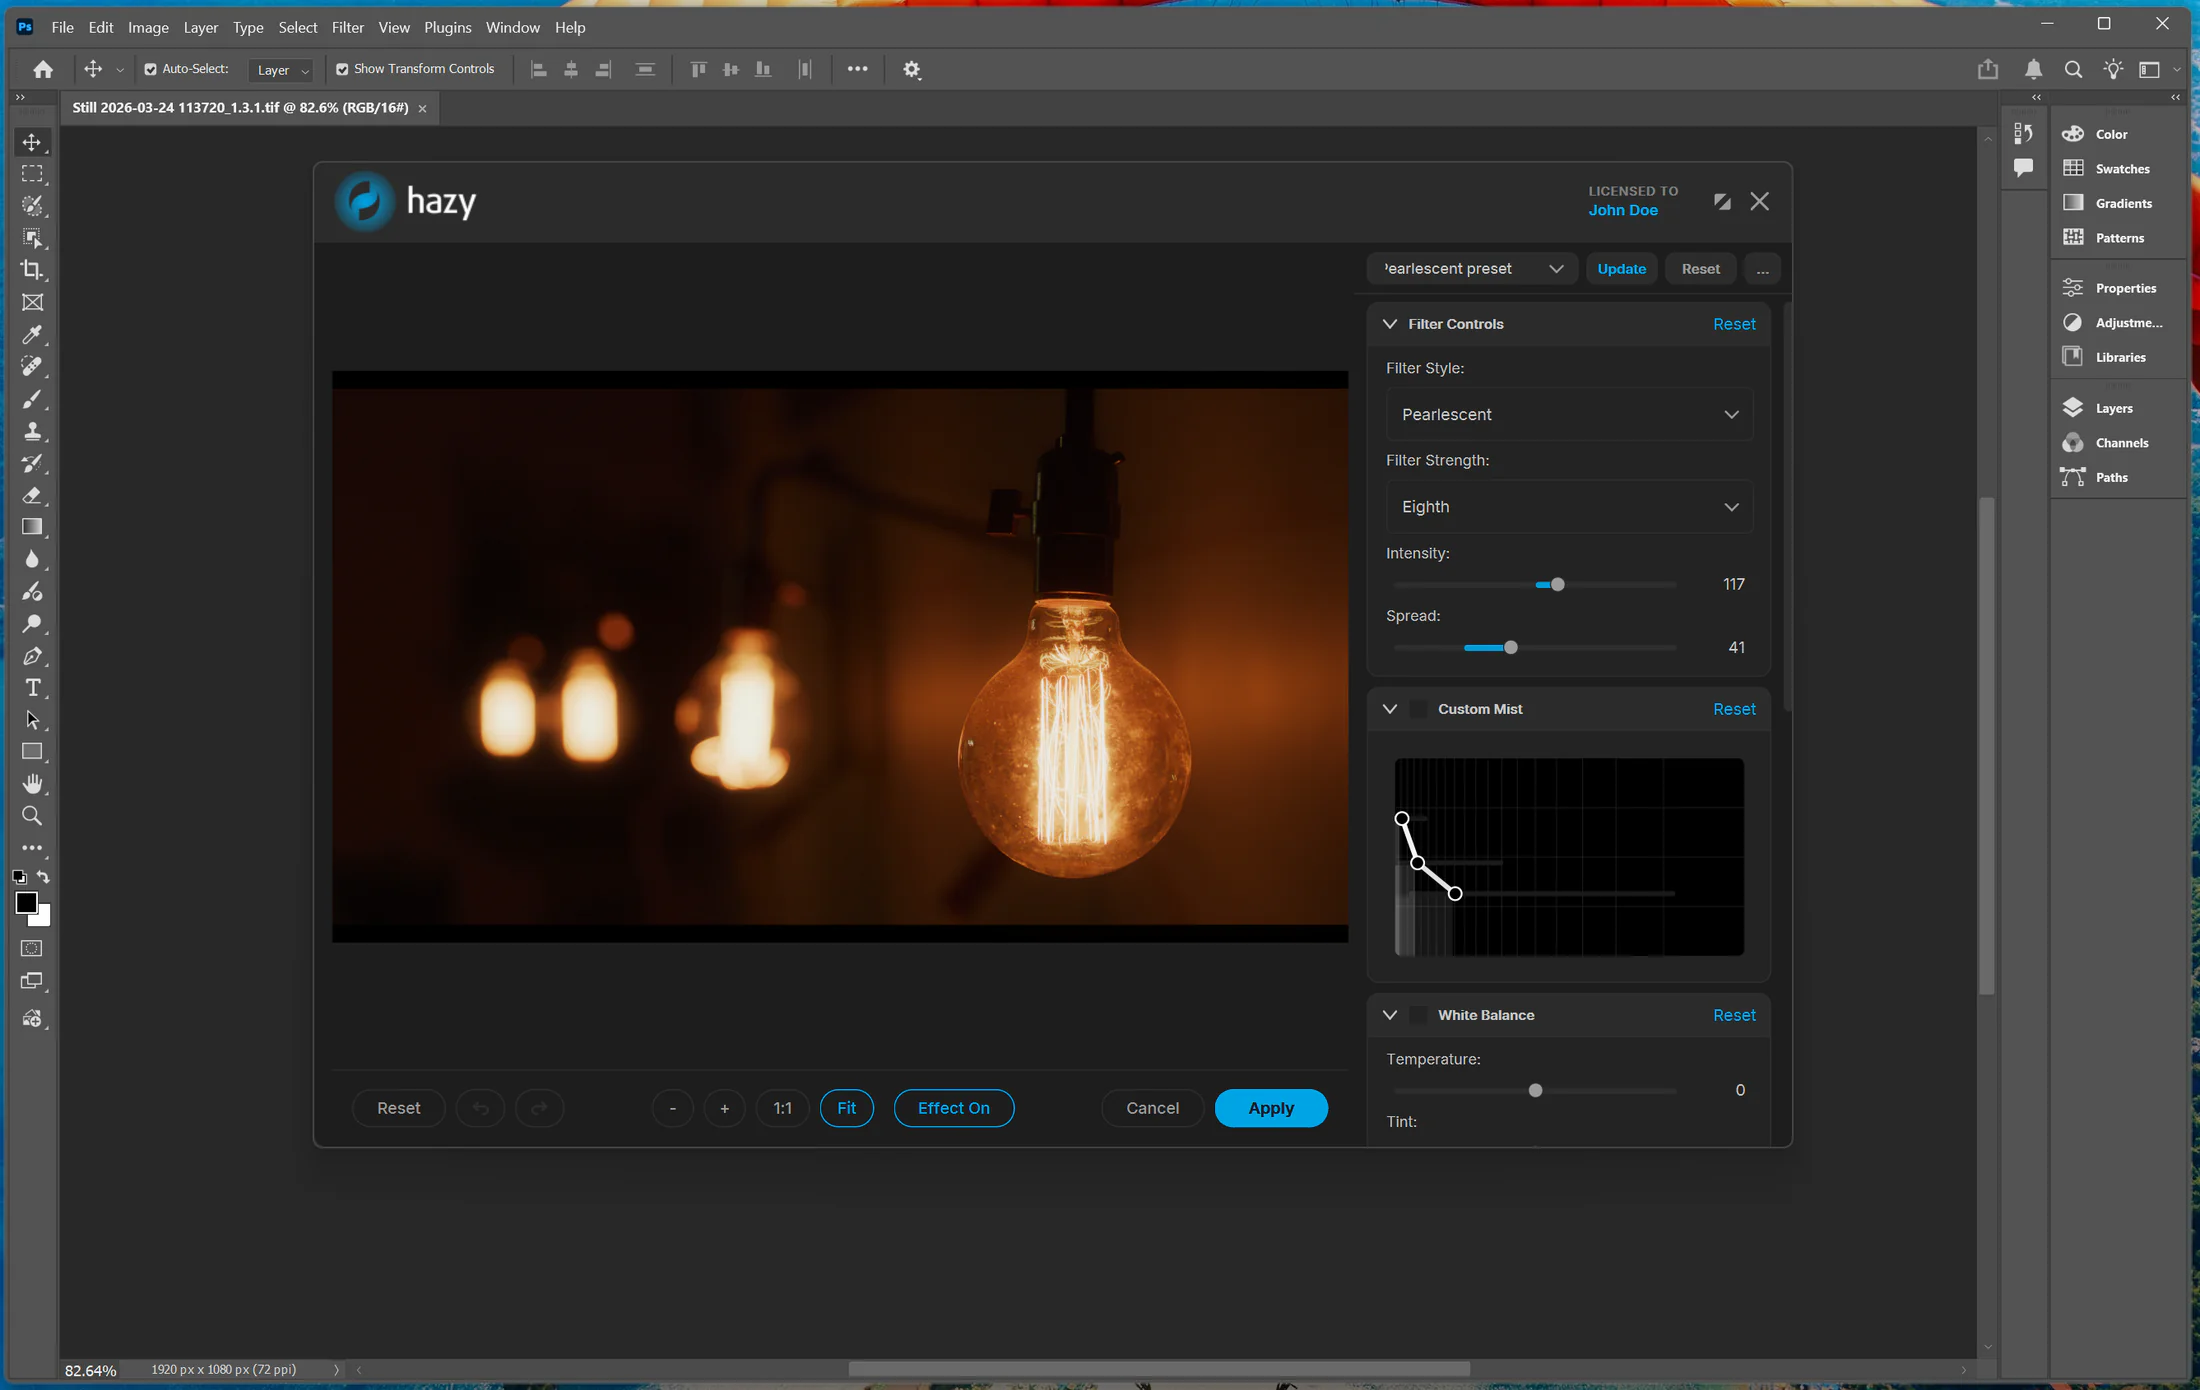
- Edit your image using Hazy’s tools. When you are done, click Apply to save your changes and send the image back to Photoshop, or click Cancel to return without making changes.
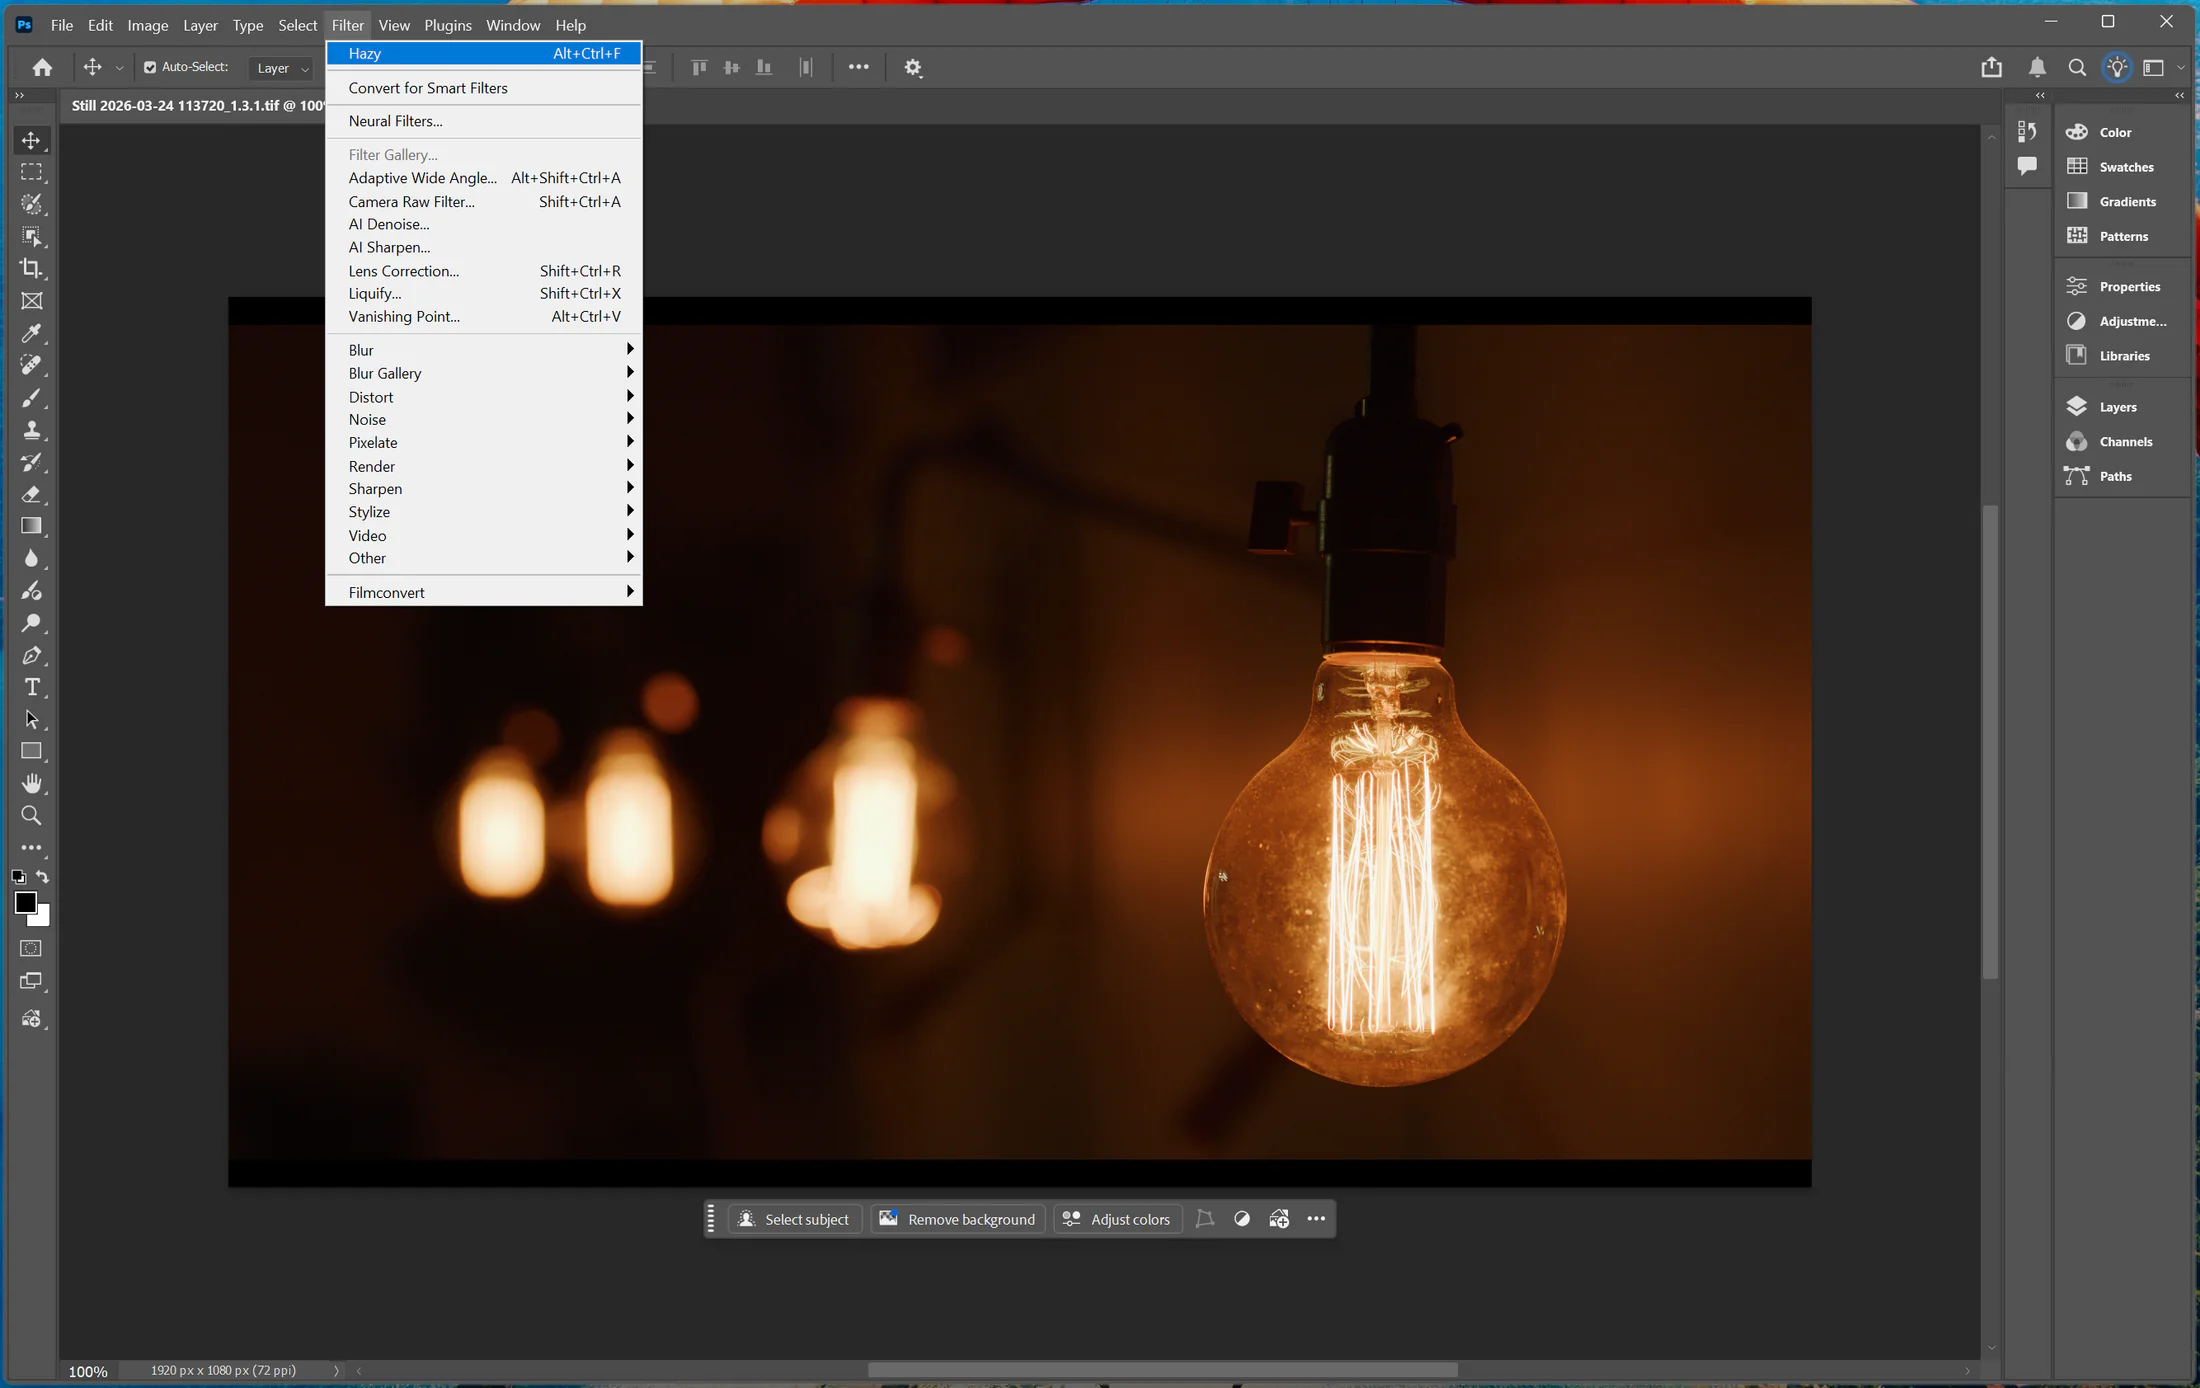
Tip: Repeat Last Edit
To quickly reapply your most recent Hazy edit during a session, use Photoshop’s Last Filter command. This processes the image using your previous settings without the need to reopen the Hazy interface.
Saved Settings and Presets
Hazy automatically saves your last applied settings. Launching the plugin via Filter > Filmconvert > Hazy... will open with your previous settings loaded, even after restarting Photoshop. You can also save and name custom presets within the Hazy interface for looks you want to reuse later.
Lightroom Classic Guide
First-Time Setup: Register Hazy
Before using Hazy for the first time, you need to register it as an external editor in Lightroom Classic:
- Open Lightroom Classic.
- In the top menu, choose Edit > Preferences....
-
Go to the External Editing tab.
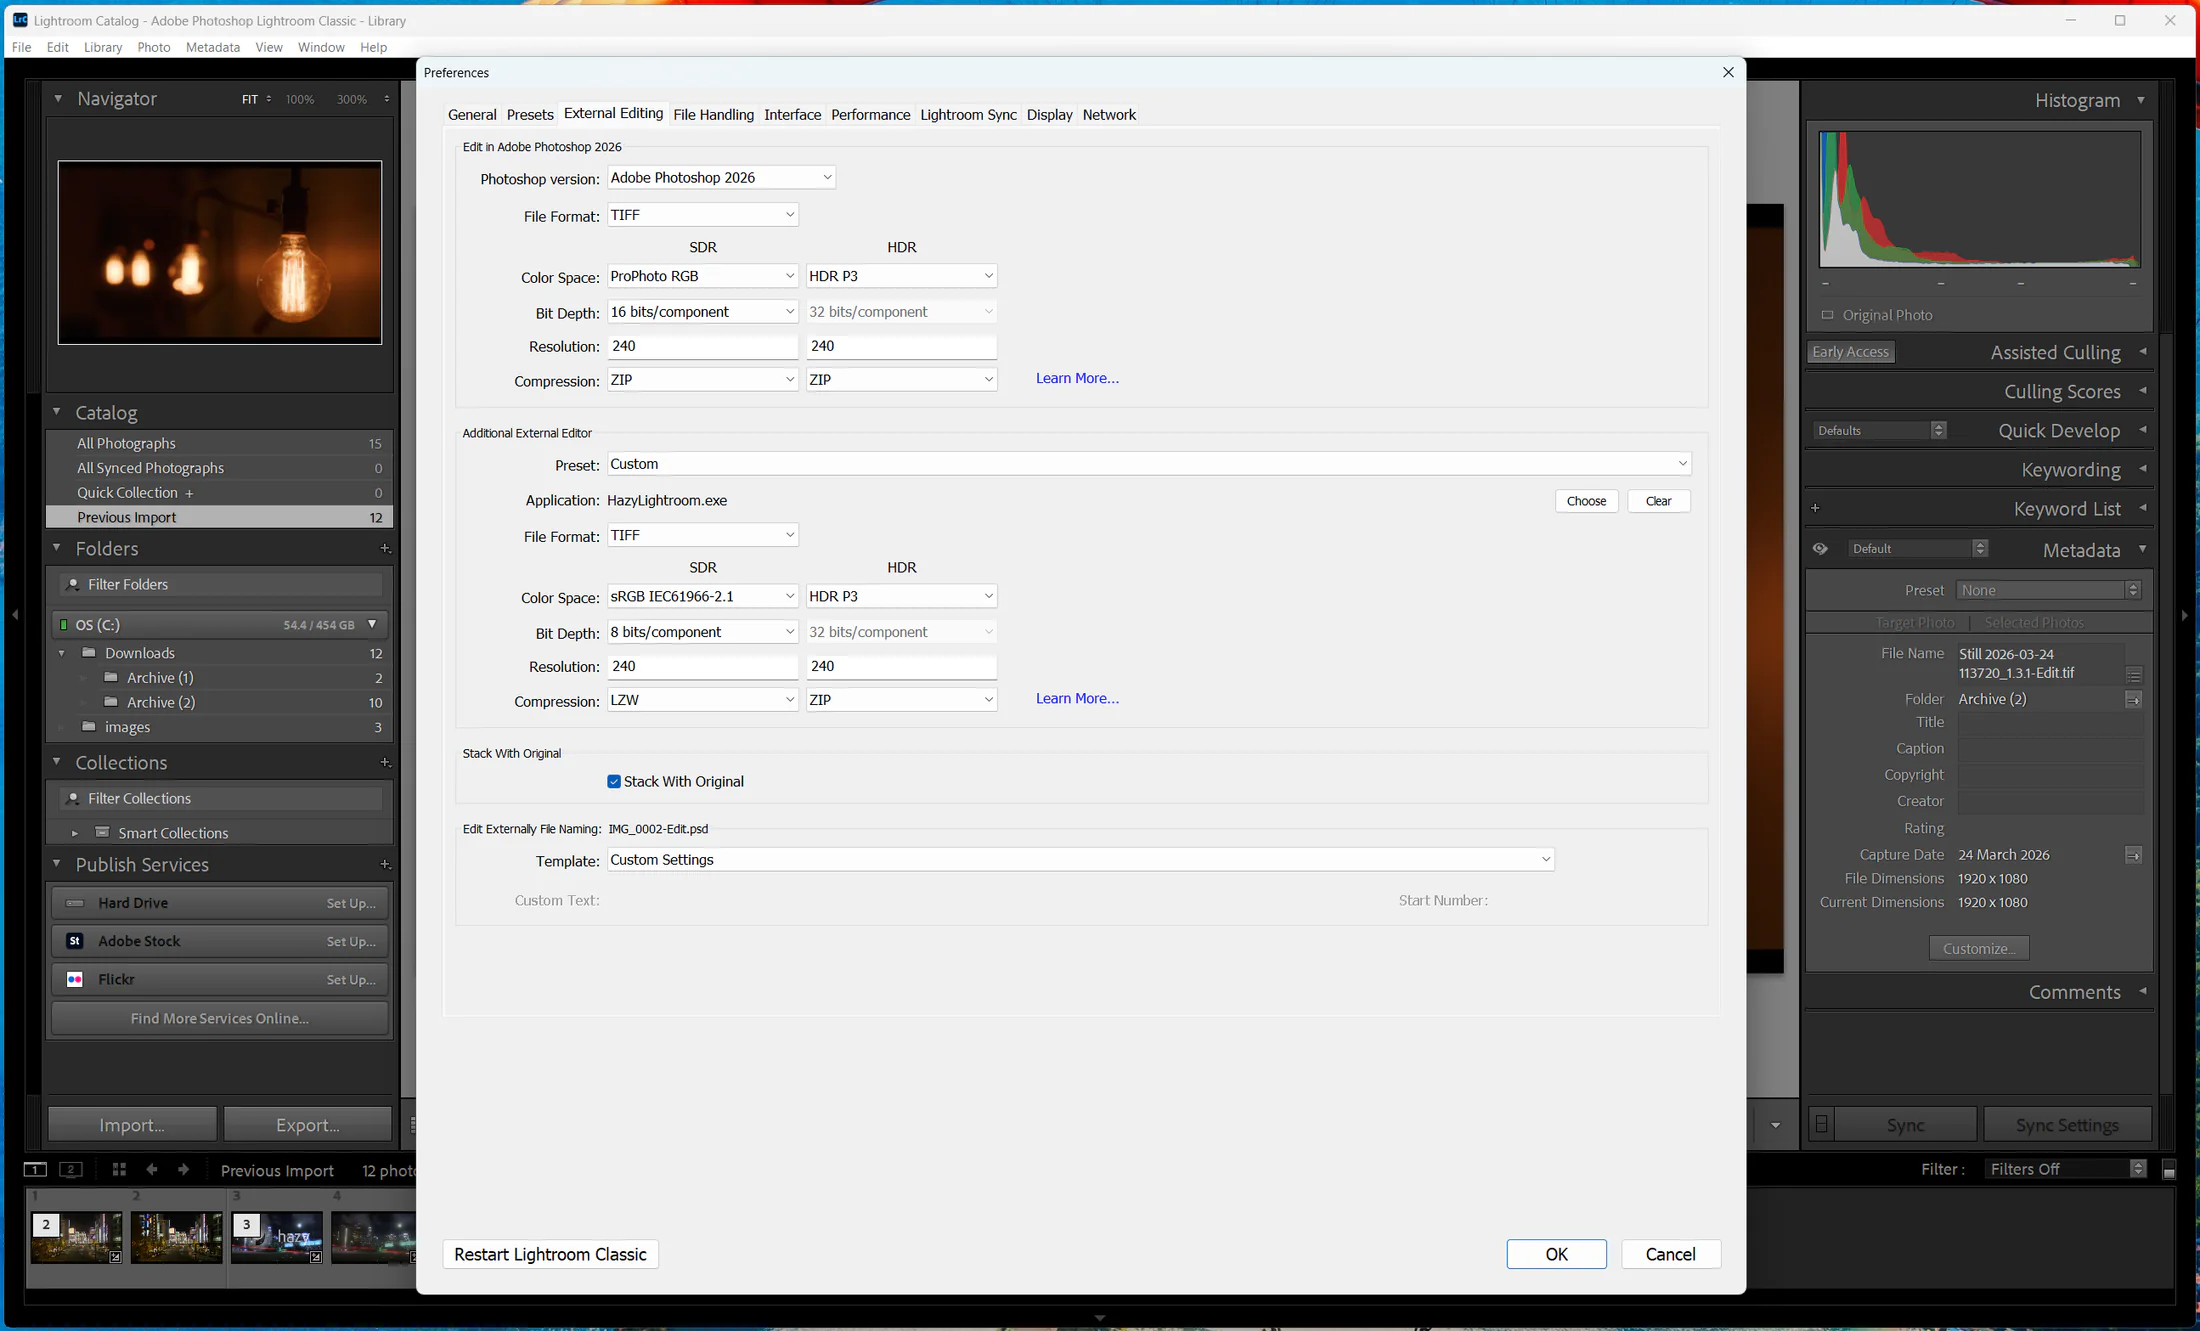
- Under the Additional External Editor section, click Choose.
-
Navigate to your Local Disk (C:) drive and select HazyLightroom.exe.
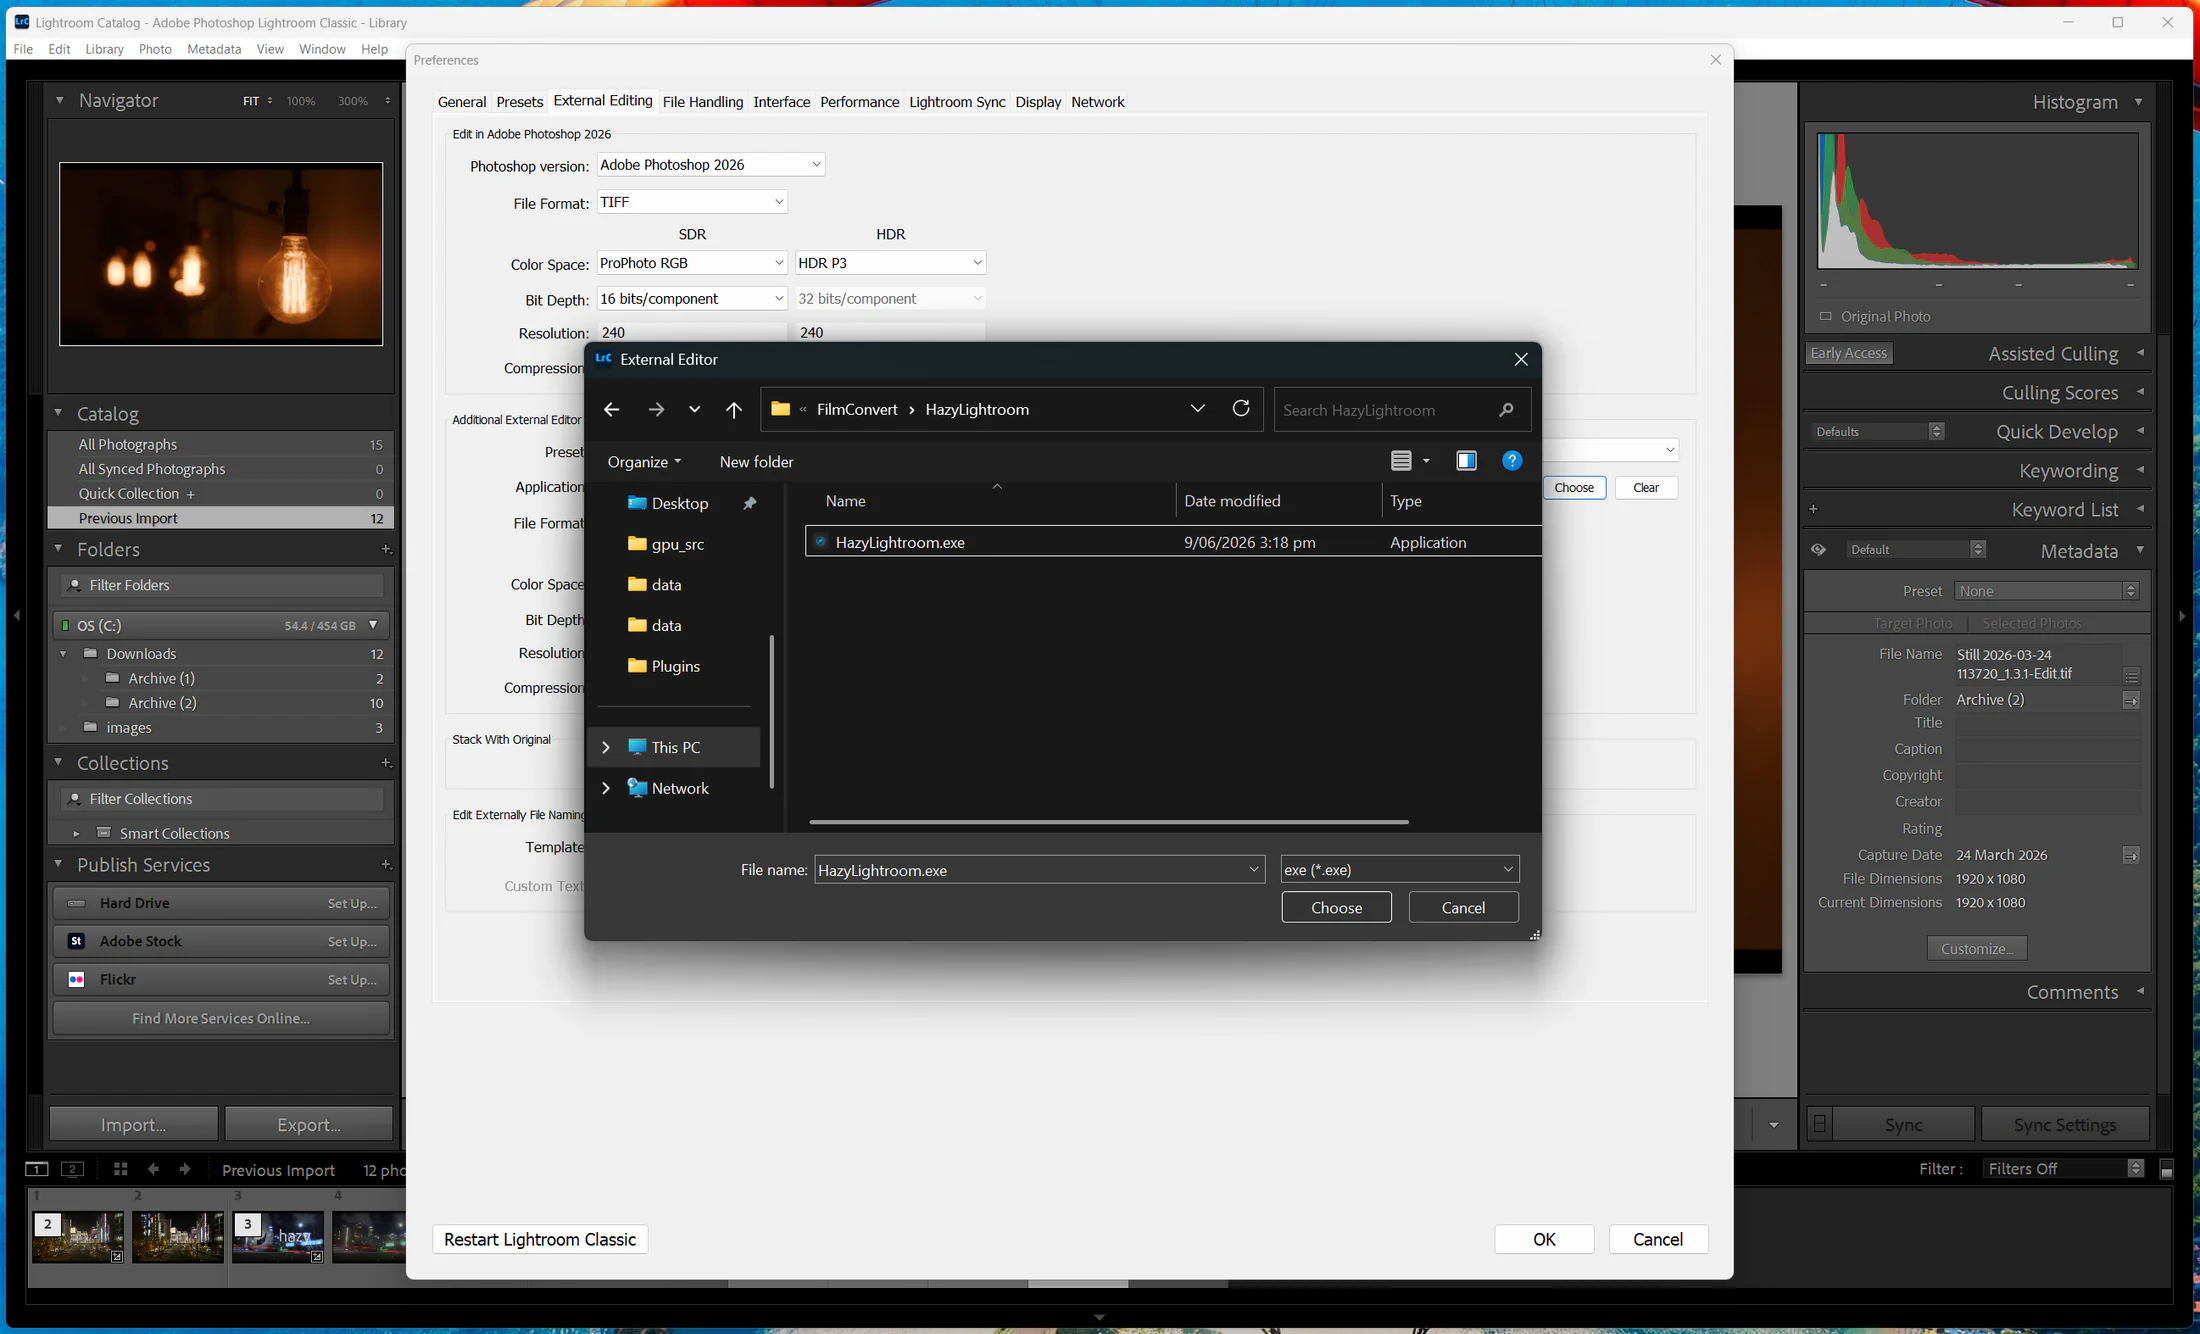
Note: By default, the installer places this file inside your C:\Program Files\FilmConvert\ folder.
How to Use Hazy
- Select a photo in Lightroom Classic.
-
Right-click the photo and choose Edit In > HazyLightroom.
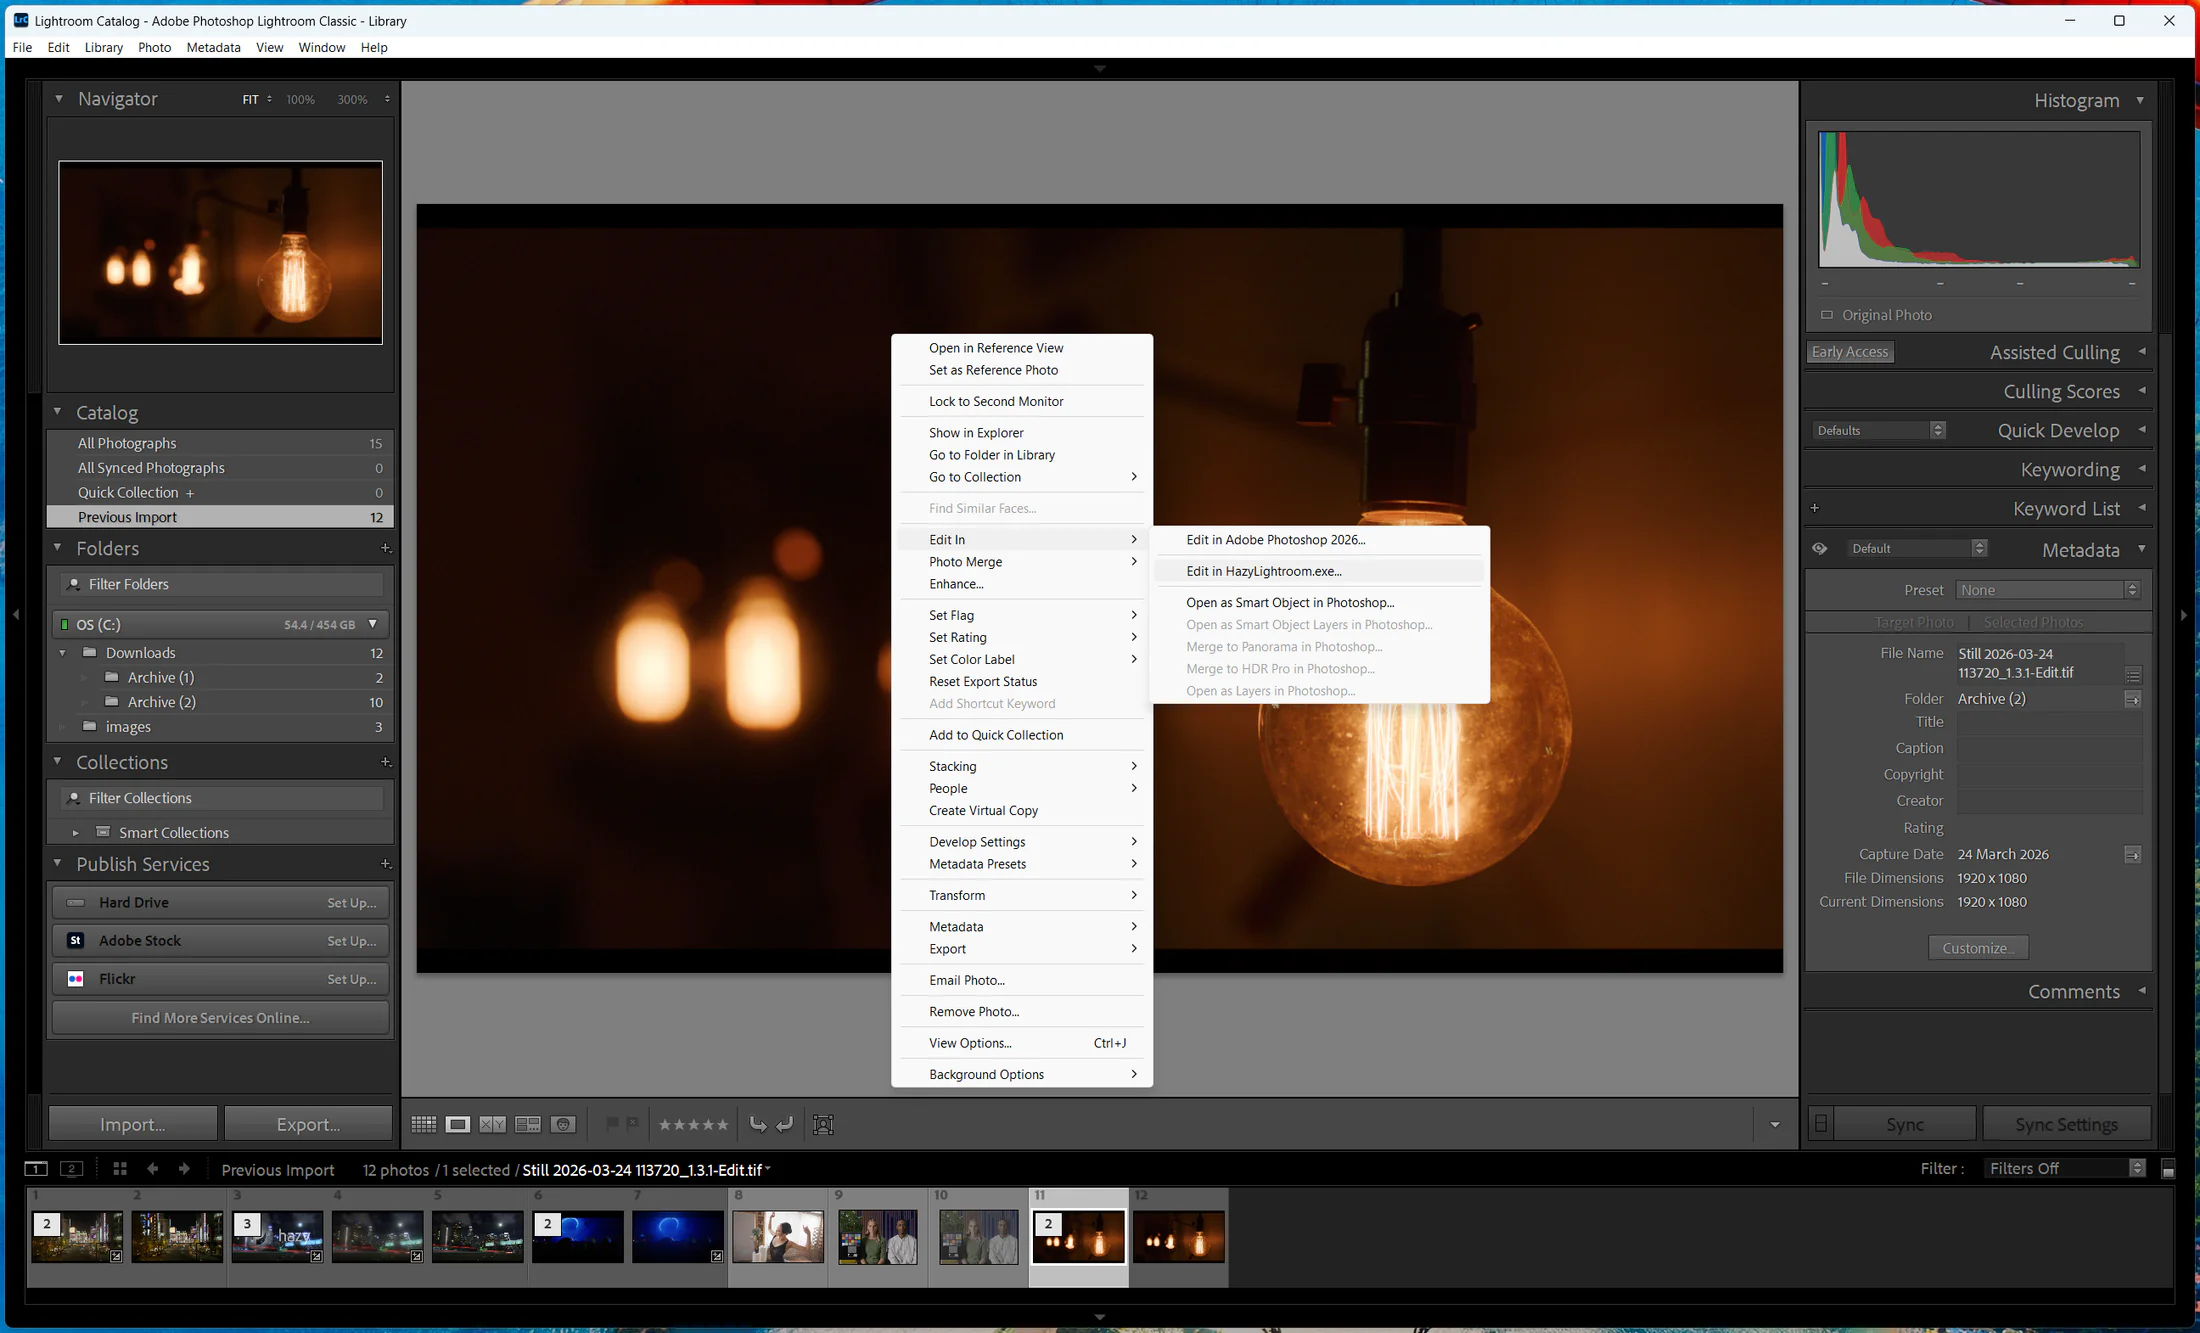
- When prompted by Lightroom, choose to create an editable copy with Lightroom adjustments.
- Edit your image using Hazy’s tools. When you are done, click Apply to save the edited copy back into Lightroom, or click Cancel to return without making changes.
Lightroom CC Guide
For Lightroom CC, you only need to link Hazy the first time you use it. After that, Lightroom CC will remember it automatically.
First-Time Setup & Use
- Open Lightroom CC.
-
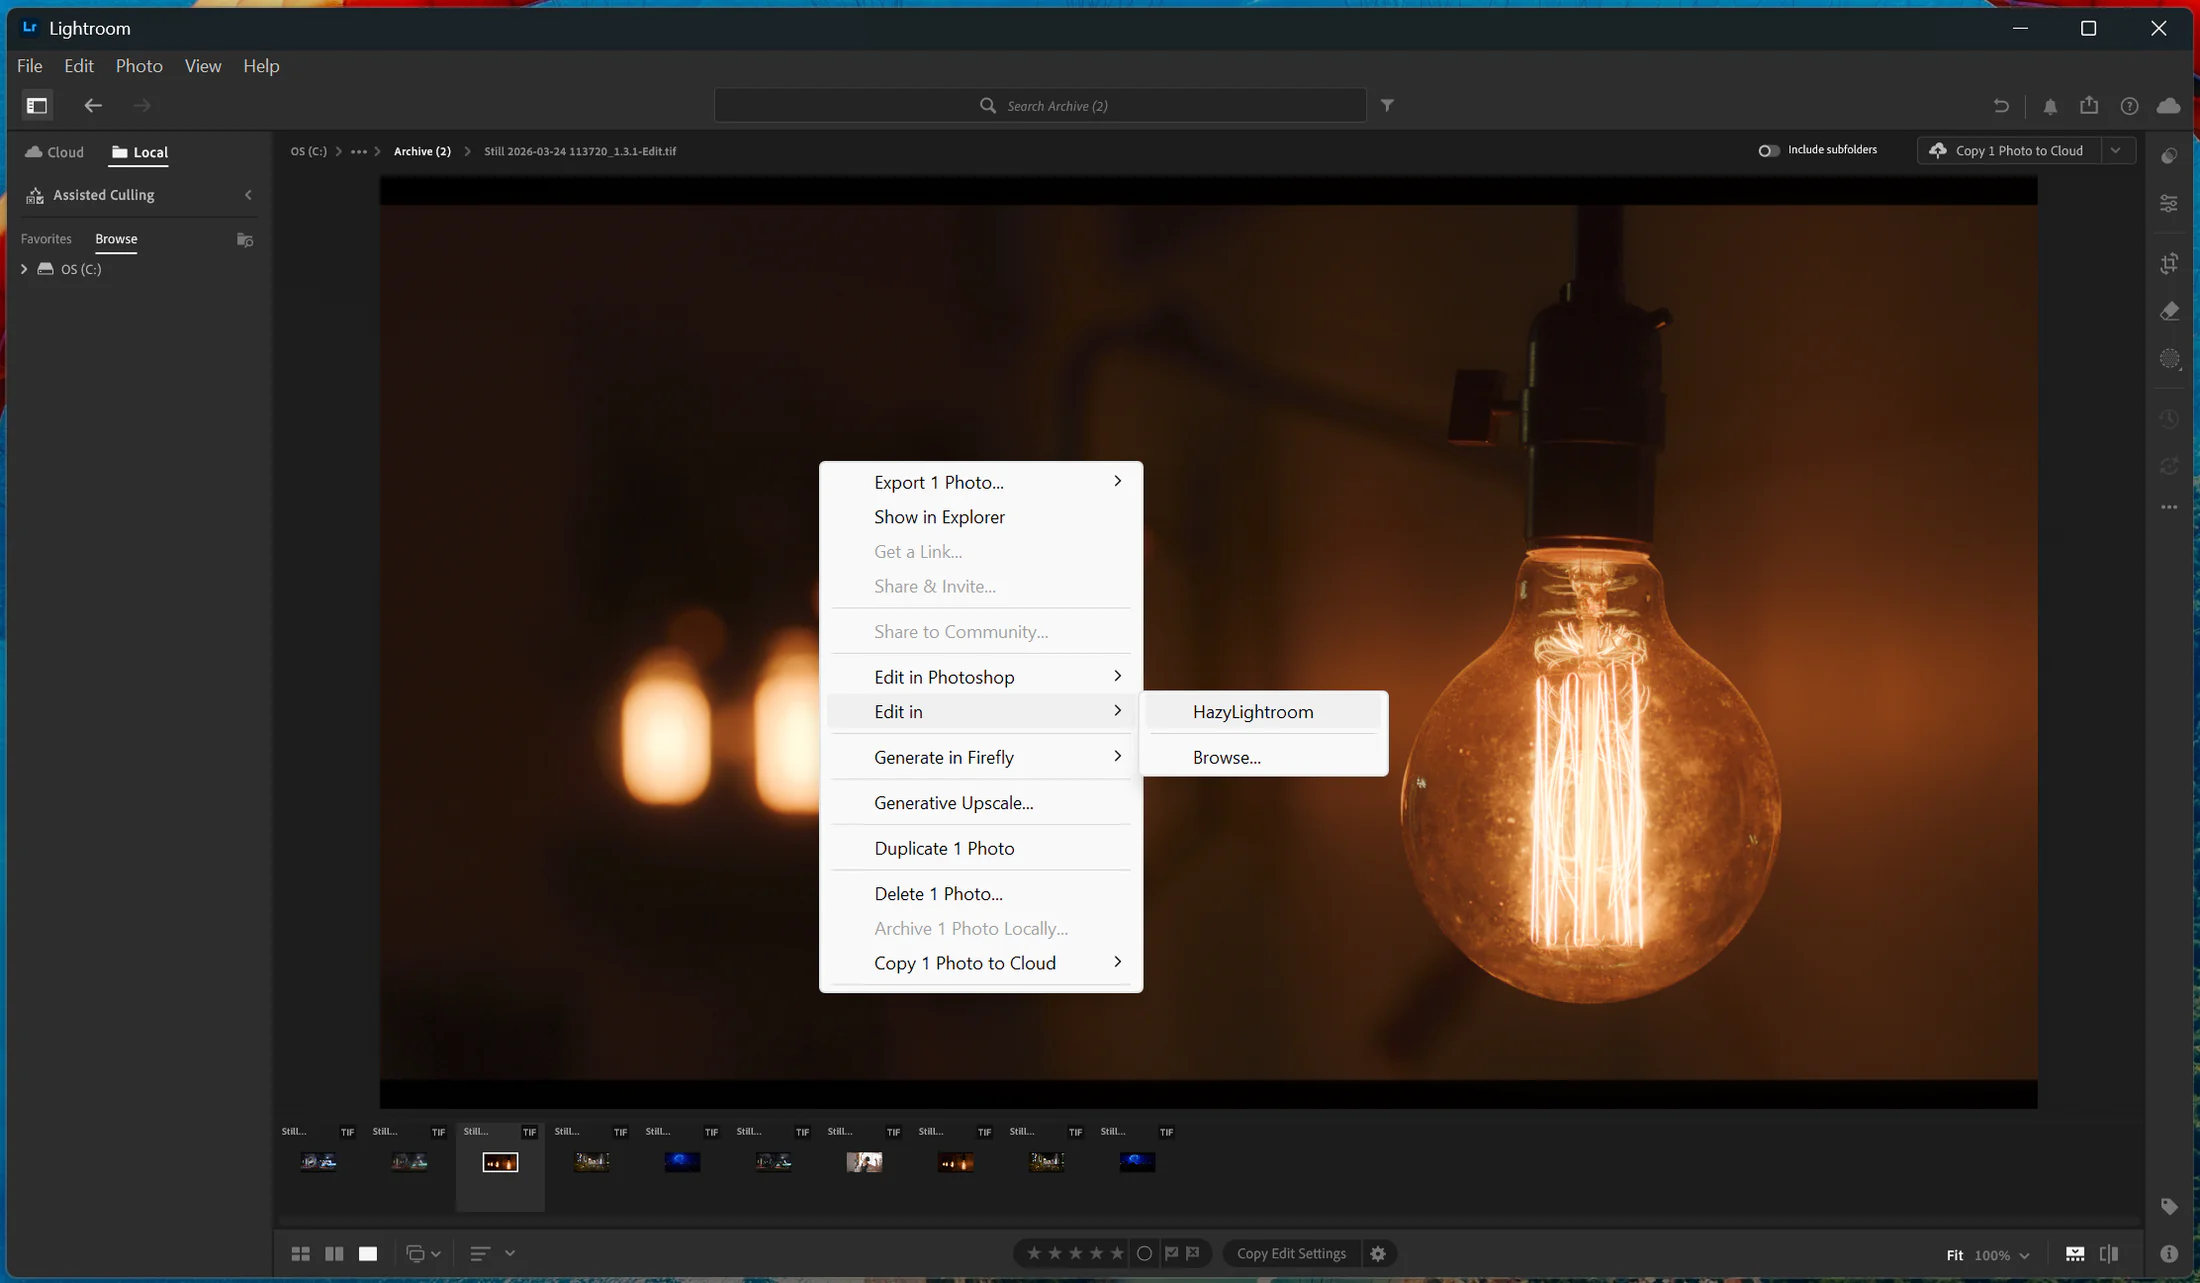
Right-click a photo and choose Edit In > Browse....
-
Select HazyLightroom.exe.
Note: After you select the app once, Lightroom CC will keep Hazy available directly in your Edit In list for future use. - Edit your image using Hazy’s tools. When you are done, click Apply to save your changes and send the image back to Lightroom CC, or click Cancel to return without making changes.
Uninstalling Hazy
If you ever need to remove Hazy from your computer, you can do so through your Windows settings.
How to remove the plugin:
- Open your Windows Start Menu and open Settings (the gear icon).
- Go to Apps > Installed apps (or Apps & features on Windows 10).
- Search for Hazy in the list.
- Click the options icon (three dots) next to Hazy and select Uninstall.